background image


Title 

Drawing 

NO 

Area Designer 

Instruction Manual 

C-41-02495 

39

51 


4.7 Data Logging 


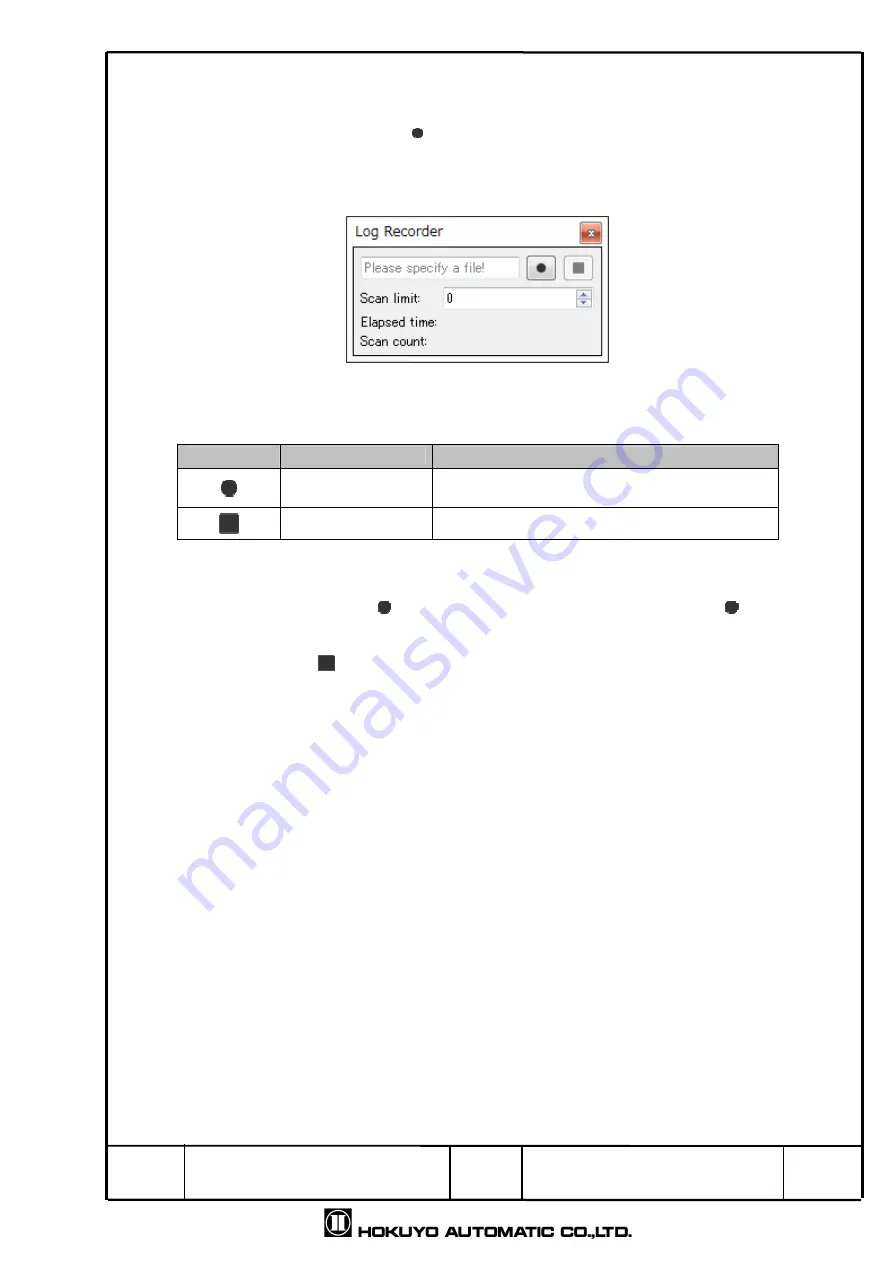
This  window  is  used  to  save  the  scanned  data  of  the  sensor.  File  extension  is  *.ubh. 

When sensor is connected, the 

  icon in the toolbar will be active. Click the icon or press 

the shortcut keys of “Ctrl + 1”, and the window illustrated in Fig. 4.7 will be displayed. The 
details of this window will be explained in Table 4.7. 


Fig 4.7 Data logging


Table


4.7 Display of data logging 


Icon 

Name 

Description 


Starts recording   

Specify the location of record scanned data   
And starts recording.


Stops recording    Stops recording the log data.


When specifying the number of scans, enter the number of scans you want to record in the 

scan  limit  box  and  click  the 

icon  to  start  recording.  After  clicking  the

icon  to  start 

recording, then select the location. After location is selected, it starts recording.


If the scan limit 

is 0,

 it 

records unit the


  icon is clicked to stop. 


Summary of Contents for UXM-30LAH-EWA

Page 1: ...Amended by DWG NO 1 51 Drawn by C 41 02495 Date 2014 5 27 Area Designer Instruction Manual Drawing No Kristou Kristou Kristou Kristou Fukuda Fukuda Fukuda Fukuda Aoki Aoki Aoki Aoki Aoki Aoki Aoki Aok...

Page 2: ...read the specification of the sensor before operation Precautions Make sure to perform operations with a stable power supply listed in the product specifications and the user s manual Operating under...

Page 3: ...r setting 33 4 5 IO simulation 35 4 6 Sensor information 38 4 7 Log data 39 4 8 Playing log data 40 4 9 About the application 41 5 Function of main window screen 42 5 1 Menu bar 42 5 1 1 File 42 5 1 2...

Page 4: ...imum free space Microsoft Windows XP Professional 32bit SP3 or above Microsoft Windows 7 Professional Compatible OS Microsoft Windows 8 Display High color 16bit color or above 800 600 dot or above The...

Page 5: ...order to install this application double click the installer Area Designer 2 Double click the installer Area Designer and the following screen will be displayed Here the language can be changed at th...

Page 6: ...the component of Area Designer If there is no particular specification then click next Fig 2 3 Select the component 5 As shown in Fig 2 3 click next then user will be proceed to specify the program gr...

Page 7: ...2 4 then proceed to additional task select screen After selecting the additional tasks you would like for this setup to perform while installing then click next Fig 2 5 Select additional tasks 7 As sh...

Page 8: ...he application 1 Power supply to the sensor Connect Ethernet cable with computer 2 Click Start menu All programs Area Designer Or Double click Area Designer shortcut icon as shown on the desktop below...

Page 9: ...1 Welcome to Area Designer screen If application starts the following window will be displayed as shown in Fig 4 1 1 Table 4 1 1 explains details of three buttons of this window Fig 4 1 1 Welcome to A...

Page 10: ...t Rescan Rescan of serial port will be performed and the number of connected COM port will be displayed again Select Baud rate value Select the baud rate value of RS422 when connected Connect Connects...

Page 11: ...mode edit and monitor of the menu bar Click the or icon from the toolbar for switching the mode The main screen window of edit mode and monitor mode will be different 4 2 1 Edit In this screen write a...

Page 12: ...d operations Areas refers to the regions configured with a maximum of 3 outputs displayed on the main view of no 6 as shown in Fig 4 2 1 2 The regions displayed in yellow orange and red on the main vi...

Page 13: ...py Cut Paste Delete Copy Cut Paste and Delete tools cannot be used for each output region Also these tools can be only used for each individual area they cannot be used for multiple areas 4 2 1 1 2 Ar...

Page 14: ...ed for the area selected Fig 4 2 1 1 2 2 Menu displayed by the right click of Area preview Area configuration is not possible in area 0 as laser is OFF The menu function can be used only for selected...

Page 15: ...1 to 3 When deleting the point of an area select the point which you want to delete then right click the mouse The Backspace or delete key can be used for deleting the point In the case when you want...

Page 16: ...this point a region of the selected shape can be configured Fig 4 2 1 2 1 Default state during independent shape selection When configuring an independent shape there is a region where outputs can be...

Page 17: ...each point in the main view window As shown in Fig 4 2 1 2 1 1 here is an example of polygon configuration Fig 4 2 1 2 1 1 1 Example of polygon configuration When a point is deleted the output will b...

Page 18: ...n area with more than 31 points to configure into the sensor the writing of point information on the area cannot be guaranteed In the event an area with more than 31 points the maximum number of point...

Page 19: ...nformation of an arc shape consists of the 2 angles to each point from the starting angle of 0 on the main view and saves the information of the radius of arc The output area of an arc shape is config...

Page 20: ...d that does not include the unavailable region When any one of the 4 points is moved the coordinates of other opposite points will be changed Points will change as drawing the rectangle s 4 points and...

Page 21: ...different area configuration When the offset bar is selected it will be displayed in a lime green yellow green color The configurable range of the offset bar is within the range of 0 100 When selecti...

Page 22: ...linear distance of the straight line to configure output of a straight line that is dependent of the outer most output Fig 4 2 1 2 2 1 Example of straight line 4 2 1 2 2 2 Fan shape In the outer most...

Page 23: ...ed output so that is dependent of the outer most output area Fig 4 2 1 2 2 3 Example of ratio Offset bar may be displayed on the upper position rather than the output on the coordinates Y axis In case...

Page 24: ...mation of each point here the coordinate position information of point will be referred to as point information The point ID starts from 1 up to maximum 541 The coordinates X Y and the radius of arc f...

Page 25: ...f 2 points and then two rows will be displayed Fig 4 2 1 2 3 1 1 Example of default state of Numerical input screen during independent rectangle selection Left XY Coordinates Right Polar Coordinates W...

Page 26: ...Fig 4 2 1 2 3 2 1 Default state of numerical input screen during selection of a dependent shape Left XY coordinates Right polar coordinates In the numerical input of XY coordinates it is possible to c...

Page 27: ...perating method is configured in the order as illustrated in Fig 4 2 1 2 4 1 1 Specify the region to perform teaching Click Select in the default state and the pink dot will be displayed in the center...

Page 28: ...igured region and the green waveform indicates the distance The difference between the pink and green waveform is the difference of offset value Fig 4 2 1 2 4 3 Display the region configured by teachi...

Page 29: ...ng the center point of departed area to its point of origin select the red point then right click the mouse The Backspace or delete key can also be used for returning to its point of origin In the eve...

Page 30: ...bers are displayed as decimal values Status display of the output lamp is explained in Table 4 2 2 Fig 4 2 2 2 IO lamp display in monitor screen Top Display when disconnected from the sensor Bottom Di...

Page 31: ...es the displayed numerical values into a CSV file When the display of the measured data is started a time stamp units us micro seconds is displayed in the top of the data table Also the distance and i...

Page 32: ...be displayed at the step position corresponding to the clicked row A blue line will be displayed as illustrated in Fig 4 3 2 Also when the main view is clicked a blue line will be displayed on that a...

Page 33: ...In the case of changing the internal parameter of the sensor from the sensor setting the user needs to change the value of parameter then click write to sensor When you want to read the internal param...

Page 34: ...t Rain Used to remove rain and snow Fog Used to remove fog Sensitivity Used to remove low reflection object Filters Echo To judge the first echo or the last echo Upper limit Hysteresis upper limit can...

Page 35: ...l Alt I and the window illustrated in Fig 4 5 1 will be displayed The Apply icon is used to apply the configurations of the simulation to the sensor and starts test Fig 4 5 1 IO Simulation In case of...

Page 36: ...right will automatically switch ON OFF such that they are in the same IO state Also when the IO state of the lamps on the right are changed the numerical values on the left will also change automatic...

Page 37: ...art the sensor and it is necessary to reconnect When the input value is 0 and output value is 1 IO simulation cannot be done It shows in Fig 4 5 5 the display in such condition because laser is off in...

Page 38: ...e icon or press to the shortcut keys of Ctrl Shift I the window illustrated in Fig 4 6 will be displayed Fig 4 6 Sensor information The details of the sensor information will be explained in Table 4 6...

Page 39: ...ow will be explained in Table 4 7 Fig 4 7 Data logging Table 4 7 Display of data logging Icon Name Description Starts recording Specify the location of record scanned data And starts recording Stops r...

Page 40: ...Table 4 8 Fig 4 8 1 Log player Fig 4 8 2 Cursor which operates play time of the log data Table 4 8 Log player Icon Name Description Open Open and select the log data which you want to play file extens...

Page 41: ...ion of the application Click Help in the menu bar about this Application or press the shortcut keys of Ctrl A as illustrated in Fig 4 9 will be displayed Version indicates time and date when the appli...

Page 42: ...his menu is used for operating of project file and closing the application This menu is displayed in Fig 5 1 1 Also the details of this menu are explained in Table 5 1 1 Fig 5 1 1 File Table 5 1 1 Fil...

Page 43: ...ails of edit menu are explained in Table 5 12 Fig 5 1 2 Edit Table 5 1 2 Edit Icon Name Shortcut Description Redo Ctrl Z It will undo the previous operation Undo Ctrl Y It will redo the last operation...

Page 44: ...ata as the measurement output data Intensity Alt I Display intensity data as the measurement output data Data table Ctrl T Display data table In Fig 5 1 3 1 it displays the mode selection menu In Fig...

Page 45: ...tcut Description Interfaces Change connection interfaces Read all settings Ctrl Shift R Read all settings from sensor Write all settings Ctrl Shift W Write all settings to sensor Sensor information Ct...

Page 46: ...n Table 5 1 5 Fig 5 1 5 Language Table 5 1 5 Language Name Description English Display in English language Display in Japanese language 5 1 6 Help This menu displays the instruction manual and applica...

Page 47: ...of project file and Redo Undo operation 2 Connection tool Establish communication with the connected sensor 3 Mode selection tool Display mode selection and setting of each mode 4 Measurement tool Mea...

Page 48: ...r Write to sensor Ctrl Shift W Write settings to the sensor 5 2 3 Mode selection tool Table 5 2 3 Mode selection tool Icon Name Shortcut Description Edit Ctrl Alt E Change Switch to edit mode Monitor...

Page 49: ...up Cursor Move the cursor left for the zooming out Move the cursor right for the zooming in Zoom fit Adjust the zoom so that the entire main view can be seen Screen capture Capture the main view save...

Page 50: ...Description Model Model of the sensor will be displayed Serial Serial number of the sensor is displayed Firmware Firmware version of the sensor is displayed Table 5 4 3 Status display Icon Name Descri...

Page 51: ...ation Symptoms Possible reason Solution suggestion Non supported OS is used Install in the OS supported computer Free space of Hard disk is not sufficient Free space of Hard disk must be more than 100...

Reviews: