


pin through the center of each hinge, before
installing. This pin will keep the hinge
centered while installing the control surface.
Note: When hinging the ailerons, which use
torque rods, use a toothpick to force epoxy
down the hole drilled for the torque rod. In
the case of the rudder, be sure not to let glue
get into the bearing tube.
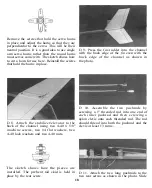
D 6. Trial fit the fin and rudder together using
the hinges to check for proper alignment.
Do Not glue the hinges in place yet! Sand the
rudder and/or fin so they match each other at
the top.
above. Use a razor saw to cut the excess off at
the leading and trailing edges.
D 9. Check the fit of the fin assembly into
the aluminum channel. It will most likely be
a little loose and we want a nice, tight fit. Add
a strip of the 1/64" plywood doubler to ONE
side of the fin. Glue it to the balsa doubler.
Check the fit again and if it is still a little
loose, add a plywood doubler to the other
side. If necessary, you can sand the plywood
slightly to help the assembly fit. Also, you
can have the covering material continue
down over the doublers if you need the
additional thickness.
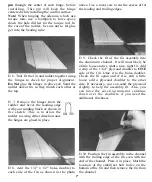
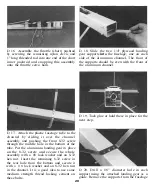
D 7. Remove the hinges from the
rudder and bevel the leading edge
with your sanding block as shown in
the sketch. This is to allow the
EDGE VIEW
rudder to swing either direction once
the hinges are glued in place.
D 8. Add the 1/4" x 1/2" balsa doubler to
each side of the fin as shown in the photo
D 10. Position the fin assembly in the channel
with the trailing edge of the fin even with the
end of the channel. Press it in place. Mark the
location of the stabilizer bolt holes on the
bottom of the fin and then remove the fin from
the channel.
7


