


bands, the throttle clevis from the servo horn
and the two front dowels. This makes
adjustments and checking of the fuel system
quick and easy.
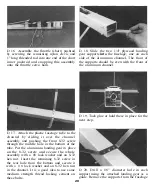
D 25. Each wheel axle is made up using a
6-32 x 1-1/2" machine screw, two 6-32 hex
nuts and two #6 washers. The sketch above
shows how these parts are assembled. It is a
very good idea to use some medium strength
thread locking cement between the screw and
the hex nuts. Also make sure that the wheel
can turn freely.
D 26. Slide the two 1/4" x 3-1/2" wing
dowels into their holes in the fuselage.
Secure with a few drops of CA.
B. The rudder moves to the right when the
left transmitter stick is moved to the
right (looking at the plane from the rear).
C. The throttle is closed almost all the way
when the left transmitter stick is down
(back) and is open completely when the
stick is up (forward).
ELEVATOR MOVES UP
RIGHT AILERON MOVES UP
LEFT AILERON MOVES DOWN
RUDDER MOVES RIGHT
CARBURETOR WIDE OPEN
4-CHANNEL RADIO SETUP
(STANDARD MODE 2)
FINAL ASSEMBLY
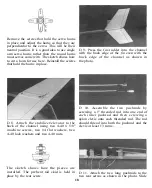
D 1. With the fin positioned correctly, apply
a few drops of thin CA around the base to
hold it in place. This type of gluing method
will keep the fin/ rudder in place unless the
plane is crashed pretty hard, in which case
the fin will come out of the channel, usually
without breaking.
D 2. Turn the radio system on and adjust all
of the trims on the transmitter so that they
are in the middle of their slots.
D 3. Check the following:
A. The elevator moves up when the right
transmitter stick is moved down (back).
D 4. Check to make sure that the tail control
surfaces are in a neutral (straight) position
and the servo arms are perpendicular to the
aluminum channel when the transmitter stick
is at neutral. Also check the control throws on
the tail surface. You should be able to move
the rudder 3/4" both directions and the
elevator should move 1/2" both directions.
This should give you a plane that is fairly
responsive but not too radical.
D 5. Install the second nylon tie wrap
around the a l u m i n u m channel and the
pushrods right in front of the tail surfaces.
This will help keep the control surfaces
from fluttering.
22


