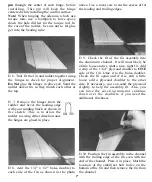
D 2. Drill two 3/32" holes t h r o u g h the
rudder using the control horn as a guide.
D 2. The control surfaces will take some
abuse in the learning-to-fly process, so you
must securely glue the hinges in place. Use
four to six drops of CA on each side of the
hinge to secure them. Try to get the surfaces
as close together as possible, but work the
control surfaces back and forth while the
glue is curing to make sure they work freely
without binding. Also, be careful not to glue
the two surfaces together.
D 3. Secure the horn to the rudder with two
2-56 x 5/8" machine screws. The screws
should thread into the nylon "nut plate" on
the opposite side of the rudder. Although not
necessary, you may use some wire cutters or
an abrasive cutoff wheel to cut the screws off
even with the plate.
D 4. The other control horn should be
installed on the top surface of the elevator
about 1" to the right of the centerline. Follow
the same procedure for installing this
control horn.
INSTALLING THE HINGES
D 1. After covering the tail surfaces and the
wing, the hinges can be installed. Use your
hobby knife to find the slots you cut earlier
and make slits in the covering so you can
push the hinges into place and trial fit the
pieces together again. (Refer to the CA hinge
section on page 6.)
FUSELAGE CONSTRUCTION
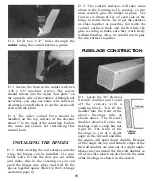
D 1. Locate the 3/8" plywood
firewall doubler and round
off the corners with a
sanding block. Test fit the
doubler into the front of the
plastic fuselage tube as
shown above. The firewall
doubler should fit into the
fuselage with a snug but not
tight fit. The front of the
fuselage is cut at a slight
angle so the firewall and thus
the engine will point down slightly. Because
of this angle the top and bottom edges of the
firewall doubler are also cut at a slight angle.
Make sure you install the firewall doubler so
all of its sides match up nicely with the sides
of the fuselage as shown in the sketch.
FIREWALL
DOUBLER
15


