


PRE-ASSEMBLY
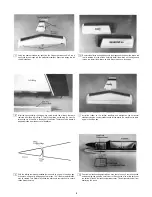
Locate part #6 wing joiner Join the two wing joiners together using a light coat
of epoxy They should form a "V" shape as shown above
Locate the #4 vertical stabilizer and #5 horizontal stabilizer The rudder is
temporarily attached to the vertical stabilizer The elevator is temporarily
attached to the horizontal stabilizer Remove the rudder, elevator, and metal
hinges
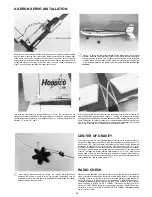
Assemble the aileron support tray with parts #21 aileron servo tray and #42
3/8" x 3" balsa aileron servo tray blocks Cut the aileron servo tray blocks 1-1/2"
long Epoxy the balsa blocks to the plywood tray as shown above
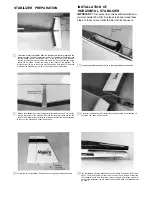
Apply a small amount of vaseline along the hinge joint on both sides of the hinge
This will prevent epoxy from getting in the hinge joint and ruining the hinge Do
not get vaseline on the rest of the hinge If this happens the epoxy will not hold
the hinge and the aileron may separate from the wing causing a crash Do this
step to all eleven hinges
All ailerons are mounted temporary from the factory Remove the ailerons from
the wings Now remove the three metal hinges on each wing
Apply epoxy to both sides on one end of the hinge as shown Slide the hinge
back into the slot in the wings trailing edge Wipe oft any excess epoxy before
it cures The hinge pin must be against the trailing edge of the wing to allow the
ailerons installed later to fit correctly Install all six hinges three in each wing,
and set the wings aside until the epoxy cures.
4
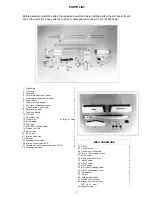
Summary of Contents for avistar 40
Page 20: ......


