


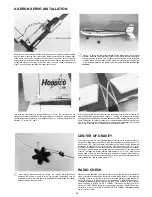


RADIO INSTALLATION
Wrap the fuel tank with natural foam to insulate it from vibration Install the fuel
tank so that the cap is through the hole in the firewall Install two five inch pieces
of fuel tubing to the fuel pipes from the fuel tank Connect the tubing from the line
with the clunk weight attached (called the fuel pick up line) to the carburator The
other line is connected to the muffler pressure tap in the next step
Using your radio switch as a guide make the necessary opening for mounting
the switch on the left side of the fuselage as viewed from above and looking
toward the engine and 1 1/4" down from the wing saddle Install the switch at this
time Mounting the switch on this side will prevent fuel from damaging the switch
Install the muffler following the manufacturers instructions Connect the pros
sure line to the muffler pressure tap
Test fit your servos into the servo tray Trim the tray as necessary to tit If mini
sized or over sized servos are being used it may be necessary to make an
additional servo tray We recommend using standard size servos Arrange them
as shown in the picture above Before securing the servos to the servo tray read
the instructions that came with your radio on how to install the servos
Set the hatch cover over the fuel tank compartment Drill four 1/16" holes as
shown Secure the hatch using four 2 6mm x 12mm screws
Mount the servo tray onto the rails inside the rear of the fuselage Epoxy the tray
in place Use enough glue to hold the tray in place but be very careful not to glue
the servos to the tray or the fuselage
13
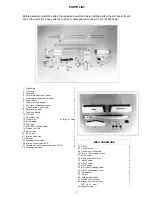
Summary of Contents for avistar 40
Page 20: ......


