


$
%
&
'
(
)
*
+
,
-
!
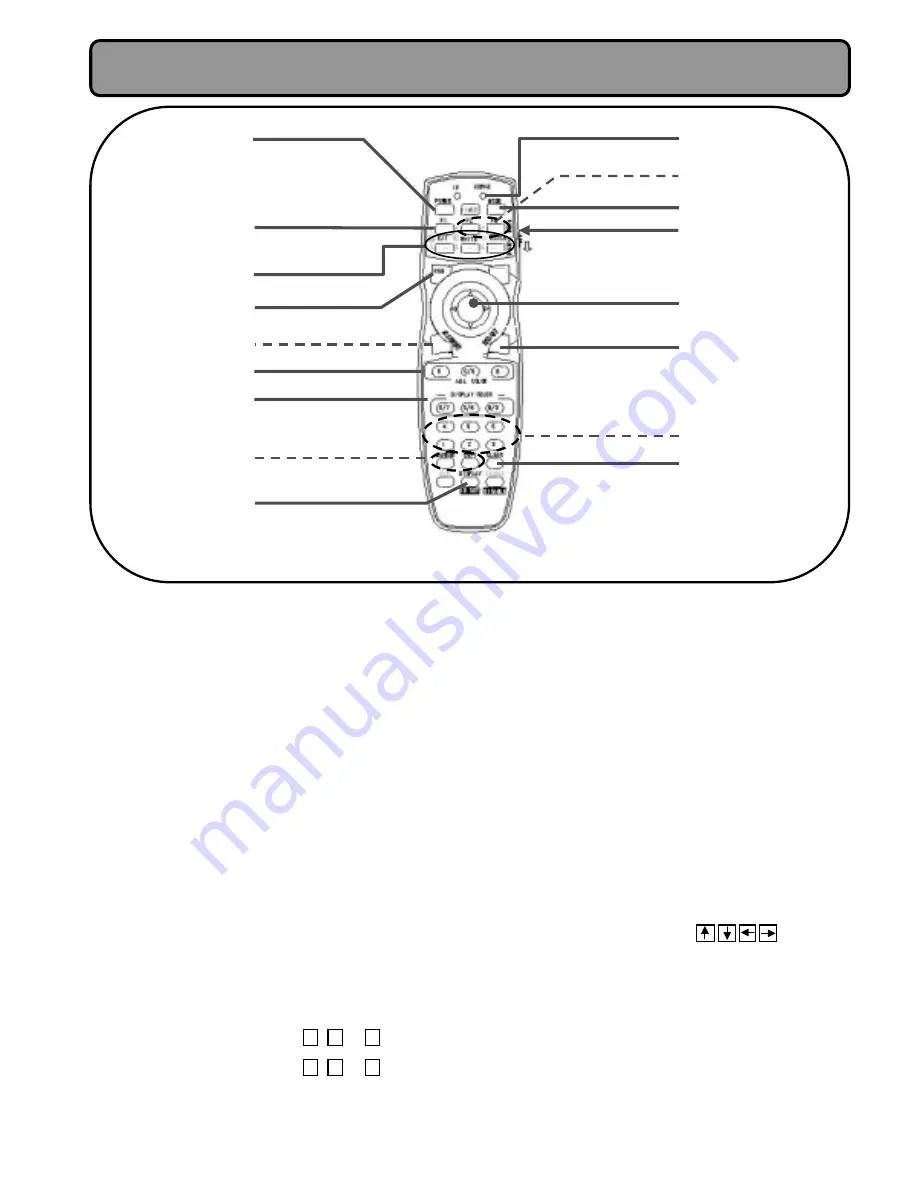
POWER(STANDBY/ON) BUTTON
+
Turns the projector on and off.
(Turning off will set to standby status) (See p.15)
"
F1
+
Pressing ADJ simultaneously will display the accumulated
operation hours. (See p. 21)
#
EXT
+
Displays external video. (See p. 16)
WHITE
+
Displays an entire white screen. Pressing repeatedly will
vary the brightness.
+
Pressing WHITE continuously will display the minimum
brightness screen (0/255) and then the grayscale screen.
(See p. 16)
HATCH
+
Displays a crosshatch screen. (See p. 16)
$
RGB
+
Switches the display to RGB input.
+
Pressing RGB will switch the input from RGB1 to RGB2,
RGB3, and back to RGB 1.
%
ADJ. COLOR RGB
+
Selects adjustment color when adjusting any color.
&
DISPLAY COLOR RGB
+
If the DISPLAY COLOR key
/
, or
0
is
.
...
pressed , red, green, blue will switch red on and off.
+
If the DISPLAY COLOR key
/
, or
0
is
pressed while the ADJ key is held down when any part of
display (or whole display) is off, all colors will appear.
Doing this when all colors are appearing will switch all
colors off.
/
0
1
2
'
DISPLAY
+
Turns on or off any on-screen information.
(
SERVICE setting indicator
+
The indicator lights in the “SERVICE” mode.
# The indicator turns on after push any effective key.
# The light turns off if you push no key within a time.
# If you push unavailable key, the light turns off for a while,
even if the indicator is ON.
)
MODE
+
Checks the frequency of RGB input set at each scan
mode, or to check the present status of RGB input.
*
MODE SELECT SWITCH
+
If you use the remote controller in the “SERVICE “ mode,
set the slide switch on the right side to “SERVICE”.
1
DISK PAD
+
Used to select menu item and adjust when the menu
screen appears (See p. 17).
Note:The arrow keys in the text (
)
correspond to the operation of upper, lower, left
and right keys on disk
2
END/SET
+
Pressing this during adjustment will terminate the
adjustment status.
3
CLEAR
+
Pressing CLEAR during adjustment will return the data
being adjusted to a default. However, this may vary
depending on the adjustment item: Check the explanation
for each adjustment.
2
2
2
4
Do not use this buttons for service man.
!3456784"
mode
#
Names and Functions of Each Part
R
G
B
R
G
B
--


