background image

- 32 -

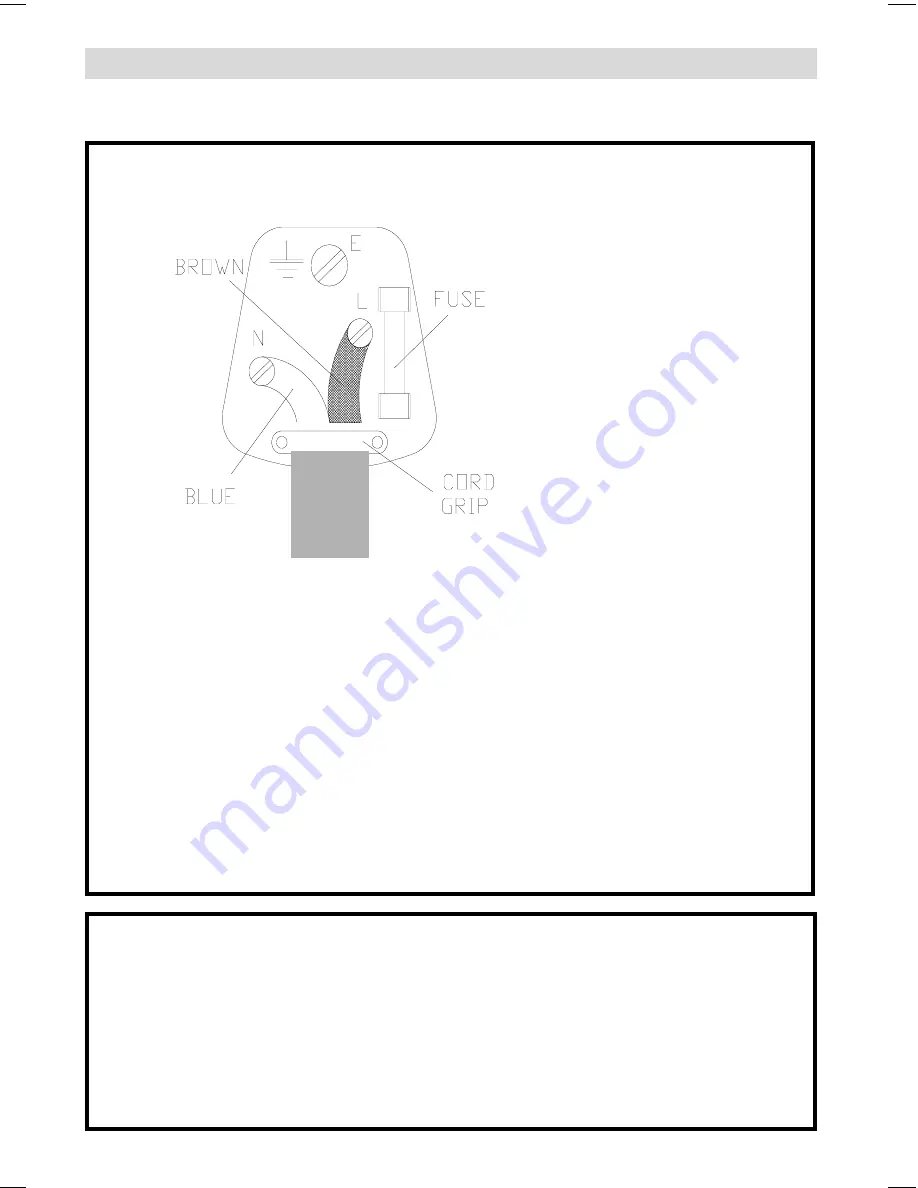
BLUE-NEUTRAL

BROWN-LIVE

CAUTION

TO  PREVENT  ELECTRIC  SHOCK  DISCONNECT  FROM  THE  MAINS  BEFORE

REMOVING COVER. NO USER SERVICEABLE PARTS INSIDE. REFER SERVICING TO

QUALIFIED SERVICE PERSONNEL.

 SAFETY PRECAUTION

THIS EQUIPMENT MUST BE DISCONNECTED FROM THE MAINS WHEN NOT IN USE.

DO NOT ALLOW THIS UNIT TO BE EXPOSED TO RAIN OR MOISTURE.

MAINS (AC) OPERATION

The wires in this mains lead are coloured in accordance with the following code :

IMPORTANT

As the colours of the wires in the mains lead of this appliance may not correspond with

the coloured markings identifying the terminals in your plug, proceed as follows:
The wire which is coloured blue must be connected to the terminal which is
marked with the letter N or coloured black.
The wire which is coloured brown must be connected to the terminal which is marked

with the letter L or coloured red.
No connection is to be made to the earth terminal of the plug.
If a 13 Amp (BS 1363) Plug is used a 5 Amp Fuse must be fitted, or if any other type of

Plug  is  used  a  5  Amp  Fuse  must  be  fitted,  either  in  the  Plug  of  Adaptor,  or  on  the

Distribution Board.

Important Instruction

For your own safety read following instruction carefully before attempting to connect this unit

to the mains.

ENG-2200-1547UK-22 INCH TFT IB.p65

03.03.2004, 18:00

32

Summary of Contents for 22LD4200

Page 1: ...GB Instructions for use 22LD4200 ...

Page 2: ...te Indicator 20 No Signal Detection TV 20 No Signal Detection PC 20 Volume Bar 20 AV Modes 20 Signal Out Of Range 21 PC MODE 21 Installation 21 Switching from TV to PC 21 Main Menu in PC mode 21 Sound Menu 21 Picture Menu 21 PIP Picture 21 Feature Menu 22 Geometry Menu 22 Source Menu 22 PIP Source Menu 23 Teletext 23 To operate Teletext 23 To select a page of Teletext 23 To Select Index Page 23 To...

Page 3: ...enu External Source AV 1 AV 2 AV 3 S VIDEO PC Yellow FEATURE Feature Menu Blue INSTALL Installation Menu Hold Update Index Page Reveal PC Switch from TV to PC Expand Aspect ratio PIP on PIP off Teletext Time Red SOUND Sound Menu Green PICTURE Picture Menu Mute I II Mono Stereo Dual I II Volume P CH Programme Down Personal Preference M Menu Cursor Down Cursor Left 0 2 ...

Page 4: ... 3 ControlPanelButtons 92 80 3 K 0 18 32 5 1 5 5 5 9 5 92 80 3 K 0 18 79 9 63 5 79 9 227 723 29 5 3 1387 9 3 8 2 17 ...

Page 5: ...he holes from the bracket with the mounting holes found on the back of the monitor chassis Secure the bracket with the same four 4 4 mm head screws Step 2 Choose the wall where the monitor would be located Level and mark with a pencil the four 4 mounting points found on the wall bracket Drill pilot holes for the plastic anchors then secure the wall bracket with the four 4 L 32 mm x D 5 mm screws s...

Page 6: ... 5 0RXQWLQJ EUDFNHW DOO EUDFNHW 3 O D V W L F D Q F K R U V P P P P V F U H Z V P P P P V F U H Z V P P P P V F U H Z V 6758 785 021 725 OPTIONAL ...

Page 7: ...in PC if PC input available TV Picture and PC PLL Channel Search PC input Support Up to WXGA 1280 x 720 Stereo PC Audio Input Plug Play for Windows 9X ME 2000 XP 4H Comb filter Panel Features High resolution 22 inch TFT LCD display High contrast ratio 500 1 Typical Brightness 450 cd m2 High speed response time 23 msec Wide viewing angle typical 170 horizontal and 170 vertical 8 bit colour depth di...

Page 8: ...parts which are specified by the manufacturer or have the same specifica tions as the original one Unauthorised sub stitutions may result in fire electrical shock or other hazards 8 Servicing Please refer all servicing to qualified per sonnel Do not remove cover as this may re sult in electric shock 9 Naked Flame Sources Do not place naked flame sources on the apparatus WARNING When the device is ...

Page 9: ...g any external device Sockets for external connections are at the back of the TV For connection of other de vices via Euroconnector refer to the manuals of the related devices Inserting batteries in the remote control handset Remove the battery cover located on the back of the handset by gently pulling up wards from the indicated part Insert two AAA R03 or equivalent type of batteries inside Repla...

Page 10: ...V 5XQQLQJ 3OHDVH DLW After APS is finalized a programme list will appear on the screen In the programme list you will see the programme numbers and names assigned to the programmes If you press the TV button at any time while the A P S is running the A P S will be ended Then the program list on the screen will show channels captured until this time If you do not accept the locations and or the pro...

Page 11: ...Swapping Press P P programme swap button to select the last selected programme This button provides swapping between last two selected programmes For example select programme 8 then select programme 2 Now if you press P P button programme 8 will be selected If you press the same button again programme 2 will be selected and so on MenuSystem Your TV has been designed with a menu system to provide a...

Page 12: ...ht Press button to change balance to the left When balance control is in mid position the cursor is displayed with one arrow 6RXQG Selecting Sound Mode Using or button select Sound Mode Press or button to change Sound Mode You can choose Mono Stereo or Dual I II mode only if the selected channel sup ports that mode You can also change sound mode directly pressing I II button on your remote control...

Page 13: ...t will be stereo or visa versa In case of bilingual broadcast you can se lect original or dubbed language again us ing mode menu So when somebody listens to the original language from the loudspeak ers somebody else can listen to the dubbed language from headphone To Store the Settings Press OK button on the remote control to store the settings directly or Using or button select Store Press or OK ...

Page 14: ... will turn on and off this feature Automatic Volume Limiting Avl function normalises sound to obtain fixed output level between programmes having different sound levels 6RXQG 2Q To Store the Settings When the cursor is on any item which has no sub menu press OK button on the re mote control to store the settings directly or Press or OK button on Store option to store Sound menu settings 6RXQG 6WRU...

Page 15: ...imum then select store and press or button to save your setting Note 1 At low signal level the changings on the Noise Reduction function are not effective when there is menu on the screen If the menu is removed the effect of this func tion is seen At normal broadcasting Noise Reduction changings are effective at once Note 2 At moving pictures while Noise Reduction is at maxi mum level some picture...

Page 16: ...al ues between Off 0 15 0 30 0 45 1 00 1 15 1 30 1 45 and 2 00 If sleep timer is activated it is displayed with the TV status on the upper right of the screen HDWXUH 2II Once the time set with the sleep timer has elapsed the set will go to standby Child Lock You can use this feature to prevent children turning on off TV or changing programmes or adjustments etc without remote control The Child Loc...

Page 17: ...u pressing or OK but ton 0HQX When any item is selected with or button in the install menu the selected item will be highlighted on the bottom bar Changes by pressing or button will be result only at highlighted item on the bot tom bar Selecting Programme To select programme number you can use or button Digit Buttons or The Double Digit button with digit buttons QVWDOO 3 Selecting Band Band can be...

Page 18: ... Settings Press OK button on the remote control to store the settings directly or Press or OK button on Store op tion to store Install menu settings Programme Menu To enter Programme menu directly press the button in TV mode or Press M button now you are in main menu In the main menu select Program using or button Then enter the Programme menu press or OK button 0HQX Moving cursor to four directio...

Page 19: ... buttons the decided programme space B can be selected and by pressing the green button again the selected programme will be inserted Press Blue button to activate Cancel func tion of Insert process Delete To start the Delete process press the yel low Delete button Name Insert and Autostore functions are inactive Press ing yellow button again erases the selected programme from the programme list a...

Page 20: ...ton is used to go to the previously entered programme again Pressing P P consecutively allows to swap into two last entered programmes Double digit This OSD is displayed when the Double Digit button pressed in place of the pro gramme number indicator 3 In order to enter a two digit programme number you must push both numbers within 3 seconds If the second number is not en tered within 3 secs the d...

Page 21: ...f no valid signal detected it takes 5 minutes for the set to switch to Standby mode unless a signal is detected or a command is re ceived from the remote control After a Remote Control command if No Sig nal Timer is active the timer stops and if no signal detected again the timer is initialized to 5 minutes and starts 3 seconds later again to count down It is not valid in AV mode No Signal Detecti...

Page 22: ...r system will se lect the appropriate timing for your monitor Switching from TV to PC Press PC button to swich directly PC mode Main Menu in PC mode Enter the main menu by pressing the M button on the remote control Sound Menu In the main menu select Sound using or button then enter the Sound menu pressing or OK buttons The items in this menu are described at Sound menu starting page 11 6RXQG Pict...

Page 23: ... the PIP is displayed and highlighted in green border sound switches to whatever is displayed in the PIP When ever you close the PIP or make the PIP bor der blue again by disselecting the PIP sound switches back to PC Sound Mode Geometry Menu In the Main menu select Geometry using or button then enter the Geometry menu pressing or OK buttons HRPHWU Adjust the required horizontal or vertical po sit...

Page 24: ...eletext Press the appropriate digit buttons for the required Teletext page number The selected page number is displayed at the top left corner of the screen The Teletext page counter searches until the selected page number is located so that the desired page is displayed on the screen Press P CH button to move the Teletext screen forward one page at a time Press P CH button to move the Teletext sc...

Page 25: ...tically Press P CH button to move the Teletext screen forward one page at a time Press P CH button to move the Teletext screen backward one page at a time For Fastext The subject heading for the information may have a particular colour Press an appropriate Red Green Yellow or Blue button in order to reach the relevant page quickly To exit Teletext Press TV or button The screen will switch to TV mo...

Page 26: ...rogrammes to be unscrambled For further information ask your dealer See also the booklet supplied with your decoder Connect a decoder with an aerial socket to the TV Connect the aerial cable Connect a decoder without an aerial socket to the TV Connect the decoder to your TV with a eurocable RCA Jack Cable to EXTERNAL RCA Jack optional When your decoder has a Euroconnector RCA Jack you can obtain b...

Page 27: ...or of your video recorder See also the handbook of your video recorder To connect your video recorder to the TV see TV and Video Recorder section If you want to connect more equipment to your TV consult your dealer Connecting Headphones Use the stereo headphone socket on the rear side of your TV to connect headphones Connecting the PC Connect PC monitor with 15 pin PC cable to the 15 pin connector...

Page 28: ... 27 PeripheralEquipmentConnections 6 57 62 7 9 8 2 1387 8 2 1387 5 9 2 1387 6 9 2 1387 6 57 62 7 9 9 3 8 2 1387 5 3 1387 3 21 9 6 9 6 3 1387 9 3 8 2 17 3 1387 9 3 8 2 17 ...

Page 29: ...2 1 5 9 2 1 1 287 1 2 8 7 DECODER FOR SATELLITE RECEIVER VIDEO HEADPHONE optional AUDIO 9 8 9 8 HULDO 9 HULDO 5RXQG RKP FRD LDO FDEOH 5RXQG RKP FRD LDO FDEOH ODW RKP WZLQ OHDG FDEOH 5HDU RI 79 5HDU RI 79 2XWGRRU HULDO RQQHFWLRQV 9 8 AERIALConnections ...

Page 30: ...tion of 1280 x 720 vertical sync frequency range of 50 75 Hz and a horizontal sync frequency range of 30 69 KHz The following table is an illustration of some of the typical video display modes RUL RQWDO 9HUWLFDO RU N 9HU RU 9HU 6 QF 3RODULW 0RGH UHTXHQF 5HVROXWLRQ ...

Page 31: ...mage means that your TV is not receiv ing any transmission Have you pressed the correct buttons on the remote control Try once more For Monitor Check that power cord of the Display has been connected securely into wall outlet or grounded extension cable or strip Display is equipped with electronic power switch it will remain power off in case of any power failure It is necessary to push power swit...

Page 32: ...ini D cable PANEL Size 22 56 cm diagonal Displayable Resolution 1280 x 720 maximum Non interlaced Active Display Area 487 68 mm horizontal x 274 32 mm Vertical NUMBEROFPRESETCHANNELS 100 CHANNELINDICATOR On Screen Display RFAERIALINPUT 75 Ohm unbalanced OPERATINGVOLTAGE For adaptor 100 240 V AC 50 60 Hz For TV 15 V DC AUDIO German Nicam Stereo AUDIO OUTPUT POWER 2 x 3 WRMS 10 THD POWER CONSUMPTION...

Page 33: ...ot correspond with the coloured markings identifying the terminals in your plug proceed as follows The wire which is coloured blue must be connected to the terminal which is marked with the letter N or coloured black The wire which is coloured brown must be connected to the terminal which is marked with the letter L or coloured red No connection is to be made to the earth terminal of the plug If a...

Page 34: ......

Page 35: ......

Page 36: ......

Page 37: ......

Page 38: ...47 Milano Italia ITALY Tel 39 02 487861 Tel 39 02 38073415 Servizio Clienti Fax 39 02 48786381 2 Email customerservice italy hitachi eu com HITACHI Europe AB Box 77 S 164 94 Kista SWEDEN Tel 46 0 8 562 711 00 Fax 46 0 8 562 711 13 Email csgswe hitachi eu com HITACHI EUROPE S A S Lyon Office B P 45 69671 BRON CEDEX FRANCE Tel 04 72 14 29 70 Fax 04 72 14 29 99 Email france consommateur hitachi eu co...

Reviews: