


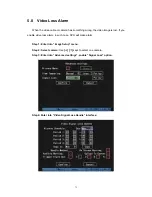


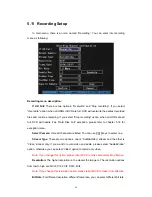


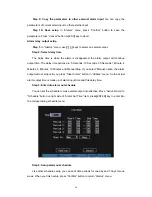


80
channels, there are “1 Screen”, “4 Screen”, “9 Screen” “12 Screen” and “16 Screen”
options.
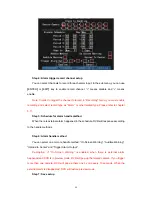
Switch time:
That is image preview switch time. You can use
[
↑
] [
↓
]
keys to select
switch time. There are many options, including “5 Seconds”, “10 Seconds”, “20 Seconds”,
“30 Seconds”, “1 Minutes”, “2 Minutes”, “5 Minutes” and “Never”. If you select “Never”, the
preview image will not be switched automatically. For example, for 16 channels DVR, if
you select “4 Screen” preview mode and “20 Seconds” switch time, DVR will cycle display
4 channels image every 20 seconds.
Audio preview:
If you enable audio preview (“
9
”), when you preview single camera,
DVR will play the audio of that channel.
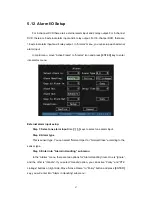
Display Delay
: In motion detection handle menu or sensor alarm handle menu, if you
enable “On Screen Warning” option. When there is alarm happened, DVR will switch the
corresponding camera live image on screen. When there are several alarms happened,
DVR will switch camera live image one by one based on “Display Delay” time.
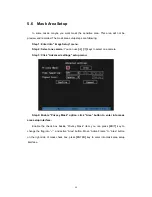
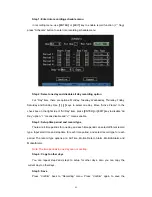
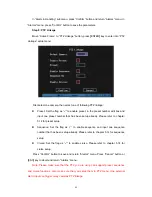
Preview layout setup:
There is a square frame divided into many windows. If you
select “4 Screen” preview mode, this frame is divided into 4 windows. Each window
represents one camera. You can move “Active Frame” among the windows. There is one
bar under the square to display the preview order of all cameras.
First select the biggest screen preview mode, for example, for 16-channel DVR,
select “16 Screen” preview mode so that all windows are display in the square.
Secondly, move “Active Frame” to one of these windows, press [Enter] or [EDIT] key
to enter into “Edit” status, then press numeric keys to input camera index (
If DVR has less
than 10 channels, just use one numeric key, otherwise, use 2 numeric keys
). The small
window will display that camera number. In this way you can change the display order. If
you press 0 or 00, then the corresponding window will not display live video.
Summary of Contents for DS-7000HI Series
Page 11: ...11 1 4 Typical Application ...
Page 14: ...14 5 Connect HDD and main board with HDD cable Then connect HDD s power cable ...
Page 27: ...27 How to exit menu Press PREV or ESC key to exit menu and return to preview mode ...
Page 54: ...54 In this case press ENTER to return password edit box and input new password again ...
Page 60: ...60 ...
Page 70: ...70 ...
Page 108: ...108 Step 6 You can preview the image of 192 1 0 2 by using client end software ...
Page 125: ...125 In the formula a means alarm occurrence rate ...
Page 127: ...127 The corresponding relationship of cross cable ...
Page 137: ...137 Suggestions ...


