


74
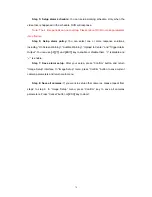
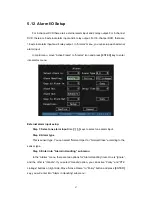
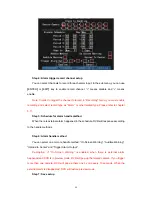
Step 5: Setup alarm schedule:
You can setup working schedule. Only when the
video loss is happened in the schedule, DVR will response.
Note: The 4 time periods can not overlap. Please reboot DVR to make parameters
into effective.
Step 6: Setup alarm policy:
You can select one or more response solutions,
including “On Screen Warning”, “Audible Warning”, “Upload to Center” and “Trigger Alarm
Output”. You can use
[
È
] [
Ç
]
and
[
EDIT
]
key to enable or disable them. “×” is disable and
“
9
” is enable.
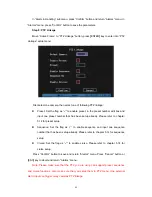
Step 7: Save alarm setup:
After your setup, press “Confirm” button and return
“Image Setup” interface. In “Image Setup” menu, press “Confirm” button to save current
camera parameters and return main menu.
Step 8: Save all cameras:
If you want to setup other cameras, please repeat from
step2 to step 6. In “Image Setup” menu, press “Confirm” key to save all cameras
parameters. Press “Cancel” button or
[
ESC
]
key to abort.
Summary of Contents for DS-7000HI Series
Page 11: ...11 1 4 Typical Application ...
Page 14: ...14 5 Connect HDD and main board with HDD cable Then connect HDD s power cable ...
Page 27: ...27 How to exit menu Press PREV or ESC key to exit menu and return to preview mode ...
Page 54: ...54 In this case press ENTER to return password edit box and input new password again ...
Page 60: ...60 ...
Page 70: ...70 ...
Page 108: ...108 Step 6 You can preview the image of 192 1 0 2 by using client end software ...
Page 125: ...125 In the formula a means alarm occurrence rate ...
Page 127: ...127 The corresponding relationship of cross cable ...
Page 137: ...137 Suggestions ...


