background image

24

07/22

7027-804H 

C. Adjustable Hopper Options

Depending on your installation, the hopper can be adjusted 

down 2-1/2 inches (64mm) and will decrease in capacity 

from 75lbs to 60lbs.

To adjust hopper:

1.  Using a Phillips head screwdriver, remove all the 

screws from the top of the hopper securing the 

top hopper piece to the bottom hopper piece and 

insert body.

2.  Adjust downward 2-1/2 inches (64mm).

3.  Mark location for new holes and drill new holes.

4.  Secure hopper pieces together using screws removed 

in step one.

5.  See drawing on page 8, 

Figures 8.1 and 8.2

.

D. Optional Log Set Placement Instructions

NOTE:

 Due to the abrasive nature of a pellet appliance 

fire, the logs are not covered under warranty. 

Any placement variation other than shown here 

can cause excessive heat and shall void the 

appliance warranty.

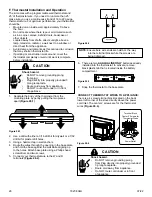
1. 

Place the front log in first as shown in 

Figure 24.2


charred area surrounding fire pot.

2.  Set the left and right logs onto the front log, placing 

the holes in the base of the left and right logs over the 

locating pins in the front log 

(See Figure 24.3)

. Ensure 

that the charred ends are facing the fire pot.  

LOCATING PINS

Charred Areas in the Back

Top Log

Right 

Top Log, Left

Front Log

Figure 24.2

Figure 24.3

CAUTION

Logs are FRAGILE. Use extreme care when handling or 

cleaning logs.

Summary of Contents for Quadra-Fire CB1200

Page 1: ...restrictions installation inspection and permits CAUTION If the information in these instructions is not followed exactly a fire could result causing property damage personal injury or death Do not s...

Page 2: ...Install Checklist 7 3 Dimensions and Clearances A Appliance Dimensions 8 B Clearance To Combustibles UL and ULC 9 C Masonry Chimney and Fireplace Clearances 10 D Minimum Opening for Masonry ZC Firepla...

Page 3: ...put 10 200 to 33 900 hr BTU Input 17 000 to 48 500 hr Vent Size 3 4 L or PL or 6 Hopper Capacity 75 lbs Fuel Premium Wood Pellets Weighted average LHV Low Heating Value efficiency using data collected...

Page 4: ...ductive harm For more information go to WWW P65Warnings ca gov WARNING F Non Combustible Materials Material which will not ignite and burn composed of any combination of the following Steel Plaster Br...

Page 5: ...stallation MUST comply with local regional state and national codes and regulations Consult insurance carrier local building inspector fire officials or authorities having jurisdiction over restrictio...

Page 6: ...ng the installation to ensure maximum safety and benefit Follow pipe manufacturer instructions for installation and air clearance requirements Tools and building supplies normally required for install...

Page 7: ...ng this checklist for your file That this checklist remain visible at all times on the appliance until the installation is complete Electrical 120 VAC unswitched power provided to the appliance Check...

Page 8: ...8 in 346mm 8 3 4 in 223mm Figure 8 5 Front View with large panel set SP CB12I3350 NB or NL TOP TRIM 18 5 16 in 465mm 24 5 16 in 618mm 50 in 1270mm 33 in 838mm 10 3 8 in 264mm 21 1 4 in 539mm 21 1 4 i...

Page 9: ...art 811 0730 is available through your dealer to be used as a floor protector for the section under the insert body only Floor protection to front and sides of insert appliance must be supplied in add...

Page 10: ...ment for clearances for any measurement in between the maximum and the minimum height The Maximum and minimum are already calculated for you in the above table for convenience E Hearth Extension Use a...

Page 11: ...nt of the insert and 8 inches 203mm to each side of the door opening See Thermal Resistance R value NOTE Clearances may only be reduced by means approved by the regulatory authority having jurisdictio...

Page 12: ...replace opening the portion of the insert extending onto the hearth must be supported Manufacturer designed adjustable support kit can be ordered from your dealer The following is only one example as...

Page 13: ...nce fireplace system must not be altered The flue liner top support attachment must not reduce the air flow for the existing air cooled chimney system NOTE It is necessary to permanently seal any open...

Page 14: ...rts of the structure P 12 in Clearance above roof line for vertical terminations All minimum clearances are listed with an Outside Air Kit OAK installed unless otherwise noted in table below 24 in Abo...

Page 15: ...mands of the pellet appliance but consideration must be given to the total house demand House demand may consume the air needed for the appliance It may be necessary to add additional ventilation to t...

Page 16: ...nce TO A CHIMNEY FLUE SERVING ANOTHER APPLIANCE Negative pressure results from the imbalance of air available for the appliance to operate properly It can be strongest in lower levels of the house Cau...

Page 17: ...n Figure 17 2 1 Locate the calculated equivalent feet of pipe on the vertical left side of the chart 2 Move to the right horizontally on the chart until you reach your altitude above sea level 3 If yo...

Page 18: ...Fire Risk Inspection of Chimney Masonry chimney must be in good condition Meets minimum standard of NFPA 211 Factory built chimney must be a minimum 6 inch 152mm UL103 HT WARNING CAUTION Never draw o...

Page 19: ...all or partition of combustible construction is desired the installation shall conform to CAN CSA B365 NOTE Illustrations reflect typical installations and are FOR DESIGN PURPOSES ONLY Illustrations d...

Page 20: ...ials to seal any edge to prevent furture serviceability Figure 20 1 NOTE In Canada this fireplace insert must be installed with a continuous chimney liner extending from the fireplace insert to the to...

Page 21: ...ke into the home 1 Remove the top vent adapter from the vertical exhaust transition pipe Figures 21 1 and 21 2 2 Using a Phillips head screwdriver and two screws to attach Filler Bracket Figure 21 3 3...

Page 22: ...piece Figure 22 1 5 Install the Rear Panel using six screws Figure 22 2 6 Install the cover plate over the top vent opening using 4 screws Figure 22 3 7 Attach the left shroud panel using eight screws...

Page 23: ...termination cap with second hose clamp 6 Secure termination cap to outside surface 7 Secure trim ring to interior wall Flex Hose Hose Clamp Collar Assembly Trim Ring Hose Clamp Termination Cap Assemb...

Page 24: ...1 and 8 2 D Optional Log Set Placement Instructions NOTE Due to the abrasive nature of a pellet appliance fire the logs are not covered under warranty Any placement variation other than shown here can...

Page 25: ...t and left side curtains are shipped with the insert Figure 25 2 Figure 25 3 Figure 25 4 6 Hold side curtains in open position and lower panel set over insert setting lower edge of top panel in slot b...

Page 26: ...h the opening in the base plate and hold the base against the wall while aligning up to the holes Attach base plate using a Phillips head screwdriver and two screws 5 Connect your thermostat wire to t...

Page 27: ...3280 Part 24 PART NUMBER 811 0872 Spark Arrestor Cap Roof Flashing Storm Collar Joist Shield Firestop Double Wall Connector Pipe Figure 27 1 CAUTION THE STRUCTURAL INTEGRITY OF THE MOBILE HOME FLOOR W...

Page 28: ...28 07 22 7027 804H 8 Reference Materials A Service Maintenance List Date of Service Performed By Description of Service...

Page 29: ...f 24 229 1100 24 Y Blower Convection 7000 537 Y 33 Control Board 3 Speed SRV7000 704 Y Fuse 8 Amp Control Box Pkg of 10 812 3780 10 Y 34 Wire Harness SRV7000 155 Y Fuse 7 Amp Junction Box Pkg of 10 81...

Page 30: ...832 0840 Logo Quadra Fire Pkg of 10 7000 649 10 Trim Panel Set Ots Nickel 510 5220 Panel Set Large W Black Nickel Trim 33 in x 50 in SP CB12I3350 NB Bracket L Trim Pkg of 2 832 0840 Logo Quadra Fire...

Page 31: ...31 07 22 7027 804H...
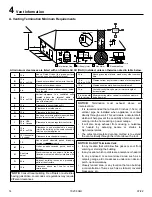
Page 32: ...maintenance instructions included Read understand and follow these instructions for safe installation and operation Leave this manual with party responsible for use and operation of this appliance We...

Reviews: