background image

13

Setting Up the Fence Boundary/

Trigger Zone

Havahart

®

 Radial-Shape 2 Wireless Dog Fence

www.HavahartWireless.com

Havahart

®

 Radial-Shape 2 Wireless Dog Fence

1-800-800-1819, Option 1

14

Installing the Radial-Shape 2 Wireless Dog Fence


Setting Up the Fence  

          Boundary/Trigger Zone

3

Fenc

e Bo

und

ary/

Trig

ge

r Z

on

e

Illustration C

Screen 1.9

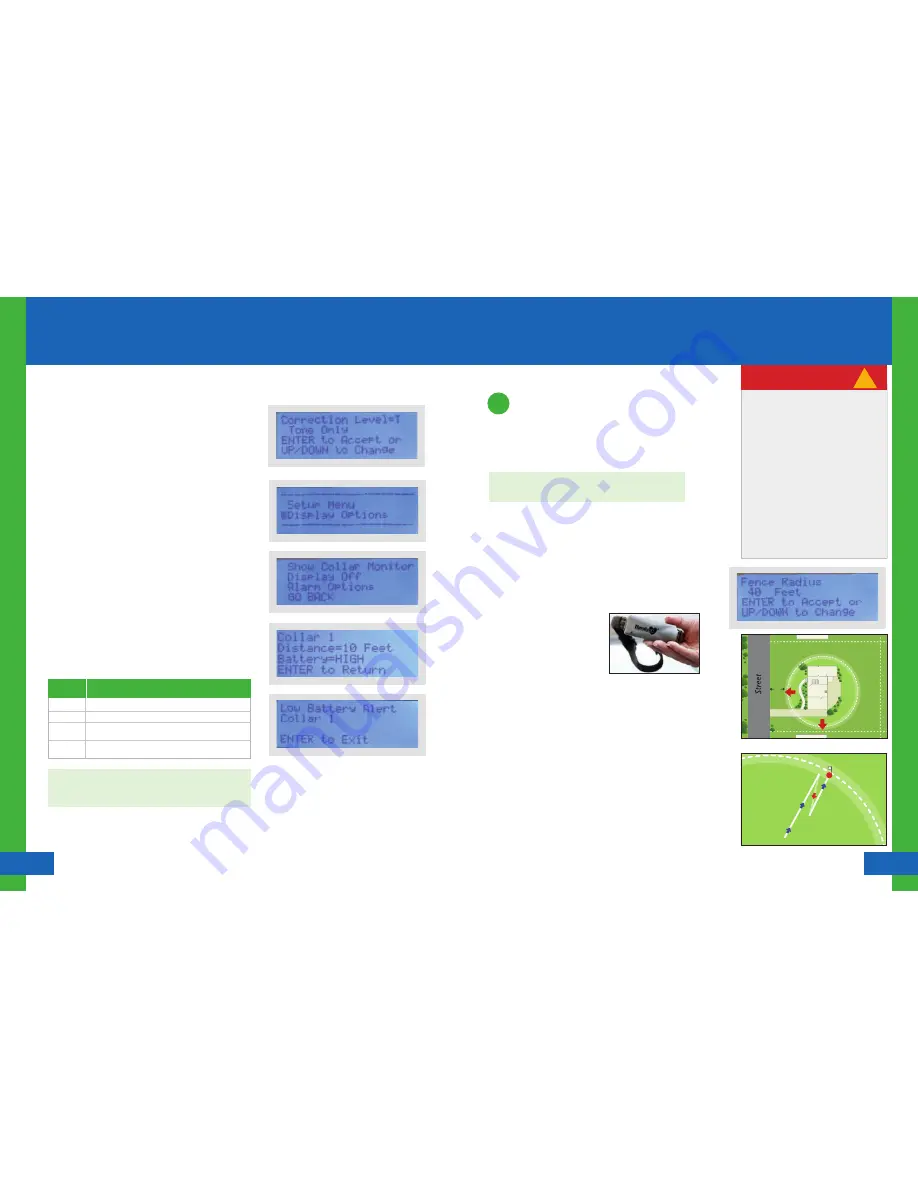
Establishing the Fence Boundary/Trigger Zone Distance:

1.  

Estimate the distance between the Controller and the desired  


boundary location.  This distance will be the radius of the Trigger  


Zone all the way around  the Controller.

2.  

Set the radius on the Controller 


From the Setup Menu, select Fence Setup (see Screen 1.1). 


Use the up/down arrow keys to scroll to the desired fence radius  


   distance and press Enter (see screen 1.9). The minimum radius 


   is 40 feet, and the maximum radius is 400 feet from the 


   Controller in all directions.


Select OK to Save Your Settings.

3.  

Test the Trigger Zone 


To confirm that the location of the actual boundary is correct...


Set the Collar to Tone Only.


- Extend your arm down by 


  your side and hold the Collar 


  by the Battery Housing 


  so that you can see the Collar 


  Light (see Figure 1.5). Make 


  sure that your body does not 


  get between the Collar and 


  the Controller as your body may affect the signal and cause  


  the boundary to shift inward (see Factors Affecting Signal  


  Strength on Page 8).


     - Walk toward the boundary while gently moving the Collar   


       until the Collar beeps and the Collar Light flashes red. To  


       confirm the boundary location, step back until the Collar  


       stops beeping and then walk forward in the same direction  


       until the Collar beeps and the Collar Light flashes red again. If  


       necessary, note how far from the desired location the actual  


       setting is. Place a flag at the boundary location 


       (see Illustration C). If you have to change the boundary   


       distance, you will know where your boundary was and to  


       where you are moving it. If the location is correct, place a flag    


       to start the flag line of your fence boundary. 

4.  

Adjust the Fence Distance on the Controller accordingly using 

 the  instructions in Step 2 until the desired boundary location is  


 established.

RO

AMING ARE

A

20 ’

Limiting  Factors

Illustration B

Your Trigger Zone should be NO closer 
than 20 feet to ANY ROAD, SIDEWALK 
OR THOROUGHFARE FOR YOUR DOG’S 
SAFETY.

TRIGGER ZONE SHAPE: It is normal that 
your Trigger Zone MAY NOT FORM A 
PERFECT CIRCLE
 and the actual distance 
from the Trigger Zone to the Controller 
may be less than the set radius. A 
reduced fence radius may be the result 
of Factors Affecting Signal Strength (see 
Page 8). Large metal objects such as a 
car or refrigerator can slightly distort 
the roundness of your fence boundary. 
However, once set, the Trigger Zone 
location will remain consistent over time. 

!

 IMPORTANT MESSAGE

NOTE :  Use the shortest distance to a property boundary as a    
starting point for the radius of the Trigger Zone (see Illustration B).

Figure 1.5

Turning a Collar Off/On:


On the Controller...


Select Setup Menu (see Screen 1.0).


Select Collar Setup (see Screen 1.1).


Select Correction Level (see Screen 1.2).


Select Turn Collar off/on (see Screen 1.3).


Press Enter.

Removing a Collar: 


On the Controller...


Select Setup Menu (see Screen 1.0).


Select Collar Setup (see Screen 1.1).


Select Delete a Collar (see Screen 1.2). If you have more than  


  one Collar installed, select the number of the Collar that you  


  would like to remove.     


Select YES.


Select OK.


Select OK Again

Screen 1.4

Is good (see screen 1.7).


Is good.


Needs to be replaced and recharged.  

A Low Battery Alert will appear (see screen 1.8).


Is not in or properly connected in the Collar or the Collar  

is asleep to conserve Battery life.


Checking Battery Status: 

1.  

Select  “Display Options” (see Screen 1.5) .

2.  

Select “Show Collar Monitor” (see Screen 1.6).


  Battery  

  Status           Means Battery: 


HIGH


  MED


LOW/ 

  REPLACE

  NA

NOTE: Routinely monitor the Battery status of your Collar(s) to 
understand when the Battery may need to be changed. Battery 
life is 1-3 days, depending on your dog’s activity level.

Screen 1.6

Screen 1.5

Screen 1.7

Screen 1.8

Setting Up the Collar

Installing the Radial-Shape 2 Wireless Dog Fence

Summary of Contents for Radial-Shape 2

Page 1: ...am Corporation 69 North Locust Street Lititz PA 17543 1 800 800 1819 www HavahartWireless com Instruction Manual Manuel d instructions REV 5 12 DO NOT RETURN THIS PRODUCT TO THE STORE FOR ANY REASON C...

Page 2: ...Thank you for purchasing the Radial Shape 2 Wireless Dog Fence from Havahart Wireless IMPORTANT MESSAGE Proper training of your dog is the most critical element to ensure the successful operation of...

Page 3: ...Collar on your dog for more than 12 consecutive hours Always remove the Collar from your dog before adjusting any of the system components or settings The system is intended to provide safe containme...

Page 4: ...sive Integrated Motion Sensor Technology which allows the Collar to go to sleep when it is not in motion to conserve and optimize Battery life The Technology Behind the System The Havahart Radial Shap...

Page 5: ...te a criss cross The resulting shape of the Trigger Zone may be slightly different than a perfect circle and the Roaming Area may be slightly reduced When this happens the object between the Controlle...

Page 6: ...ached to the Controller see Figures 1 3a 1 3b Installing the Radial Shape 2 Wireless Dog Fence Figure 1 0 Figure 1 1a Figure 1 2 Figure 1 3a NOTE The removable wall mount adhesive strips are not recom...

Page 7: ...ed before installing it in the Collar Turn the Battery Cap on the Collar counterclockwise about 1 4 turn and pull it out With the positive side facing outward install one RCR123 Battery into the Colla...

Page 8: ...rt the flag line of your fence boundary 4 Adjust the Fence Distance on the Controller accordingly using the instructions in Step 2 until the desired boundary location is established ROAMING AREA 20 Li...

Page 9: ...the Fence Boundary Trigger Zone Distance by walking toward the fence boundary about 6 feet 2 paces to the right of the previous flag verifying the fence boundary placing a flag and then stepping back...

Page 10: ...e Collar high on your dog s neck underneath the chin with the Probes facing upward and centered on your dog s neck The Havahart logo should be right side up when you look at your dog 3 Make sure the P...

Page 11: ...d frequent approximately 10 15 minutes long 2 3 times a day Every dog is unique and may respond differently to the training depending on its age size temperament and ability to learn For this reason y...

Page 12: ...Flags IMPORTANT MESSAGE Do not force your dog to receive too many static corrections as this may make your dog nervous or anxious It may be necessary to decrease the speed of the training schedule or...

Page 13: ...ions per day each 10 15 minutes long 1 Fit the Havahart Collar around your dog s neck Place a different non metal collar above the Havahart Collar and attach a leash to it Make sure that this collar d...

Page 14: ...ivers a correction is influenced by the speed and orientation of the Havahart Collar as your dog crosses the Trigger Zone Check that the Controller is plugged into a working 120V AC outlet turned on t...

Page 15: ...of the Havahart Collar If necessary trim your dog s hair where the Probes touch the neck and or switch to the Long Probes Increase the static correction by one level Repeat training steps as necessary...

Page 16: ...ince the tolerance level to static correction varies from dog to dog Woodstream Corporation CANNOT and DOES NOT guarantee or warrant that the system will in all cases keep a dog within the established...

Page 17: ...com customerservice product registration pour ACTIVER VOTRE GARANTIE Merci d avoir achet la cl ture sans fil de forme radiale pour chien Havahart Wireless MESSAGE IMPORTANT Il est essentiel de dresse...

Page 18: ...osants ou des param tres du syst me Le syst me est destin assurer un enclos sans danger votre chien Tous les composants doivent tre tenus hors de la port e des enfants Conformez vous aux lois de tenue...

Page 19: ...dans l industrie des cl tures sans fil pour chien Fonctionnement Le collier et le contr leur Havahart contiennent un jeu de puces d metteur r cepteur nanoLOC TRX 2 4 GHz Ces puces envoient et re oive...

Page 20: ...lenchement obtenue peut alors ne pas former un cercle absolument parfait et la zone autoris e peut tre l g rement r duite Lorsque cela se produit l objet qui se trouve entre le contr leur et la zone d...

Page 21: ...es sur du papier peint Appliquez sur les surfaces dont la temp rature est sup rieure 10 C 50 F L adh sif pourrait ramollir et perdre son pouvoir d adh sion si la temp rature d passe 40 C 105 F Figure...

Page 22: ...cle du logement de pile qui se trouve sur le collier de 1 4 de tour dans le sens contraire des aiguilles d une montre et retirez le Installez une pile RCR123 dans le collier avec le c t de la polarit...

Page 23: ...Collar off on Activer D sactiver collier voir cran 1 3 Appuyez sur Enter Entr e Suppression d un collier Sur le contr leur S lectionnez Setup Menu Menu configuration voir cran 1 0 S lectionnez Collar...

Page 24: ...de la cl ture droite du drapeau pr c dent v rifiez la limite de la cl ture placez un drapeau puis reculez pour revenir dans la zone autoris e 2 R p tez l tape 1 jusqu ce que toute la zone enclose soi...

Page 25: ...vers le haut lorsque vous regardez votre chien 3 Assurez vous que les capteurs sont maintenus en contact avec la peau Des capteurs longs ont t install s l usine sur le collier pour les chiens dont les...

Page 26: ...selon son ge sa taille son temp rament et sa capacit d apprentissage Vous devez donc ajuster votre programme de dressage en cons quence Il sera peut tre n cessaire de ralentir la cadence du dressage...

Page 27: ...us de retirer le collier Havahart du cou de votre chien apr s chaque s ance de dressage 14 Vous pouvez passer la PHASE 2 lorsque votre chien vite d aller pr s des drapeaux de dressage lorsque vous vou...

Page 28: ...Havahart et attachez une laisse ce dernier Assurez vous que ce collier n applique pas de pression sur les capteurs du collier Havahart car cela pourrait faire mal votre chien quand vous tirez sur la l...

Page 29: ...tr leur est branch dans une prise c a de 120 V en bon tat qu il est activ que l cran ACL affiche le texte et que le niveau de correction et la distance la zone de d clenchement sont r gl s aux niveaux...

Page 30: ...touchent le cou et ou utilisez les capteurs longs Augmentez la correction statique d un niveau R p tez les tapes de dressage autant de fois que n cessaire Probl me Solution L cran ACL n est pas activ...

Page 31: ...er la zone de d clenchement vous ne devriez PAS compter uniquement sur la cl ture sans fil de forme radiale pour chien Havahart pour le maintenir dans l enclos Woodstream Corporation ne sera PAS tenue...

Reviews: