55
ZOOMING IN AND OUT
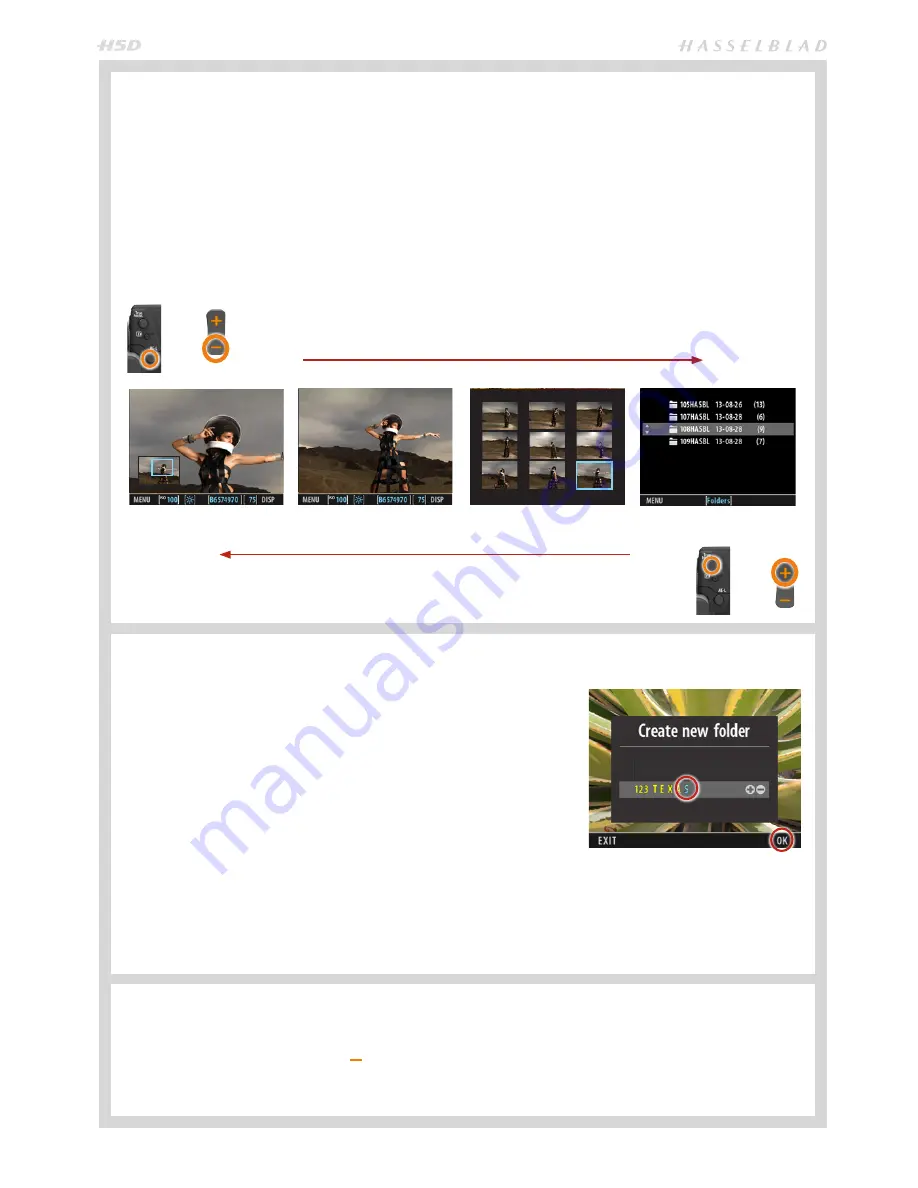
There are four views in
Browse
mode. Zoom in by using the the
Zoom in
(
+
)
/ out
(
-
) buttons or
True Focus
(
+
) and
AE-L
(
-
)
buttons.
Zoomed View
is reached by zooming in from the Standard View. When zoomed in, you can select the area of interest by
using the front and back scroll wheels or the navigation button. A smaller inserted overview of the capture at 100% displays
the position of the enlarged area with a blue frame. While zoomed in, navigate the blue frame (
navigator button
or
scroll
wheels
) to view other areas of interest for checking.
Standard Preview
displays the full frame partially covered by the information bar at the bottom.
9-Thumbnail
View
displays an overview of your work so far and helps to find specific shots. Selection of specific images,
highlighted by a blue frame, is made by the navigation button.
Folder view
displays the list of folders saved. The highlighted folder is the current folder and contains the images you were
browsing. Navigate to another folder and then zoom in to reveal its contents if desired.
CREATE NEW FOLDER
SENSOR UNIT MENU > STORAGE > CREATE NEW FOLDER
All new captures are automatically stored in the current folder until directed other-
wise. A newly created folder automatically becomes the ‘current’ folder.
1. Press
MENU
.
2. Navigate to
STORAGE
(use the
Rear scroll wheel
or the
Navigator
).
3. Navigate to
CREATE NEW FOLDER dialog
(use the
Front scroll wheel
or the
Navigator
).
4. The
CREATE NEW FOLDER dialog
allows folder naming. The first three-
digits are fixed and are automatically incremented for each new folder. The
following five characters can be assigned as follows:
Use the
Front scroll wheel
or the
Navigator
to select each character in turn.
When selected (highlighted as blue) use the
ZOOM
button to select the desired
character/digit.
5. Press the
OK
button to save.
‘CURRENT’ FOLDER SELECTION
You can re-direct new captures to a selected folder for storage instead of the latest folder created.
1. Enter
Browse
mode
2. Zoom out (use the
ZOOM
out button ) to reach the Folder View.
3. Navigate to the desired folder
(use the
Rear scroll wheel
or the
Navigator
and zoom in) and return to the Standard Preview.
4. In this way, the newly selected folder becomes the ‘current’ folder, so all new captures will now be stored there instead.
Standard Preview
Zoomed View
9-Thumbnail View
Folder View
ZOOM IN
ZOOM OUT
or
or
The last character has been selected
and is colored blue to indicate that it
can be changed. Pressing OK saves
the new name and creates the new
folder which now becomes the ‘cur-
rent’ folder.
Summary of Contents for H5D
Page 1: ...1 USER MANUAL v11 ...
Page 2: ...2 INTRODUCTION ...
Page 19: ...19 Photo Dmitry Ageev Hasselblad Masters GENERAL ...
Page 31: ...31 Photo Roman Jehanno Hasselblad Masters LENSES FOCUS MODES ...
Page 42: ...42 Photo Martin Schubert Hasselblad Masters EXPOSURE CONTROL ...
Page 48: ...48 Photo Hengki Koentjoro Hasselblad Masters NAVIGATING THE MENUS ...
Page 52: ...52 Photo Dmitry Ageev Hasselblad Masters PREVIEWS BROWSING ...
Page 56: ...56 SENSOR UNIT SETTINGS Photo Hengki Koentjoro Hasselblad Masters ...
Page 71: ...71 Photo Bara Prasilova Hasselblad Masters GRIP MENU SETTINGS ...
Page 87: ...87 PROFILES Photo Rafal Maleszyk Hasselblad Masters ...
Page 90: ...90 Photo Bara Prasilova Hasselblad Masters FLASH STROBE ...
Page 94: ...94 HM 16 32 FILM MAGAZINE OPTIONAL ACCESSORY Photo Hengki Koentjoro Hasselblad Masters ...
Page 102: ...102 ACCESSORIES Photo Roman Jehanno Hasselblad Masters ...
Page 108: ...108 APPENDIX Photo Bryn Griffiths Hasselblad Masters ...
Page 118: ...118 H5D UM 1L v11 2015 Copyright 2015 Victor Hasselblad AB ...


