51
OVERVIEW OF NAVIGATING MENU AND SETTINGS
Navigating the menu and accessing the settings on the grip is achieved by pressing the buttons surrounding the display and
turning the scroll wheels. Note that some of the buttons are modal and so have several functions which is indicated by the
designation that appears closest to that particular button when navigating. For example, the
ISO/WB
button also acts as a
SAVE
button.
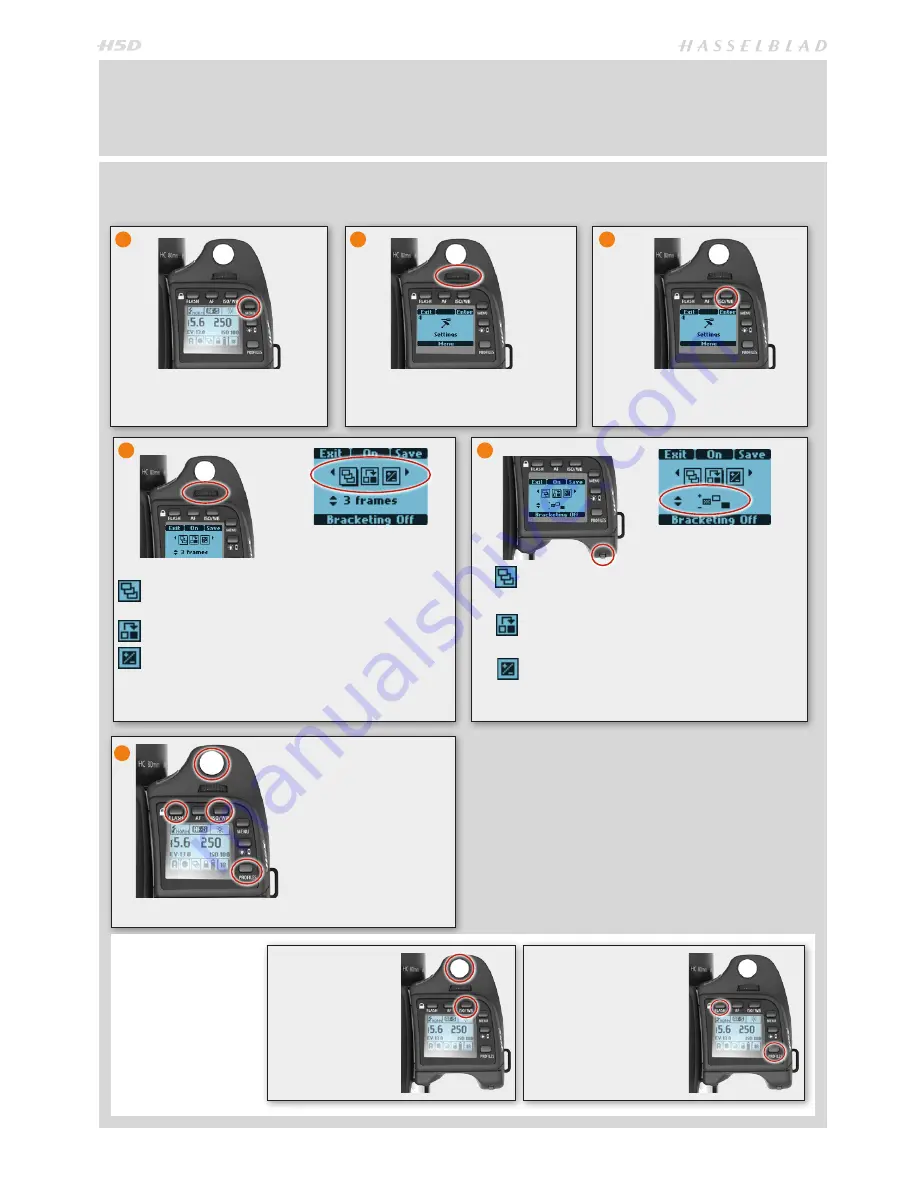
Here is an example of the necessary steps to take to make a setting change, in this case Bracketing. The actions are illustrated
in full here to clearly describe the procedure. The procedures later on in this manual are described and illustrated in an abbrevi-
ated manner so it wise to study this full description first.
Press the
MENU
button to access
the menu from the regular info
display.
Turn the
Front Scroll Wheel
until
Settings
appears.
Press
Enter
(
ISO/WB
button).
1
4
5
2
3
Press
Save
(
ISO/WB
button) or make a ‘quick
save’ by half-pressing
the shutter release but-
ton. To escape press
ESC
(
Profiles
button).
When finished, press
Exit
(
FLASH
button).
6
Number of Captures
(the number of captures required in the se-
quence)
Sequence
(the sequential order of the over- or underexposures)
Step
(the amount of EV variation from the standard exposure setting)
In
turn the rear wheel to choose the number of frames
required:
2, 3, 5, 7 or 9.
In
turn the rear wheel to choose one of the four
sequences.
In
turn the rear wheel to choose the amount of EV
variation required:
3, 2, 1, 1/2, 1/3 EV.
Turn the front scroll wheel
to access the options.
The following is a list of the various terms describing the
various actions that appear on the grip display:
Enter:
navigates down one level on the menu.
Exit:
navigates back up one level on the menu. Does not save any settings.
Off:
deactivates the particular function being set.
On:
activates the particular function being set.
Sel.:
(Select) - selects the character marked for image info and profile name
ESC:
(Escape) - terminates an action and returns to the main screen. Does
not save any settings.
Save:
saves a setting and also moves screen back up one level on the menu.
Can save many changes made in a setting sequence.
SAVE
ACTIONS
Remember the follow-
ing groupings of ‘saved’
and ‘not-saved’ actions
when making settings
changes.
SAVED
‘Quick save’
- half-
press shutter release
button
Save
- press save but-
ton (ISO/WB button)
NOT SAVED
Escape
- press ESC button
(PROFILES /ESC button)
Exit
- press exit button
(FLASH button)
Summary of Contents for H5D
Page 1: ...1 USER MANUAL v11 ...
Page 2: ...2 INTRODUCTION ...
Page 19: ...19 Photo Dmitry Ageev Hasselblad Masters GENERAL ...
Page 31: ...31 Photo Roman Jehanno Hasselblad Masters LENSES FOCUS MODES ...
Page 42: ...42 Photo Martin Schubert Hasselblad Masters EXPOSURE CONTROL ...
Page 48: ...48 Photo Hengki Koentjoro Hasselblad Masters NAVIGATING THE MENUS ...
Page 52: ...52 Photo Dmitry Ageev Hasselblad Masters PREVIEWS BROWSING ...
Page 56: ...56 SENSOR UNIT SETTINGS Photo Hengki Koentjoro Hasselblad Masters ...
Page 71: ...71 Photo Bara Prasilova Hasselblad Masters GRIP MENU SETTINGS ...
Page 87: ...87 PROFILES Photo Rafal Maleszyk Hasselblad Masters ...
Page 90: ...90 Photo Bara Prasilova Hasselblad Masters FLASH STROBE ...
Page 94: ...94 HM 16 32 FILM MAGAZINE OPTIONAL ACCESSORY Photo Hengki Koentjoro Hasselblad Masters ...
Page 102: ...102 ACCESSORIES Photo Roman Jehanno Hasselblad Masters ...
Page 108: ...108 APPENDIX Photo Bryn Griffiths Hasselblad Masters ...
Page 118: ...118 H5D UM 1L v11 2015 Copyright 2015 Victor Hasselblad AB ...


