


22
SYSTEM CONFIGURATION
SYSTEM CONFIGURATION
22
SYSTEM CONFIGURATION
time-out may be increased to as much as 50 seconds
by going to the
ADVANCED SELECT
menu,
and changing the item titled
FULL OSD TIME
OUT
(see page 44).
When the full-OSD menu system is used,
OSD ON
will appear in the
Upper Display Line
P
to remind
you that a video display must be used. When the
semi-OSD system is used in conjunction with the dis-
crete configuration buttons, the on-screen display will
show the current menu selection. That selection will
also be shown in the
Upper Display Line
P
or
the
Lower Display Line
ı
, depending on which
parameter is being adjusted.
Setting the System Configuration Memory
The AVR 340 features an advanced memory system
that enables you to establish different configurations
depending on the input source or the surround mode.
This flexibility enables you to customize the way in
which you listen to various types of program materials
and have the AVR 340 memorize those settings. This
means, for example, that if you mostly use your DVD
player for watching movies, you may configure your
DVD source to default to a particular digital input and
surround mode each time you select it, optimizing
your home theater for cinematic materials. Once these
settings are made, they will automatically be recalled
whenever you select that input.
In addition to the previously mentioned settings, which
always vary with the input, you may also choose to set
different speaker size configurations for each input. In
most cases, this is not required, thus the factory
default keeps these settings the same for all inputs.
However, should you wish to have these settings
change for any one, or all, inputs, follow the instruc-
tions shown on page 29 to select the Independent
mode for speaker configuration.
The first time you use the AVR 340, we recommend
that you take advantage of the simplicity of configuring
the system using the EzSet/EQ process, which takes
the guesswork out of speaker size and delay settings,
and balances the speaker output levels to tailor the
AVR’s sound presentation to your specific system and
room. Before beginning the EzSet/EQ procedure, there
are a few adjustments that need to be made to ensure
accurate results.
The factory default settings for the AVR 340 have all
inputs configured for an analog audio input except
for the DVD input, where the
Coaxial Digital Audio
Input 1
f
is the default, and the Video 2 input,
where the
Optical Digital Audio Input 1
fi
is the
default. The default speaker settings are for “Small”
at all positions, and the subwoofer on.
The default surround mode setting for all sources
using an analog input is the Logic 7 Music mode.
Dolby Digital or DTS will always be automatically
selected anytime a source with digital encoding in that
format is in use. When a Dolby Digital 2.0 source is
detected, the AVR 340 will automatically add Dolby
Pro Logic II or IIx processing. Once a surround mode
is selected for a particular source, the AVR 340 will
default to that surround mode the next time the source
is selected, unless the input signal is in a Dolby Digital
or DTS digital format. For Dolby Digital and DTS mate-
rials, the AVR 340 will default to the surround mode
encoded in the bitstream. As explained on pages
39–40, you may select from a limited number of
other surround modes for these materials. If you wish
to have the AVR 340 default to one of these alternate
surround modes each time a Dolby Digital or DTS
source is encountered, you may use the Default
Surround Mode setting in the
ADVANCED
SELECT
submenu (see page 45).
Before using the unit, you will probably want to pro-
gram the settings for most inputs so that they are
properly configured to reflect the use of digital or ana-
log audio inputs, component video inputs and the sur-
round mode specifics of your home theater system.
Remember that since the AVR 340 memorizes these
settings for each input independently, you will need to
make some of these adjustments for each input used.
However, once they are made, further adjustment is
only required when system components are changed.
To make this process as quick and easy as possible,
we suggest that you use the full-OSD system with the
on-screen menus, and step through each input. It is
also a good idea to set the configuration data in the
order these items are listed in the
MASTER
MENU
, as some settings require a specific entry
in a prior menu item. It is recommended that you
record your settings for each input using the work-
sheets in the appendix to this manual, in the event
there is a power loss or if you need to reenter the
settings for some other reason.
Input Setup
The first step in configuring the AVR 340 is to configure
each input. Once an input is configured, all settings for
the Digital Input, Component Video Input and Surround
Mode will “attach” themselves to that input and be
stored in a nonvolatile memory. The later selection of
that input will automatically recall those settings. For
that reason, the procedures described below must be
repeated for each input source so that you have the
opportunity to customize each source to your specific
listening requirements. However, once made, they
need not be changed again unless you need to alter
a setting.
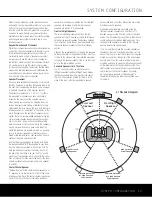
When using the full-OSD system to make the setup
adjustments, press the
OSD Button
v
once so that
the
MASTER MENU
(Figure 1) appears. The
›
cursor will be next to the
INPUT SETUP
line.
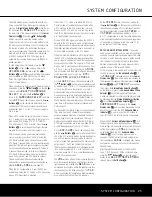
Press the
Set Button
p
to enter the menu and
the
INPUT SETUP
menu (Figure 2) will appear
on the screen. Press the
‹
/
›
Buttons
o
until the
desired input name appears on the first line, as well
as being indicated in the front-panel
Input Indicators
Ú
. If the input will use the standard left/ right analog
inputs and will not use component video, no further
adjustment is needed.
NOTE
: The
DIGITAL IN
line will default to
COAXIAL 1
when the DVD input is selected.
Similarly, when the Video 2 input is selected,
the
DIGITAL IN
line will default to
OPTICAL 1
.
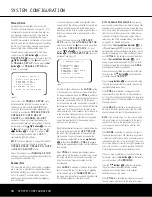
Figure 2
The AVR 340 offers you the opportunity to rename
any source (except the tuner) to customize it for your
particular equipment configuration, e.g. to designate
the source input to which you have connected a VCR,
or a DVD-Audio player. This name will appear in the
Upper Display Line
P
and in the on-screen display
whenever that source input is selected. If you wish to
rename a source, press the
¤
Button
n
until the
›
cursor is pointing to the
NAME:
line. Press the
Set Button
p
. A flashing box will appear. Press the
⁄
Button
n
to scroll through the letters of the
alphabet first in upper case, then in lower case, then
the numerals 0 through 9, and then followed by the
symbols ! ‘ ( ) * + , - . / ; < = > ? [ ] and then a
blank space. Use the
¤
Button
n
to scroll in the
reverse order. Use the
‹
/
›
Buttons
o
to move
from one character to the previous or following char-
acter. You may create a name of up to 14 characters,
including spaces. Press the
Set Button
p
when
you have finished entering the name, and then press
the
¤
Button
n
to proceed to the next setting.
If your system includes any sources that are equipped
with Y/Pr/Pb component video outputs, the AVR 340
is able to switch them to send the proper signals to
your video display. Each of the two
Component
Video Inputs
‡°
may be assigned to a source for
added system flexibility. The
Component Video 1
Input
‡
may be assigned to any one of the DVD,
Tuner, CD or Tape inputs. The
Component Video 2
Input
°
may be assigned to any one of the Video 1
(VCR), Video 2 (Cable/Sat), Video 3 (TV) or 6/8-
Channel Direct inputs. If your system does not include
component video at this time, or if you do not need
* INPUT SETUP *
INPUT :DVD
NAME:
COMPONENT IN:COMP V 1
DIGITAL IN:COAXIAL 1
AUTO POLL :OFF
BACK TO MASTER MENU
AVR 340 OM 3/22/06 9:09 AM Page 22
Summary of Contents for AVR 340
Page 67: ......


