


10
REAR-PANEL CONNECTIONS
REAR-PANEL CONNECTIONS
REAR-PANEL CONNECTIONS
10
REAR-PANEL CONNECTIONS
i
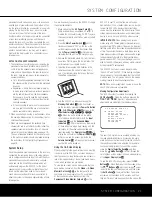
Video 1 S-Video Input:
If the product connected to
the
Video 1 Audio Inputs
a
has S-video capability,
connect this jack to the PLAY/OUT S-video jack on
that unit and then make certain that the
S-Video
Monitor Output
g
is connected as described above.
j
Digital Media Player (DMP) Connector:
With the AVR 340 turned off, connect the optional
Harman Kardon
to this connector. When the
Digital Media Player source is selected, you may view
iPod control and navigation messages on your video
display (if one is connected to one of the
Video
Monitor Outputs
g
Y
), and in the
Upper
and
Lower
Display Lines
PQ
.
You may navigate the iPod
and select tracks for playback using the
⁄
/
¤
/
‹
/
›
Buttons
no
, the
Set Button
p
and
Transport
Controls
`
on your AVR remote. See page 42 for
more information.
k
Video 1 S-Video Output:
If the product connected
to the
Video 1 Audio Outputs
Y
has S-video capa-
bility, connect this jack to the REC/IN S-video jack on
that unit.
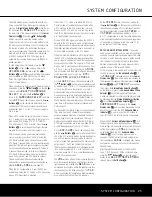
U
Video 2 S-Video Input:
If the product connected
to the
Video 2 Audio Inputs
c
has S-video capabil-
ity, connect this jack to the PLAY/OUT S-video jack
on that unit and then make certain that the
S-Video
Monitor Output
g
is connected as described above.
V
Video 2 S-Video Output:
If the product connected
to the
Video 2 Audio Outputs
d
has S-video capa-
bility, connect this jack to the REC/IN S-video jack on
that unit.
W
Video 3 S-Video Input:
If the product connected to
the
Video 3 Audio Inputs
e
has S-video capability,
connect this jack to the PLAY/OUT S-video jack on
that unit and then make certain that the
S-Video
Monitor Output
g
is connected as described above.
X
6/8-Channel Direct Inputs:
These jacks are
used for connection to source devices such as
DVD-Audio or SACD
™
players with discrete analog
outputs. Depending on the source device in use, all
eight jacks may be used, though in many cases only
connections to the front left/right, center, surround
left/right and LFE (subwoofer input) jacks will be used
for standard 5.1 audio signals.
Y
Video Monitor Output:
Connect this jack to the
composite video input of a TV monitor or video projec-
tor to view the on-screen menus and the output of a
standard video source.
NOTE:
Thanks to the AVR 340’s cross-conversion
capability, if your video display device is equipped with
component (Y/Pb/Pr) video inputs, you need only to
connect the
Component Video Monitor Outputs
fl
to your display device, and the AVR 340 will convert
all composite and S-video source signals to component
video. You will also be able to view the AVR 340’s on-
screen displays using the component video connec-
tion, unless the source device is high-definition (720p
or 1080i) video, in which case you should either
switch to a 480p source or connect the
Video
or the
S-Video Monitor Output
PY
to your video display
to view the on-screen displays.
Z
DVD Audio/Video Inputs:
Connect the composite
video and L/R analog audio outputs of a DVD player or
other video source to these jacks.
a
Video 1 Audio/Video Inputs:
Connect the com-
posite video and L/R analog audio PLAY/OUT jacks
of a VCR or other video source to these jacks.
b
Video 1 Audio/Video Outputs:
Connect the
composite video and L/R analog audio REC/IN jacks
of a VCR or other video recording device such as a
DVD recorder or PVR to these jacks.
c
Video 2 Audio/Video Inputs:
Connect the com-
posite video and L/R analog audio PLAY/OUT jacks
of a cable television box or other video source to
these jacks.
d
Video 2 Audio/Video Outputs:
Connect the
composite video and L/R analog audio REC/IN jacks
of a VCR or other video recording device such as a
DVD recorder or PVR to these jacks.
e
Video 3 Audio/Video Inputs:
Connect the com-
posite video and L/R analog audio PLAY/OUT jacks of
an HDTV tuner or other video source to these jacks.
f
Tape Inputs:
Connect these jacks to the
PLAY/OUT
jacks of an audio recorder.
g
Tape Outputs:
Connect these jacks to the
RECORD/INPUT
jacks of an audio recorder.
h
AM Antenna Terminals:
Connect the AM loop
antenna supplied with the receiver to these terminals.
If an external AM antenna is used, make connections
to the
AM
and
GND
terminals in accordance with
the instructions supplied with the antenna.
NOTE ON VIDEO CONNECTIONS:
When connecting
a video source product such as a VCR, DVD player,
satellite receiver, cable set-top box, personal video
recorder or video game to the AVR 340, you may
use either a composite or S-video connection, but
not both, for each source device.
The AVR 340 features cross-conversion capability,
enabling you to benefit from higher-quality viewing of
your video sources, even those that use composite or
S-video switching, when connected to your video dis-
play with component video inputs.
The
Bridge
TM
The
Bridge
TM
AVR 340 OM 3/22/06 9:09 AM Page 10
Summary of Contents for AVR 340
Page 67: ......


