


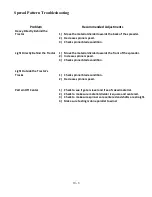


10 - 2
Spinner Assembly
Spinner speed is adjustable as outlined above, and is a major factor in a proper spread
pattern. The best spinner speed will depend on the material being spread, and only
obtainable by way of testing.
Material properties play an important role in properly adjusting the spinner speed for the
maximum spread pattern width. The particle size and distribution can greatly affect the
spread width. This can vary from 25 feet for very finely ground dry lime and up to 70
feet or more for extremely large pelletized fertilizer. For each material there is an
optimal spinner speed. In other words, there is a spinner speed that results in the best
spread pattern and width.
Setting the spinner speed above the optimal speed will not create a wider pattern;
instead it will result in a poor spread pattern. By setting the spinner speed to high, there
will be a heavy deposit of material directly behind the tractor as a result of the break-
down of material. The maximum spinner speed will be lower for finely ground material,
and can be much higher for coarser materials. Generally the optimal spinner speed will
be somewhere between 650 and 750 rpm for ordinary materials. Once the initial testing
is completed, testing should be repeated at the beginning of each spreading season,
anytime maintenance or adjustments are made to the spread assembly, and periodically
throughout the season as components can wear and change spreading characteristics.
NOTE: Spinner discs and blades must be kept clean and maintained to ensure a
proper spread pattern. A small build-up of material can have adverse effects on
the spread pattern. Rusted, rough, bent, or worn blades and discs will produce a
poor spread pattern.
Material Divider Assembly
As spinner speed is an important factor in a proper spread pattern, the position of the
material divider is equally as effective in acquiring an optimal spread pattern. The
position of the divider varies from one product to the next, and best determined by
testing. However, there are some guidelines listed below on divider setting.
When spreading ag lime, be sure to remove the rear section of the divider, and start with
the divider set on 1-1/2”.
For most fertilizers, begin with the divider at approximately 2-1/2”.
While spreading, if too much material is applied directly behind, move the divider
towards the back of the spreader. If there is more being applied outside of the tractor,
adjust the divider towards the front of the spreader.
Summary of Contents for PT-6 FSS
Page 1: ...Model PT 6 FSS Fertilizer and Lime Spreader SERIAL __________________ WORK ORDER ___________...
Page 2: ......
Page 8: ......
Page 12: ......
Page 13: ...Fertilizer and Lime Spreader Safety...
Page 17: ...S 4 PTO SAFETY DECAL...
Page 19: ...S 6 HYDRAULIC SYSTEM DECAL...
Page 20: ...S 7 ROTATING CHAIN WARNING ROTATING SPINNERS WARNING...
Page 21: ...PTO Shaft Adjustment And Maintenance...
Page 24: ......
Page 25: ...Section 1 Basic Information...
Page 26: ...1 1 6PT FSS...
Page 27: ...1 2...
Page 29: ...Section 2 PTO Drive Spinners...
Page 33: ...2 4...
Page 36: ...2 7 Hydraulic Cylinder Engagement Assembly...
Page 38: ......
Page 39: ...PTF 71 2 RZ PTO Drive Spinner Gear Case Assembly and Parts List...
Page 43: ...Section 3 Full Press Wheel Drive Assembly...
Page 44: ...3 1...
Page 47: ...3 4...
Page 48: ...3 5...
Page 49: ...3 6 Hydraulic Cylinder Engagement Assembly...
Page 51: ...PTF 71 2 RZ FP Full Press Wheel Drive Spinner Gear Case Assembly and Parts List...
Page 55: ...Section 4 Press Wheel for Plug to Tractor Hydraulic Spinners...
Page 58: ...4 3...
Page 61: ...4 6 Hydraulic Cylinder Engagement Assembly...
Page 63: ...Section 5 Hydraulic Spinners...
Page 64: ...5 1...
Page 67: ...5 4...
Page 68: ...5 5...
Page 74: ......
Page 75: ...Section 6 Flow Divider Assembly...
Page 76: ......
Page 77: ...5 4...
Page 79: ...Section 7 Rigid Axle Assembly...
Page 80: ...7 1 6 Bolt 7 000 per Pair Hub Assembly J I H G A F E C B D L K...
Page 82: ...7 3 8 Bolt 12 000 per Pair Hub Assembly J I H G A F E C B D L K...
Page 85: ...Section 8 Basic Set Up Operation...
Page 88: ...8 3...
Page 90: ......
Page 91: ...Section 9 Maintenance Troubleshooting...
Page 97: ...Section 10 Spread Pattern...
Page 101: ...10 4 Data Recording...
Page 102: ...10 5 Data Recording Unacceptable Pattern Acceptable Pattern...
Page 104: ...10 7 Acceptable Pattern Using a 3 Pass Switchback Driving Method...
Page 106: ...10 9 Notes...