121
HA<O>
XK-5
Owner’s Playing Guide
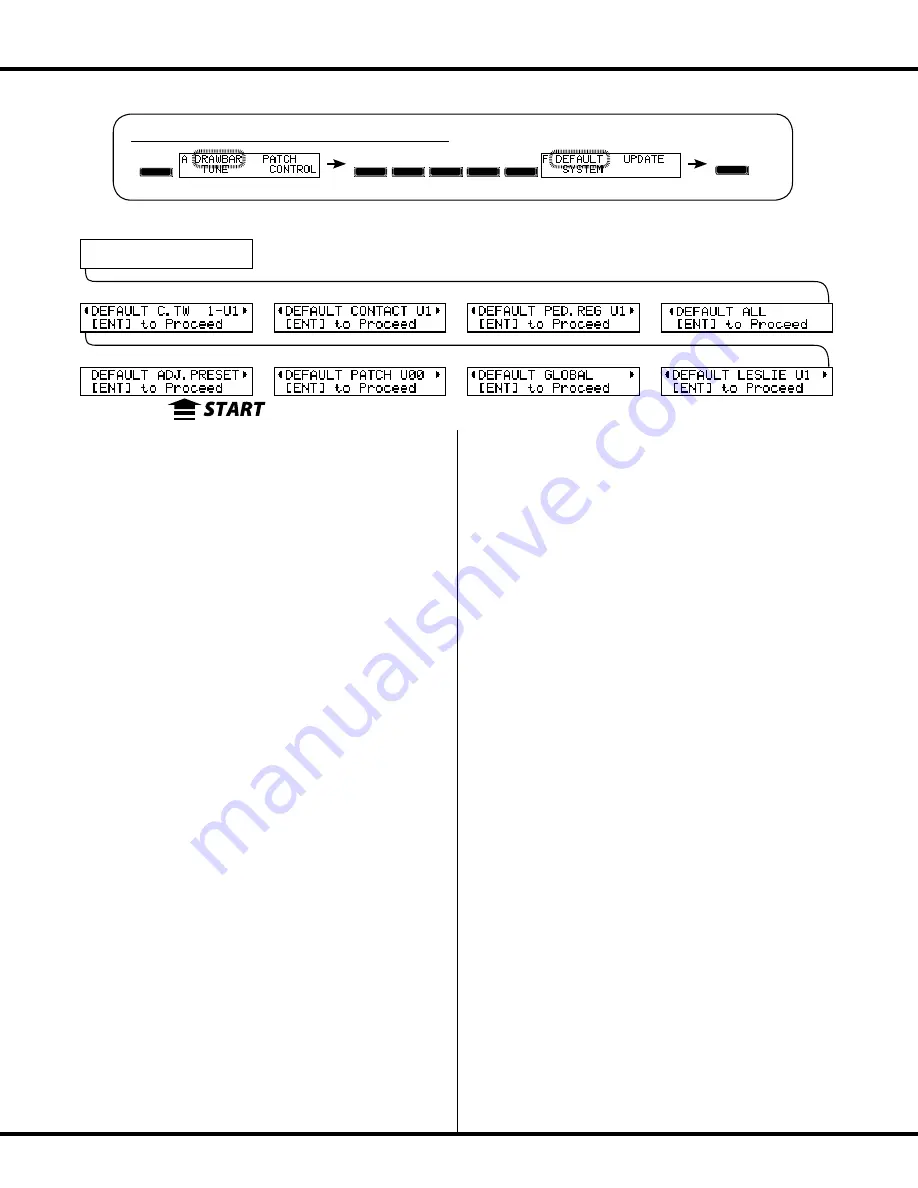
DEFAULT
This Edit Menu Menu allows you to reset the XK-5 to factory-default settings.
To initialize each parameter, select the parameter you want to ini-
tialize with the [
][
] Touch Buttons and press the [ENTER]
Touch Button.
❶
ADJUST PRESET
This allows you to initialize the contents of the “A#” and “B” Preset
Keys.
You can use this to create a “clean slate” for new Patch settings.
❷
PATCH
This allows you to initialize the contents of User Patches. Select the
Patch you want to initialize with the [VALUE] Rotary Knob. The
selecting range is U00 to U99 and ALL (All User Patches).
NOTE: This procedure will copy the contents of a Factory Patch
into the User Patch of the same number.
❸
GLOBAL
This allows you to initialize Global Parameters such as Master Tune
or Foot Switch assignment.
❹
CUSTOM LESLIE CABINETS
This allows you to initialize the contents of an internal Leslie Cabi-
net. Select the number you want to initialize with the [VALUE]
Rotary Knob. The selecting range is U1 to U8 and ALL (All User
Cabinets).
❺
CUSTOM TONE WHEELS
This allows you to initialize the contents of Custom Tone Wheels.
Select the number you want to initialize with the [VALUE] Rotary
Knob. The selecting range is shown as below and ALL (All Custom
Tone Wheels).
A-U1:
A-100, U1
A-U2:
A-100, U2
A-U3:
A-100, U3
B-U1:
B-3, U1
C-U2:
C-3, U1
M-U1:
Mellow, U1
❻
CUSTOM CONTACTS
This allows you to initialize the contents of all Custom Contacts.
Select the number you want to initialize with the [VALUE] Rotary
Knob. The selecting range is U1 to U3 and ALL (All User Con-
tacts).
❼
PEDAL REGISTRATION
This allows you to initialize the contents of all Pedal Sub Drawbars.
Select the number you want to initialize with the [VALUE] Rotary
Knob. The selecting range is U1 to U3 and ALL (All User Pedal
Sub Drawbars).
❾
ALL
This allows you to initialize all parameters of the XK-5.
If any unstable condition occurs on the XK-5 system, initializing
“all” will usually clear the problem.
NOTE: You can also initialize the entire instrument by doing the
following:
1. Press and Hold the [RECORD] Touch Button.
2. Turn the power to the instrument “ON.”
3. Release the [RECORD] Touch Button when the PLAY Mode
screen appears.
MENU/EXIT
ENTER
To locate this Menu, follow the steps below:
❺
❻
❼
❽
❶
❷
❸
❹
Summary of Contents for XK-5
Page 5: ...5 HA O XK 5 Owner s Playing Guide INTRODUCTION...
Page 17: ...17 HA O XK 5 Owner s Playing Guide MAKING THE CONNECTIONS...
Page 27: ...27 HA O XK 5 Owner s Playing Guide TURN ON PLAY...
Page 35: ...35 HA O XK 5 Owner s Playing Guide INFORMATION CENTER...
Page 45: ...45 HA O XK 5 Owner s Playing Guide DRAWBARS PERCUSSION...
Page 63: ...63 HA O XK 5 Owner s Playing Guide DRAWBAR EFFECTS...
Page 87: ...87 HA O XK 5 Owner s Playing Guide CUSTOM TONE WHEELS...
Page 95: ...95 HA O XK 5 Owner s Playing Guide VIRTUAL MULTI CONTACTS...
Page 101: ...101 HA O XK 5 Owner s Playing Guide PATCHES FAVORITES...
Page 113: ...113 HA O XK 5 Owner s Playing Guide SPECIAL ADVANCED FEATURES...
Page 123: ...123 HA O XK 5 Owner s Playing Guide MIDI USB...
Page 137: ...137 HA O XK 5 Owner s Playing Guide USING THE USB PORTS...
Page 151: ...151 HA O XK 5 Owner s Playing Guide FREQUENTLY ASKED QUESTIONS...
Page 153: ...153 HA O XK 5 Owner s Playing Guide APPENDIX...
Page 173: ...173 HA O XK 5 Owner s Playing Guide...
Page 174: ...FM2327 1116 V1 10...


