background image

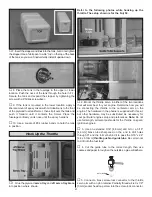
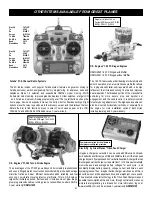
12. Use a fine-point felt-tip pen to mark a line behind the

strut brackets on both sides of the bottom wing 3/4" [19mm]
from the aileron hinge line. Fit the right strut to the wing
against the outside of the brackets. The aft end of the strut
should be contacting the line you marked. You’ll know you’ve
selected the right strut because the top and bottom will be
angled correctly to fit the top and bottom wings.

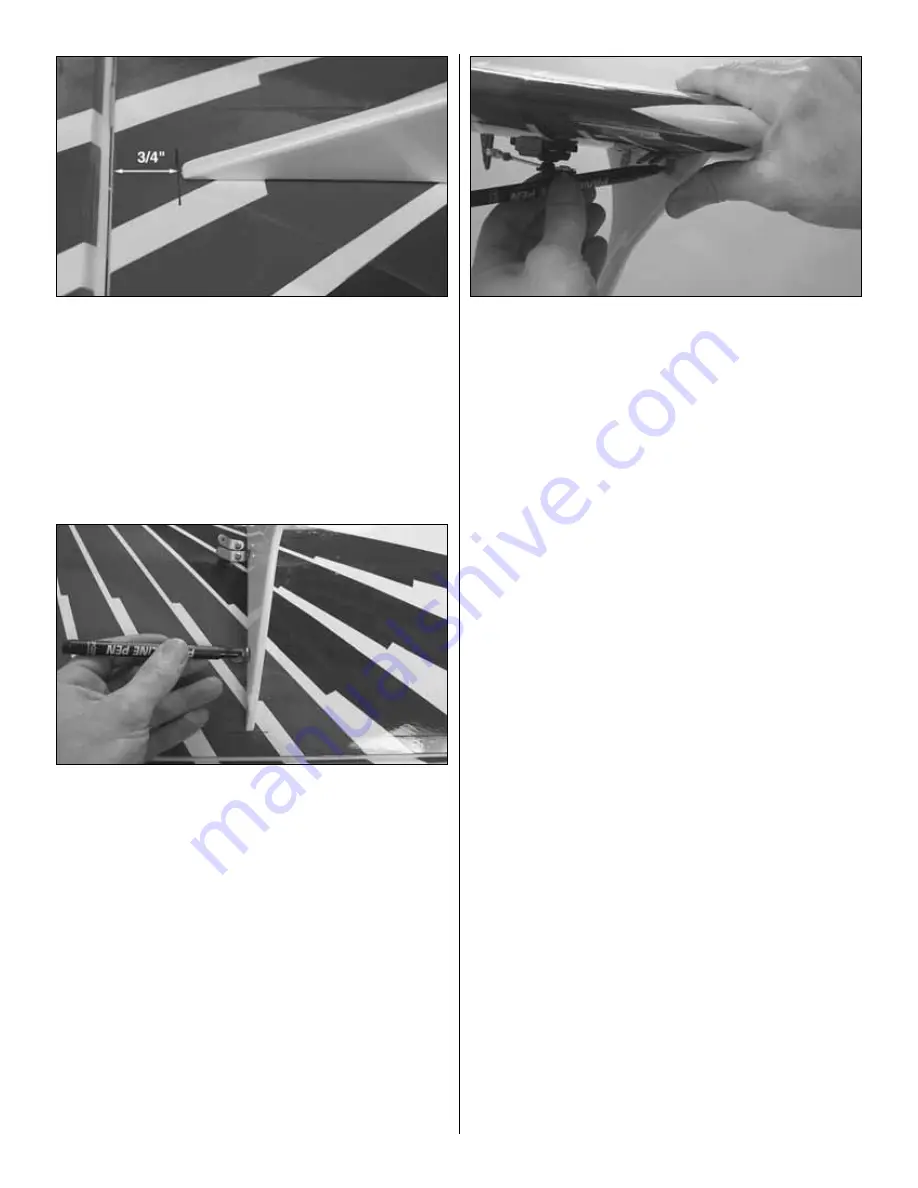
13. Mark the holes in the bottom strut brackets onto the strut.

14. Drill 1/8" [3.2mm] holes at the marks. Bolt the strut

into position with two 4-40 x 1/2" [13mm] socket head cap
screws, flat washers and lock nuts.

15. Mark and drill the holes in the top of the strut the

same way. Mount the strut to the top and bottom wing.

16. Mark and drill the bottom holes in the left strut, then

mount the strut.

17. Holding the top wing and left strut together, mark the

holes in the top brackets onto the strut. It’s okay if pressure
is required to hold them together. The struts will hold the
wings at the correct incidences.

18. Remove the left strut, drill the top holes, then mount

the strut to the top and bottom wings.

Now the wings are mounted! If you will be mounting the
optional flying wires, skip the following two steps, then
return and perform these steps after the wires have
been mounted.

19. If not mounting the optional flying wires, lift the model

at the recommended balance point on the tape lines previously
marked on the bottom of the top wing. The strongest part of the
top wing is where the center panels join the outer panels, so
this is a good place to lift. Be certain your fingertips are on the
middle lines, not on the forward or aft lines.

20. Observe whether the tail or nose drops, indicating a

tail-heavy or nose-heavy situation. This will give you an
indication of where to mount the receiver battery inside the
fuselage to reduce or eliminate any additional lead ballast
that would be required to balance the model. Make a mental
note (or write it down on a piece of paper) whether you will
be mounting the battery pack in front of, behind or directly
below the cockpit.

38

Summary of Contents for Christen Eagle II

Page 1: ...er assembled product the user accepts all resulting liability If the buyer is not prepared to accept the liability associated with the use of this product the buyer is advised to return this kit immediately in new and unused condition to the place of purchase READ THROUGH THIS MANUAL BEFORE STARTING CONSTRUCTION IT CONTAINS IMPORTANT WARNINGS AND INSTRUCTIONS CONCERNING THE ASSEMBLY AND USE OF THI...

Page 2: ...ARF Similar in size shape assembly and flying characteristics to the Great Planes Pitts Special ARF the Eagle provides the same aerobatic thrills and enjoyment as the Pitts In fact with the exception of a few cosmetic details such as the trim scheme cowl canopy wheel pants and the outline of the tail feathers the Great Planes Eagle has essentially the same airframe as the Pitts However a few struc...

Page 3: ...l has remained structurally sound Be sure to check clevises or other connectors often and replace them if they show any signs of wear or fatigue 7 If you are not already an experienced R C pilot you should fly the model only with the help of a competent experienced R C pilot 8 While this kit has been flight tested to exceed normal use if the plane will be used for extremely high stress flying such...

Page 4: ...a guide The recommended engine size range for the Eagle is specified on the cover of this manual All engines within the specified range will power the Eagle well At no time should an engine larger than the recommended range be flown on this model because it has not been tested for such use Powered by a two stroke glow engine such as the O S MAX 1 60 FX the Eagle is able to perform aerobatics and h...

Page 5: ...arbs can be soldered on Fuel line barbs are not necessary when medium silicone fuel tubing is used The Christen Eagle ARF comes with all the hardware necessary to add semi scale flying wires The wires are mounted near their scale locations but the flying wires on the full size Eagle are rigid and streamlined rather than the flexible cable used on this model The flying wires are for scale enhanceme...

Page 6: ... Denatured alcohol for epoxy clean up Naphtha lighter fuel or denatured alcohol to remove adhesive from masking tape Dave Brown Carbon Fibre Tape DAVR2000 for reinforcing wheel pants see page 24 2 oz 57g spray CA activator GPMR6035 CA debonder GPMR6039 Epoxy brushes 6 GPMR8060 Mixing sticks 50 GPMR8055 Switch Charge Jack Mounting Set GPMM1000 Hobbico Builder s Triangle Set HCAR0480 Curved tip cano...

Page 7: ...ten Eagle II ARF use the order numbers in the Replacement Parts List that follows Replacement parts are available only as listed Not all parts are available separately an aileron cannot be purchased separately but is only available with the wing kit Replacement parts are not available from Product Support but can be purchased from hobby shops or mail order Internet order firms Hardware items screw...

Page 8: ...3 4 19mm SHCS rudder elevator control horns 2 4 40 set screws for wheel collars for tail steering 1 2 56 ball link ball tail steering arm 4 6 32 x 1 4 6mm SHCS main landing gear wheel collars 1 4 40 x 1 8 3mm SHCS for screw lock 1 2 56 ball link ball carb end of throttle 6 4 40 x 5 8 16mm screw tail wire bracket mounting PUSHRODS 4 4 40 x 4 1 2 115mm pushrod ailerons 3 4 40 x 5 3 4 145mm pushrod e...

Page 9: ...f the iron shrink the covering If the wrinkles momentarily disappear then immediately reappear the iron may be too hot thus causing air bubbles Lower the temperature of the iron or use a sharp 11 blade to puncture several small holes in the covering then reheat The suggested iron temperature is around 360 degrees F Hint Any MonoKote pigment that gets smeared on other areas may be removed with a ti...

Page 10: ... for the CA to get full penetration all the way into the hinge slots a strip of covering must be removed from each slot This is done by first marking the ends of the hinge slots with small slits cut in the covering in the wing and aileron 4 Remove the aileron and take out the hinges Use a small metal ruler and a 11 blade to cut a small strip of covering from the hinge slots between the slits 5 Ins...

Page 11: ...pe the string for the servo wires to the top of the panels Do the bottom wing first 1 Round both ends of the 3 8 x 1 3 16 10 x 30mm hardwood wing dowels 2 Use a bar sander with coarse sandpaper to true the edges and remove any excess hardened epoxy from the forward and aft bottom wing joiners prepared earlier Without using any glue test join the bottom wings with the joiners and the dowels Make an...

Page 12: ...tly tape the wing together with several strips of masking tape on the top and bottom Use the small paper towel squares dampened with denatured alcohol to wipe away excess epoxy as the tape is applied Be certain the trailing edges of both wing halves accurately align After the wing is all taped together epoxy under any of the strips of masking tape can be wiped away by removing the strip wiping awa...

Page 13: ...ng in the bottom of the wing If necessary use a hobby knife to enlarge the opening to fit the servo 2 Connect a 12 300mm servo extension wire to the aileron servo Slip a 1 1 2 38mm piece of heat shrink tubing supplied with this kit over the connection then carefully shrink the tubing with a small flame from a soldering torch or a heat gun Tie the string in the servo opening to the end of the servo...

Page 14: ... hardens Important After the joint cools coat with oil to prevent rust Note Do not use the acid flux that comes with silver solder for electrical soldering This is what a properly soldered clevis looks like shiny solder with good flow no blobs flux removed 10 Slide a silicone retainer over the clevis then connect the aileron to the servo with the pushrod The clevis will be adjusted and the nut wil...

Page 15: ...nd the model and view the alignment of the stab and wing If the stab is not parallel with the wing place a small weight on the high side of the stab to bring it into alignment If weight is not enough remove the stab from the fuselage and lightly trim or sand the stab saddle as necessary until you can get the stab parallel with the wing 5 Once the stab and wing align center the trailing edge of the...

Page 16: ...w the iron to heat fully Use a straightedge to guide the soldering iron at a rate that will just melt the covering and not burn into the wood The hotter the soldering iron the faster it must travel to melt a fine cut 10 Peel the covering from the center of the stab Remove any ink with one of your paper towel squares dampened with denatured alcohol Re seal the ends of the covering to the stab where...

Page 17: ...of the fuselage to hold it down while mounting the engine or skip ahead to page 28 and perform steps 1 and 2 to mount the elevator and rudder servos The fuselage will be nose heavy and could nose over and fall off your building stand until the servos are installed A small zip lock sandwich bag half filled with shot is shown in the photo MOUNTING A GLOW ENGINE Follow these instructions if mounting ...

Page 18: ...mplete return to this page and finish mounting the engine in step 8 below 8 Mount the engine mount to the firewall horizontally but do not fully tighten the screws Mount the engine to the mount with four 8 32 x 1 25mm socket head cap screws 8 lock washers and 8 flat washers Center the mount vertically then tighten the screws MOUNTING A U S ENGINES 41CC ENGINE 1 Use a straightedge and a pen to exte...

Page 19: ...pe the pattern to the firewall aligning the lines on the pattern with the lines on the firewall Use a large T pin to mark the center of the engine mounting holes onto the firewall 3 Remove the pattern from the firewall Drill 1 16 1 6mm pilot holes at the marks Enlarge the holes with a 19 64 7 6mm drill 4 Use large wire cutters a metal file or a rotary tool with a cutoff wheel to trim two 1 4 20 bl...

Page 20: ... push the alignment pins rounded end first into the cowl ring and F 1 Approximately 1 8 of the pins should protrude through the front of the cowl ring this will improve the glue joint Use a few dabs of epoxy to glue the alignment pins into the cowl ring but not to the fuselage Allow the epoxy to harden before proceeding 5 Remove the cowl ring from the fuselage Trim off any epoxy that may have leak...

Page 21: ...in F 1 Pull the blind nut into the wood on the back of F 1 Unthread the rod then use a 4 40 x 1 2 13mm socket head cap screw and several washers to fully draw the blind nut all the way in Install the rest of the blind nuts the same way then mount the cowl ring with the screws Okay we ve got the cowl ring mounted to the fuselage and we know the cowl will align with the spinner so it s time to glue ...

Page 22: ...ed wrench but they are not accessible enough for installing the cowl without access holes which will be cut in the next step 16 Using a piece of leftover wire as an alignment cue use a pencil to mark the holes in the bottom of the cowl for the bottom mounting screws 17 Put on your safety glasses ear protection particle mask and a long sleeve shirt Use a rotary tool with a cutting bit like the one ...

Page 23: ...then hold it all together with silver solder 22 Now that the cowl is all fitted up use thin CA to permanently join the elevators to the stabilizer and the rudder to the fin with the hinges Use 30 minute epoxy 30 minute epoxy thinned with denatured alcohol or fuelproof paint to lightly coat the main landing gear cutout on the bottom of the fuselage and the exposed balsa areas of the landing gear co...

Page 24: ...y still may not hold up to a crash but they will survive the day to day rigors of bouncy landings and rough runways This could get messy so take precautions and wear a shop apron and rubber gloves The instructions show how to do one pant at a time but they could be done simultaneously A Thoroughly sand the inside of the wheel pants where the carbon fiber will go Cut an approximately 13 330mm long ...

Page 25: ...re it hardens 7 Glue the plywood wheel pant doubler to the wheel pant brace inside each pant The 3 16 4 8mm hole in the doubler must be centered over the 1 2 13mm hole in the pant the wheel axles cut to the correct length as shown on page 27 could be used to align the holes 1 Noting which direction is forward as shown in the sketch center the main landing gear on the landing gear plate on the bott...

Page 26: ...re to sand Perform the following four steps only if you will be mounting the optional flying wires on the wings 3 Use a fine point felt tip pen to mark the outline of the top of the landing gear fairings onto fuselage 4 Remove the fairings Position one of the B3 metal brackets on the fuselage so the bend in the bracket is even with the line and centered over the landing gear Holding the bracket in...

Page 27: ...nch and a 1 2 wrench to bolt the axles to the gear with 5 16 24 lock nuts Rotate the axles so the flat spots are facing downward 2 Take the fuselage off the building stand and place it on your workbench resting on its gear Slip the pants and wheels onto the axles In the following step the wheel pants should be positioned as shown on this finished model The wheel pants should be parallel with the g...

Page 28: ...d hooking up the pushrods Note To achieve perfect symmetry in both elevator linkages the elevator servos move in opposition For this reason a computer radio will be required to electronically mix the servos so one of them can be reversed Or if you do not have a computer radio an in line mixer such as the Futaba SR 10 servo reverser will be required 1 The same as was done for the aileron servos con...

Page 29: ...6 threaded ball to the arm with a 2 56 nut and a drop of thread locking compound 4 Position the tail gear mount on the bottom of the fuselage so the bend in the mount aligns with the aft end of the fuselage Using the holes in the mount as a guide drill 3 32 2 4mm holes through the bottom of the fuselage for the mounting screws Mount the tail gear to the fuselage with two 4 x 5 8 16mm screws Remove...

Page 30: ...stem will be used 4 If using fuel line barbs as recommended for gas engines replace the aluminum fuel tubes with 1 8 3 2mm brass tubing not included Cut the brass tubes to the correct length then solder the barbs onto one end of the tubes The long brass tube will be bent upward for the vent inside the tank 5 Assemble the rubber stopper with the metal plates screw and metal fuel tubes as shown in t...

Page 31: ...g photos while hooking up the throttle The setup shown is for the Fuji 50 2 Mount the throttle servo in either of the two locations that will work best for your engine Determine how you will be connecting the throttle to the carburetor arm on the engine The hardware in the photos is supplied with this kit but other hardware may be substituted as necessary for your particular engine setup and prefe...

Page 32: ... a 1 4 6 4mm and a 1 8 3 2mm hole were drilled through a basswood block not included to secure the fueling line and the vent A fuel line holder was made for the fueling line by drilling a 1 4 6 4mm hole through a basswood block not included and cutting a slot so the line can be press fit into the hole If using a gas engine be certain the lines cannot contact the engine or muffler most fuel tubing ...

Page 33: ...s to the wires Mount the connectors to the engine Be certain the wires will not contact the muffler Refer to this photo while finishing the cockpit 1 Optional Should you desire to enhance the scale appearance of the cockpit area an anti glare panel could be made by covering the fuselage inside the canopy with flat black MonoKote This can be done by cutting out the canopy as shown on page 34 then p...

Page 34: ...of the decal is covered with the paper backing Once the decal is in position rub your finger up and down the front sticking the 1 4 exposed area down Now peel one side of the backing off Rub your finger over it to stick it down then peel off the other side 6 Glue the pilot and rear instrument panel into position In addition to gluing in the pilot for the most security it should also be fastened me...

Page 35: ...sition the belly pan on the wing and bolt it down with the wing bolts There should be a small gap between both ends of the belly pan and the fuselage 7 Apply medium CA to the bottom of the wing where the front of the belly pan comes into contact Press the belly pan down holding it in position until the CA hardens Wipe away excess epoxy and do not disturb the wing until the epoxy has hardened 1 Mar...

Page 36: ...s to mount two each of the C3 and A3 metal brackets as shown Note that the shorter surface of the C3 brackets contacts the wing Also mount two B2 metal brackets for if installing flying wires Note that the shorter part of the B2 brackets contacts the wing 4 IMPORTANT Remove the screws harden the holes with a few drops of thin CA allow to harden then reinstall the brackets with the screws As you pr...

Page 37: ...n Remove the screws harden the holes with thin CA and then remount the cabanes 9 Use coarse sandpaper to smooth the molded in parting line from both ends of both fiberglass wing struts where they contact the top and bottom wings 10 Identify the top and bottom of the struts The bottom is the end with the short straight section as indicated by the arrow 11 Bolt the bottom wing to the fuselage Mount ...

Page 38: ...ld them together The struts will hold the wings at the correct incidences 18 Remove the left strut drill the top holes then mount the strut to the top and bottom wings Now the wings are mounted If you will be mounting the optional flying wires skip the following two steps then return and perform these steps after the wires have been mounted 19 If not mounting the optional flying wires lift the mod...

Page 39: ...ses on all the flying wires It isn t necessary to have the retainers installed during assembly and initial setup but make certain the retainers are installed when flying the model Otherwise some of the clevises may detach from the brackets Refer to the following photos while mounting the tail wires 2 Mount the bottom tail wire bracket to the tail gear mount using the screw that is already in the f...

Page 40: ...of the top tail wires Pull the brackets on one side of the stab up to the trailing and leading edge of the fin Mark the locations of the holes Cut the holes with the sharpened brass tube 9 Now there are six holes in the tail surfaces two in both sides of the stab and two in the fin Roughen the brass tube with coarse sandpaper so glue will adhere Use a rotary tool with a cutoff wheel to cut six 3 8...

Page 41: ...ation for the receiver is on the servo tray cushioned with R C foam using the supplied Velcro strips Depending upon whether the model was nose heavy or tail heavy during the initial C G test the battery could be mounted either on the servo tray or on the optional plywood battery tray in front of or behind the cockpit Should you decide to mount the battery pack behind the cockpit note the notches i...

Page 42: ...e tail drops the model is tail heavy and the battery pack and or receiver must be shifted forward or weight must be added to the nose to balance If the nose drops the model is nose heavy and the battery pack and or receiver must be shifted aft or weight must be added to the tail to balance Usually it is desirable to relocate the battery pack and receiver to minimize or eliminate any additional bal...

Page 43: ... each control surface as indicated in the chart NOTE The throws are measured at the widest part of the elevators rudder and ailerons Once the control throws have been set be certain to tighten all the 4 40 nuts against the clevises on the pushrods 1 With the wings level have an assistant help you lift the model by the engine propeller shaft and the bottom of the fuselage under the trailing edge of...

Page 44: ...rfaces are doing Repeat this test with the engine running at various speeds with an assistant holding the model using hand signals to show you what is happening If the control surfaces do not respond correctly do not fly Find and correct the problem first Look for loose servo connections or broken wires corroded wires on old servo connectors poor solder joints in your battery pack or a defective c...

Page 45: ... turn after takeoff away from the pit or spectator areas and I will not thereafter fly over pit or spectator areas unless beyond my control 4 I will operate my model using only radio control frequencies currently allowed by the Federal Communications Commission Definition For the purpose of the following IMAA Safety Code the term Giant Scale shall refer to radio controlled model aircraft either sc...

Page 46: ...ess than five 5 pounds overpowered per cubic inch of engine displacement Example Using a 3 cu in engine a model would likely be underpowered at an aircraft weight greater than 36 pounds With the same engine an aircraft weighing less than 15 pounds would likely be overpowered Servo arms and wheels should be rated heavy duty Glass filled servo arms and control horns are highly recommended Control su...

Page 47: ...del will roll straight down the runway If you need to regroup before the first takeoff shut the engine down and bring the model back into the pits Top off the fuel then check all fasteners and control linkages for peace of mind Remember to takeoff into the wind When ready point the model straight down the runway hold a bit of up elevator to keep the tail on the ground to maintain tail wheel steeri...

Page 48: ...in airspeed Once over the runway you can cut the throttle the rest of the way and the model will slow for the landing flare To initiate a landing approach lower the throttle while on the downwind leg Allow the nose of the model to pitch downward simultaneously losing altitude while maintaining airspeed Continue to lose altitude and keep the nose down as you turn onto the crosswind leg Make your fi...

Page 49: ...49 Fuji BT 50SA Engine Mounting Bolt Pattern 19 64 7 6mm Engine Bolt Holes Glow Engine Mounting Bolt Pattern ...

Page 50: ... in flight power The result A power plant that s superior to any other comparably sized gasoline engine in dependability and smooth operation FJIG0047 Top Flitefi Power Pointfi Propellers Top Flite Power Point Propellers give you a visible power boost no matter what your aircraft application may be Strict manufacturing quality controls and tight tolerances in design and tooling give Power Point pr...

Page 51: ...rom the engine for more installation options Both styles include glow plug and 2 year warranty Weight w o Muffler 32 6 oz Practical RPM Range 1 800 10 000 BHP RPM 3 7 9 000 O S Enginesfi FT 300 Twin 4 Stroke Engine The advantages of the FT 300 go well beyond its incredibly realistic looks and sound Ringed piston construction boosts durability while ball bearings minimize friction and wear Efficien...

Page 52: ..._____________ Where Purchased _________________________ Date Construction Started __________________ Date Construction Finished _________________ Finished Weight __________________________ Date of First Flight ________________________ FLIGHT LOG ...

Reviews: