background image

5-12

Chapter 5  Detailed Settings

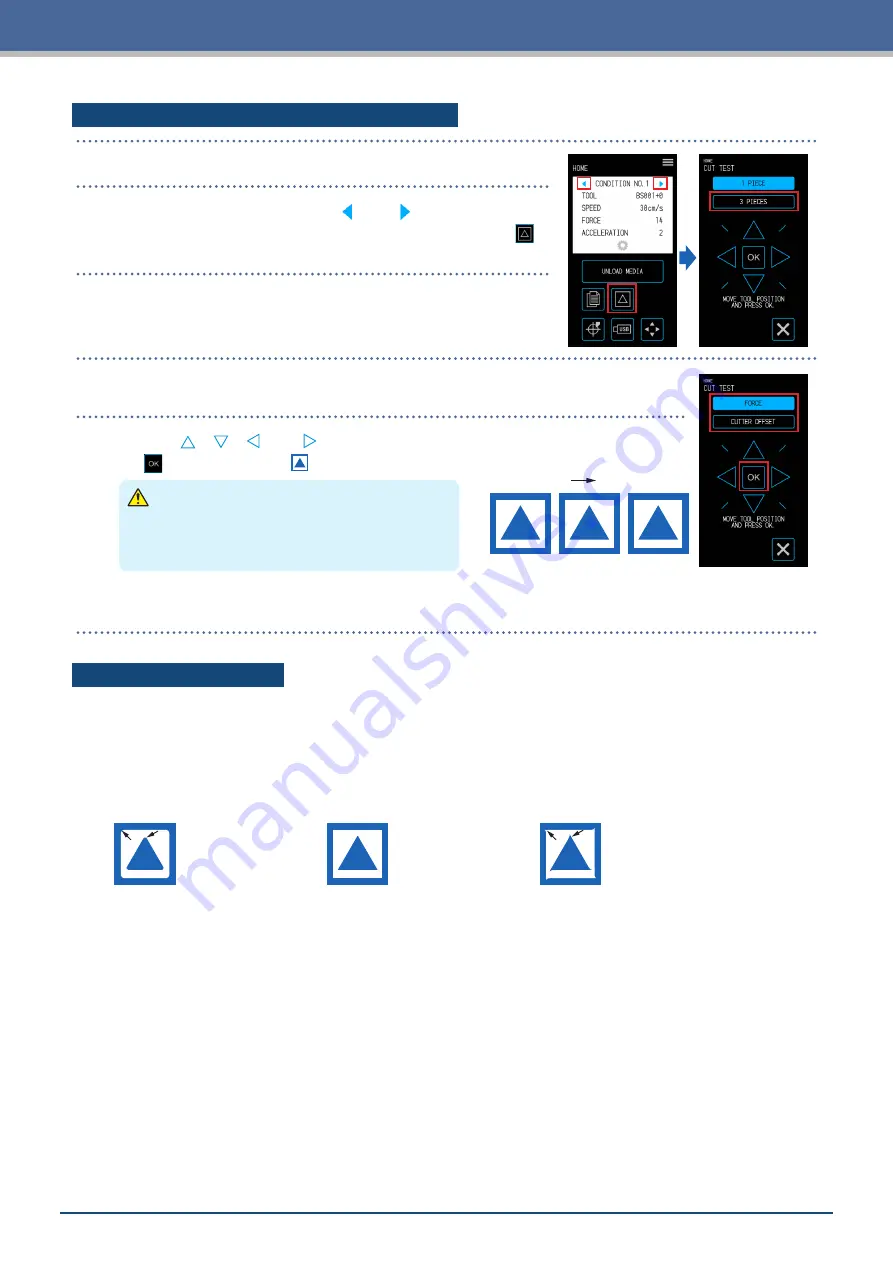
Cutting 3 Tests to include Setting Values ± 1

 1.

  Set the same media and tool as the actual cut.


 2.

  On the "HOME" screen, use the "

" and " " to select the 

CONDITION NO. to perform the cut test with and touch the 


(CUT TEST) to open the setting screen.

 3.

  Select the "3 PIECES" for the cut test.


 4.

  Select the item ("FORCE" or "CUTTER OFFSET") you wish to confirm.

 5.

  Use the " ", " ", "

" and " " to move the tool to the cut starting position and touch 

the 

 (OK) to cut three " 

 " marks.

–1

0

+1

Cutting Order

 CAUTION

When the "OK" is touched, the media and tool 

carriage will start moving. Be careful to avoid 

contact with your body or any object.

The cut test patterns will be created using setting values increased/decreased in the cutting order shown 

on the right.

Confirming the Cut Test

Confirm the results of the cut test and adjust various settings so that the settings are optimal. Repeat the 

process of performing cut tests and adjusting settings until settings for an excellent cut are established.

Adjusting the Offset Value

Confirm the corners of the triangle and square. If the corners are being cut excessively or not being cut 

properly, adjust the offset value.

The correction amount 

is insufficient. 

Increase the offset value.

The offset value is 

appropriate.

The correction is excessive. 

Lower the offset value.

Adjusting for Kiss Cuts

Peel off the triangle and make adjustments so that a light trace of the cut is left on the backing. 


If the backing has been cut all the way through, either the cutting force is too high or the blade depth is 

excessive. If there are parts where a trace of the cut is not left on the backing, either the cutting force is too low 

or the blade depth is insufficient.

Adjusting for Full Cuts

Make adjustments so that the media is cut all the way through. 


If the media is not cut all the way through, either the cutting force is too low or the blade depth is insufficient. 


Be sure to use the carrier sheet when creating full cuts.

Adjusting for Use of the Drawing Pen

Adjust the pen force so that the plot is not blurred. However, as increasing the pen force will shorten the life of 

the pen, lower the pen force yet only to a degree where the plot does not become blurred.

Summary of Contents for CELITE-50

Page 1: ...USER S MANUAL CE LITE 50 UM 151...

Page 2: ......

Page 3: ...rior written permission of Graphtec Corporation 2 The product specifications and other information in this manual are subject to change without notice 3 While every effort has been made to provide com...

Page 4: ...wer ON The tool carriage and media that is set may suddenly move during work immediately after work has ended and while configuring various settings Keep hands hair and clothes etc away from moving pa...

Page 5: ...out reading this section may lead to an unexpected accident or cause a fire Precautions when Using Curled Media An upward curl even when weak can cause the media to jam Either use media that is not cu...

Page 6: ...ng Area 1 7 1 6 Installing the Driver and Software 1 8 1 7 Connecting and Turning ON the Power 1 9 1 8 Connecting a Computer 1 10 1 9 Settings when Turning the Power ON for the First Time 1 11 Chapter...

Page 7: ...t 4 9 Loading Media onto the Carrier Sheet 4 10 Loading the Carrier Sheet 4 11 4 3 Plotting with the Drawing Pen 4 14 Setting the Drawing Pen in the Pen Adapter 4 14 Setting the Pen Adapter 4 15 4 4 C...

Page 8: ...Media Operation 5 20 Setting the Pre Feed Operation 5 20 Setting the Auto Pre Feed 5 21 Setting the Initial Feed 5 21 Setting the Media Width Detection 5 22 5 8 Setting Commands 5 24 Selecting the Co...

Page 9: ...ontents 6 4 Confirming the Main Unit Firmware Version 6 7 Appendix A 1 Standard Specifications A 2 A 2 Supply Items A 3 A 3 Appearance Drawing A 4 A 4 Menu Tree A 5 A 5 List of Initial Values A 9 INDE...

Page 10: ......

Page 11: ...er 1 1 Standard Accessories 1 2 Names and Functions of Each Component 1 3 Operation Panel 1 4 Installing the Main Unit 1 5 Media Size and Cutting Area 1 6 Installing the Driver and Software 1 7 Connec...

Page 12: ...ontact your store of purchase or our company s customer service Cutter Set Standard Blade PM BS 001 1 set Blade Tip Cap Jig 1 unit Cross Cutter PM CC 001 1 unit Software Activation Code 1 sheet SETUP...

Page 13: ...es the media to fix transport the media Adjust this roller according to the type and size of the media Push roller positioning guide Sets the push rollers at the position of the indicated marking Tool...

Page 14: ...transition to the position key screen Other Buttons Page button Used to transition to the next page on the same tier level Exit button Used to exit the current screen When touched before the Confirm i...

Page 15: ...n a few seconds Other Displays and Operations Instruction Screen If the power is turned ON while in a state where the media set levers are released the message SET THE MEDIA SETTING LEVER will appear...

Page 16: ...s in front of or behind the main unit that will interfere with transportation of the media Installation Space when Using Carrier Sheets 296mm 934mm 834mm 311mm 50mm 100mm When using the roll media sto...

Page 17: ...r ISO A JIS A JIS B ISO B Inch Non Standard 210 0mm A4 1 215 9mm 8 5inch 220 0mm OK 250 0mm B4 257 0mm B4 279 4mm 11inch 297 0mm A3 304 8mm 12inch 2 320 0mm OK 329 0mm A3 353 0mm B3 364 0mm B3 381 0mm...

Page 18: ...e website URL http www graphtec co jp en imaging celite support html The device driver for Mac does not need install CAUTION Do not connect this device and the computer with a USB cable before install...

Page 19: ...oltage 3 2 AC Adapter AC Cable 1 3 2 Press the power switch to turn ON the power Confirm that the touch panel has started up When turning ON the power wait at least 20 seconds to turn on the power aft...

Page 20: ...omputer by using the supplied USB Cable For Windows Connect the USB cable after the device driver was installed to the PC 1 Turn OFF the power Touch the touch panel and confirm that the screen does no...

Page 21: ...n When the power of this device is turned ON for the first time the startup screen will be followed by a language selection screens Select the language used and then touch the Confirm Selection of Uni...

Page 22: ......

Page 23: ...ems explained in this chapter 2 1 Setting the Tool 2 2 Setting the Media Set Levers 2 3 Setting the Push Rollers 2 4 Loading Sheet Media 2 5 Confirming the CONDITION NO Cutting Condition 2 6 Precautio...

Page 24: ...a maximum of approximately 1 mm CAUTION Do not turn the cap clockwise towards 10 from the state where the blade tip is not protruding at 0 Similarly do not turn the cap further counter clockwise towar...

Page 25: ...th the cutter blade when setting the tool 1 Pull the locking lever to open the lock Locking Lever Locking indicator Lock Unlock 2 Insert the cutter pen to the tool holder while holding it Locking Leve...

Page 26: ...ock position to hold the media with the left side push roller Release Lock Setting the Media Set Lever Right There are three lock positions for the media set lever right The lock position depends on t...

Page 27: ...tool carriage from both sides Holding this at a different position or forcefully moving it may cause damage The tool carriage that has been moved will return to its home position when the power is tu...

Page 28: ...media is lifted up When the media is load flat move them to the right push roller Move the Media holding rollers movable after raising the Media set levers Limp or too much thin media cannot be cut Fo...

Page 29: ...e Edge of Sheet Media Push Roller Sheet Media 6 Align the left edge of the sheet media with the I marking of the mark on the front guide Sheet Media Carrier Sheet Marking Sheet Media Front Guide 7 The...

Page 30: ...when the media cannot be scanned Sheet Media Cutting Mat Push Roller Edge of Sheet Media Set to be parallel Front Guide Sheet Media Push Roller Edge of Sheet Media Cutting Mat Push Roller 4 Align the...

Page 31: ...2 9 Chapter 2 Basic Operations Unloading Sheet Media 1 Confirm that the cutting operation has stopped 2 Touch the UNLOAD MEDIA and the media will be unloaded from the front of the device...

Page 32: ...ered and confirm the setting details That which is displayed in the currently selected CONDITION NO and cutting condition Select the CONDITION NO to use with the and on the HOME screen and confirm the...

Page 33: ...f cutting data exists The cutting origin 0 0 will be the vertex of the effective cutting area The point approximately 5 mm inward from the front edge and approximately 10 mm from the left edge Cutting...

Page 34: ...ge 5 mm Left Right 10 mm Rear Edge 30 mm X Y 10mm 10mm 5mm 30mm Cutting Area Media Transport Direction Front Edge 5 mm Left Right 5 mm Rear Edge 30 mm X Y 5mm 5mm 5mm 30mm Cutting Area Media Transport...

Page 35: ...e of the environments listed below For more details refer to the manuals respective to each software Dedicated software Graphtec Pro Studio Plus optional Dedicated software Graphtec Pro Studio Dedicat...

Page 36: ...re to remove the tool from the tool holder when storing the device Prevent dust from accumulating by covering the main unit with a cover cloth cover Refrain from storing the device in a location expos...

Page 37: ...ia along printed data is explained in this chapter along with registration marks 3 1 What is Printing Cutting 3 2 Simple Printing Cutting 3 3 Registration Mark Scanned Printing Cutting 3 4 Types and A...

Page 38: ...with media on which registration marks cannot be printed However as the edge of the media needs to be scanned there are conditions such as the media having to be a standardized size and the cutting l...

Page 39: ...aged can cause erroneous scans This method cannot be used with roll media For available media setting on the software you must configure the standard paper size the same as that of your configured plo...

Page 40: ...tion to the input screen Input the values for the offset value in the X Y directions and the distance adjustment volumes in the X Y directions How to Input Numbers Offset Volume Input the displacement...

Page 41: ...Registration Marks 2 On the HOME screen select the CONDITION NO to use by using the and and set the tool 3 Load the printed media on which registration marks have been drawn 4 Touch the Position to op...

Page 42: ...or Type 2 Create the registration marks as plot data using the dedicated application software Registration marks unique to the application software cannot be used Line thickness of registration marks...

Page 43: ...e media so that it is free of dirt and dust etc Dirt or dust may be mistaken for a registration mark Create the registration marks using a contrast that is easy to scan such as black on white media Ad...

Page 44: ...may be difficult to scan registration marks depending on the state of the media being used Transparent media Media with blurry printed registration marks Bent media Media with a dirty surface Media ha...

Page 45: ...gle As the printing position may vary depending on the printer used to print the design it is recommended that a few extra millimeters be allowed for the margin 2 Select the rectangle and then select...

Page 46: ...r the outline Cutting Data Media Transport DirectionX Y Registration Mark Type 1 Registration Mark Type 2 3 On the Design Central screen click the Cutting data will be created over the design 3 Printi...

Page 47: ...n the Cut Contour screen is displayed for the first time the Add Device screen will be displayed Follow the on screen instructions to select CE LITE 50 for the model name and Graphtec USB for the conn...

Page 48: ...e when using Illustrator access the File menu and select Cutting Master4 Registration Marks When using CorelDRAW go to the tool bar and select Launch Registration Marks CM4 When using a version of Cor...

Page 49: ...rs 3 Printing the created data 1 Print the created data Before printing the data set the layer containing the cutting data to be hidden CAUTION Be careful to observe the following items as doing other...

Page 50: ...ontaining the printing data to be hidden 3 The Cut Plot screen will launch In order to match the orientation in which the media has been loaded set ROTATE to When the Cut Plot screen is displayed for...

Page 51: ...he design it is recommended that a few extra millimeters be allowed for the margin 2 Specify the registration mark pattern length line thickness and arrangement positions Media Transport Direction X Y...

Page 52: ...Direction X Y Registration Mark Type 1 Registration Mark Type 2 1 Load the printed media onto CE LITE 50 Refer to 2 4 Loading Sheet Media 2 Open the Configure Cut Job panel From Apply Conditions selec...

Page 53: ...tting Roll Media 4 2 Cutting using the Carrier Sheet 4 3 Plotting with the Drawing Pen 4 4 Cutting from a USB Memory 4 5 Cutting Multiple Media using the Same Data Copy Function 4 6 Cutting upon Speci...

Page 54: ...edia holding rollers movable after raising the Media set levers Limp or too much thin media cannot be cut For more information on the media width detection refer to 5 7 Setting the Media Width Detecti...

Page 55: ...to move the roller and fasten the knob to fix the roller in place Place the roll media on top of the rollers so that the media can be pulled out from the top Roll Media Roller Roller Knob Roller Rolle...

Page 56: ...the Push Rollers When loading the roll media up against the push rollers the detection method will be ROLL START EDGE 1 Raise the media set levers on both sides and release the push rollers 2 Set the...

Page 57: ...e parallel Front Guide Leading Edge of Roll Media Push Roller Roll Media 7 Align the left edge of the roll media with the I marking of the mark on the front guide Roll Media Marking Roll Media Front G...

Page 58: ...ll media under the push roller positioning guide and load it so that it is parallel with the front guide If the roll media is inserted too far there may be cases when the media cannot be scanned When...

Page 59: ...E the width and the leading edge of the roll media will be scanned and the roll media will be loaded When Scanning the Roll Media at the Loaded Position By touching the ROLL CURRENT POSITION only the...

Page 60: ...precision for up to 100 cm when using media and setting conditions specified by Graphtec When loading media to cut a long item load the media so that the tension is even at both sides in the direction...

Page 61: ...ower the adhesion of the carrier sheet and may void the carrier sheet of use When removing media from the carrier sheet after it has been cut be sure to remove the media slowly and carefully As the ad...

Page 62: ...hat the media is not excessively curled Using stiff media that is curled can cause problems such as registration mark scanning errors and the media itself getting caught on something 1 Peel the separa...

Page 63: ...the media set levers and release the push rollers 2 Set the push roller on the left side at the position of the mark Set the push roller on the right side according to the width of the carrier sheet...

Page 64: ...et Media Carrier Sheet Marking Carrier Sheet Front Guide 7 The device pulls the carrier sheet in to set If an error is displayed operate the device by following the on screen instructions CAUTION When...

Page 65: ...nnot be scanned Carrier Sheet Push Roller Cutting Mat Push Roller Leading Edge of Carrier Sheet Set to be parallel Guide Carrier Sheet Leading Edge of Carrier Sheet Cutting Mat Push Roller 4 Align the...

Page 66: ...dy of the pen adapter Use the screw appropriate for the thickness of the drawing pen being used S light gray 8 9mm M dark gray 9 10 2mm L black 10 2 11 3mm 1 Insert the drawing pen into the pen adapte...

Page 67: ...pter to the tool holder while holding it Locking Lever 3 Push the locking lever until it clicks to hold the cutter pen Confirm the locking indicator became the white Locking Lever Lock Unlock Click Lo...

Page 68: ...Chapter 4 Convenient Functions 6 Touch the selection box for TOOL 7 Select PEN and touch the Confirm 8 Configure various settings for the PEN 9 Load the media and send the cutting data from the compu...

Page 69: ...h will be scrolled to be displayed Folders are indicated by a folder icon displayed at the beginning of the name The folders and files are listed in order of their names in the ascending order A maxim...

Page 70: ...cutting data xpf within the USB memory is detected to perform the cut 1 Insert a USB memory on which cutting data is saved into the device USB Memory 2 Load the tool and the media on which a barcode...

Page 71: ...rigin In order to eliminate wasteful margins create cutting data to be as close as possible to the origin The data of layout registration marks cannot be copied Copying Multiple Cuts on a Single Media...

Page 72: ...the SPACING FOR COPIES 8 Use the and to select the spacing for copies and confirm the selection with the Confirm 9 When the Execute is touched the device will start cutting CAUTION When the Execute is...

Page 73: ...ear 1 Perform the cut once with the data to copy The cutting data will be retained in the buffer memory 2 On the HOME screen touch the COPY 3 Touch the ON in MEDIA CHANGE MODE and touch the NUMBER OF...

Page 74: ...ing origin The cutting origin can be set at any position Once you are done with the setting touch the Exit to return to the HOME screen X Y Original Origin New Origin 1 Touch the Position to open the...

Page 75: ...nt normal transport with certain types of media Send cutting data after setting the margin The cutting data in the buffer memory will be erased when the margin is changed Once you are done with the se...

Page 76: ...cut while it is in progress touch the Stop 2 As the operation method accompanying confirmation of whether to exit the operation will appear make a selection according to the situation CHANGE SETTING b...

Page 77: ...carriage can be withdrawn to the home point Withdrawing the tool carriage after a cut has been completed will make it easier to confirm the results of the cut The media moves Home Point Tool Carriage...

Page 78: ......

Page 79: ...in this chapter 5 1 Individually Registering Settings for Cutting Conditions 5 2 Adjusting the Cutting Quality 5 3 Adjusting the Cutting Time 5 4 Cutting Thick Media 5 5 Performing Cut Tests 5 6 Regi...

Page 80: ...t the acceleration TANGENTIAL MODE Used when cutting thick media OVERCUT START Used to prevent uncut corners OVERCUT END Used to prevent uncut corners DISTANCE ADJUST Corrects the displacement by the...

Page 81: ...f Blade Tip The offset value is the positional error between the center of the cutter pen body and the center of the blade tip Adjust this value if the corners of a cut are being cut excessively or no...

Page 82: ...rce Set the cutting force for initial control offset force that is performed during initial operations in order to confirm the orientation of the blade tip If the offset force is too weak the orientat...

Page 83: ...edia being used The value for distance adjustment is input as a percentage for the amount of displacement for the length of the line For example if 0 1 is set as the correction value the length of a l...

Page 84: ...scratch the cut OUTSIDE The blade tip orientation initialization will be performed at a position that is outside of the cutting area 2mm BELOW The blade tip orientation initialization will be performe...

Page 85: ...3 4 5 6 7 8 9 10 15 20 25 30 35 40 45 50 1 Touch the CONDITION on the HOME screen to open the CONDITION NO setting screen 2 Select the CONDITION NO to set by using the and and touch the SPEED 3 Use th...

Page 86: ...during cutting The AUTO setting will apply the same speed as the cutting speed when the tool is lowered Configurable values AUTO 10 20 30 40 50 cm s 1 From the MENU screen open the TOOL 1 2 screen 2...

Page 87: ...the blade to rotate in the direction in which the tool is traveling With the tangential mode the tool is lifted upon creating an excessive cut at each corner up to the overcut ending point The tool is...

Page 88: ...lines Configurable range 0 0 0 9 mm 1 Touch the CONDITION on the HOME screen to open the CONDITION NO setting screen 2 Select the CONDITION NO to set by using the and and touch the OVERCUT START 3 Use...

Page 89: ...y displayed CONDITION NO as well as a cutting force or cutter offset value that is one less than or higher than the setting values Cutting 1 Test with the Setting Values 1 Set the same media and tool...

Page 90: ...the Offset Value Confirm the corners of the triangle and square If the corners are being cut excessively or not being cut properly adjust the offset value The correction amount is insufficient Increa...

Page 91: ...ng the scan mode Also set the registration mark adjustment values as necessary The registration mark adjustment values can be set using and When using MODE 1 decide the setting based on the darkness o...

Page 92: ...dia Transport Direction 5 Use the and to move the tool carriage to the scan starting position any position in the top left corner and touch the OK 6 The tool carriage will move and automatically detec...

Page 93: ...ansport Direction 5 Select the type of registration marks to scan use the and to move the tool carriage to the scan starting position the position of the red circle in the image to the right and touch...

Page 94: ...nd the tool that are actually going to be used Once you are done with the setting touch the Exit to return to the HOME screen Scanning the Printed Registration Mark for Correction and Entering the Cor...

Page 95: ...h the Confirm 9 Similarly input ADJUST Y Adjusting after Cutting the Test Pattern Registration Mark for Correction Plot a registration mark for adjustment of the registration mark position and make th...

Page 96: ...djustment Value Y Distance Adjustment Value X Registration Mark for Correction Registration Mark for Comparison X Y Media Transport Direction 9 Measure by how much the registration mark for comparison...

Page 97: ...n of the tool is far away from the registration mark scan starting area the search may take time or the process may even end in an error due to not being able to find the registration marks The above...

Page 98: ...he media When feeding long media breaking in the media to the environment removes expanded or contracted areas and enables the media to be fed in a stable manner Setting values 10 300 cm 1 From the ME...

Page 99: ...ED When ON is selected it will be possible to input a value in the FEED LENGTH 3 Touch the FEED LENGTH 4 Input the distance by which to feed the media and confirm the input with the Confirm Setting th...

Page 100: ...to the MEDIA 3 3 screen 2 Select ON or OFF for WIDTH DETECTION When ON is selected When OFF is selected 3 Depending on the setting the display on the LOAD MEDIA screen on the HOME screen will change W...

Page 101: ...5 23 Chapter 5 Detailed Settings 3 Select ON or OFF for WIDTH DETECTION...

Page 102: ...he Exit to return to the HOME screen Selecting the Command Select the command to use 1 From the MENU screen open the INTERFACE 1 3 screen 2 Select the command to use Setting the HP GL Origin Point Thi...

Page 103: ...etting values do not match the size of the cutting may become irregular Match this with the setting value of the software being used This item is available only when using the GP GL command 1 From the...

Page 104: ...box for LANGUAGE SELECTION 3 Select the language to use and confirm the selection with the Confirm Selection of Unit for Lengths Set the unit for lengths that will be displayed in the operation panel...

Page 105: ...trouble with the device This chapter also explains how to confirm the settings of the device and cutting data as well as how to plot the test pattern 6 1 Responding to Trouble 6 2 Confirming Error Mes...

Page 106: ...ed to the intense light If direct sunlight is coming in from a nearby window block the light If a fluorescent lamp stand is located nearby move this away from the device The transparent media has been...

Page 107: ...he data Confirm the size and cutting area of the media Confirm the settings for the scale Confirm the settings for the size of steps HP GL Command Errors When an HP GL command error is displayed the c...

Page 108: ...The end of the media was scanned while scanning the registration marks Confirm the media Review the positions where the registration marks are printed E04009 to E04017 The search range was exceeded w...

Page 109: ...When the Execute is touched the media and tool carriage will start moving Be careful to avoid contact with your body or any object Plotting the Test Pattern Plot the test pattern a shape named CUTTIN...

Page 110: ...is Test The operating status of the device can be checked by following instructions on the screen to operate each of the sensors and switches 1 From the MENU screen open the TEST screen 2 Touch the DI...

Page 111: ...6 7 Chapter 6 Troubleshooting 6 4 Confirming the Main Unit Firmware Version The version of the system within the device can be confirmed The version no is displayed in the ADVANCE 3 3 screen...

Page 112: ......

Page 113: ...Appendix The specifications etc of the device are explained in this chapter A 1 Standard Specifications A 2 Supply Items A 3 Appearance Drawing A 4 Menu Tree A 5 List of Initial Values...

Page 114: ...Media Tilt Correction Offline Output and Barcode Management Functions Power Supply Rating 100 240 VAC dedicated adapter output 24 VDC 2A Power Consumption 32 W or less Usage Environment 10 to 35 C 35...

Page 115: ...ix A 2 Supply Items Product Name Model No Cutter Set Standard Blade PM BS 001 Cutter Set Thick Blade PM BS 002 Carrier Sheet 13 inch PM CM 003 Pen Adapter PM BH 001 Cutting Mat PM CR 001 Cross Cutter...

Page 116: ...A 4 Appendix A 3 Appearance Drawing 164 784 227 173 400 Units mm Dimension error 5 mm...

Page 117: ...A 5 Appendix A 4 Menu Tree TOOL SPEED ACCELERATION TANGENTIAL MODE OVERCUT START OVERCUT END DISTANCE ADJUST HOME MENU MENU page To Next Page LOAD MEDIA Load the Media FORCE...

Page 118: ...A 6 Appendix 3 PIECES Previous Page HOME SELECT FILE...

Page 119: ...A 7 Appendix TOOL ARMS MODE 1 MODE 2 MODE 3 CHECK MARK SCAN SENSOR OFFSET ADJ Next Page MENU...

Page 120: ...A 8 Appendix INTERFACE ADVANCE TEST Previous Page AREA MEDIA MENU...

Page 121: ...X 0 Y 0 AUTO MARK SCAN ON AREA MARGIN NORMAL MEDIA AXIS ADJUST OFF MEDIA AXIS ADJUST OFFSET X 0 0 mm MEDIA AXIS ADJUST OFFSET Y 0 0 mm MEDIA AXIS ADJUST DISTANCE ADJUST X 0 00 MEDIA AXIS ADJUST DISTAN...

Page 122: ...ED ACCELERATION FORCE 30 2 12 From TANGENTIAL MODE to DISTANCE Same as CONDITION NO 1 CONDITION NO 4 TOOL TOOL OFFSET PM BS 001 0 SPEED ACCELERATION FORCE 20 1 17 From TANGENTIAL MODE to DISTANCE Same...

Page 123: ...tion Marks 5 15 Connecting a Computer 1 10 Connecting and Turning ON the Power 1 9 Copy button 1 4 Copy Function 4 19 Correcting the Registration Mark Position 5 16 Cross Cutter 1 2 A 3 Cutter groove...

Page 124: ...g to Trouble 6 2 Roll media stocker 1 3 Roll Media Stocker 1 2 S Selecting the Command 5 24 Selecting the Tool 5 3 Selection of Unit for Lengths 5 26 Sending Cutting Data 2 13 Setting Automatic Regist...

Page 125: ...E SAFE AND CORRECT USE 1 2 Tool carriage 1 3 Tool holder 1 3 Turning the Power ON for the First Time 1 11 U Unit for Lengths 1 11 Unloading Sheet Media 2 9 Unload Media button 1 4 USB button 1 4 USB C...

Page 126: ...Specifications are subject to change without notice CE LITE 50 User s Manual CE LITE 50 UM 151 January 22 2018 1st edition GRAPHTEC CORPORATION...

Page 127: ......

Page 128: ......

Reviews: