Differential
Differential
Differential Pressure
Pressure
Pressure and
and
and the
the
the Mix
Mix
Mix Pressure
Pressure
Pressure Tolerance
Tolerance
Tolerance Set
Set
Set Point
Point
Point
A primary means of maintaining ratio assurance for
the ProMix PD2K system is through monitoring of
the differential pressure between the A-pump and
B-pump outlets. Ideally, these two pressures would
be identical, but factors such as line sizing, viscosity,
and mix ratio lead to some variation. Understanding
where your system typically operates is imperative
when setting up an effective differential pressure
check that notifies the user of potential mix ratio
inaccuracies while avoiding nuisance alarms.
It is recommended that, once the system is fully
installed and ready to use, the user load a recipe and
then spray the mixed material. While spraying, note
the outlet pressures of both the A and B pumps (per
the ADM’s main screen or the PLC) and spray long
enough to ensure the pressures have stabilized to
a nominal value. The difference between the outlet
pressures of the A and B pumps is an established
baseline for the Mix Pressure Tolerance set point.
The Mix Pressure Tolerance set point allows the
B-side pump outlet pressure to vary a specified
percentage away from the A-side pump outlet (spray)
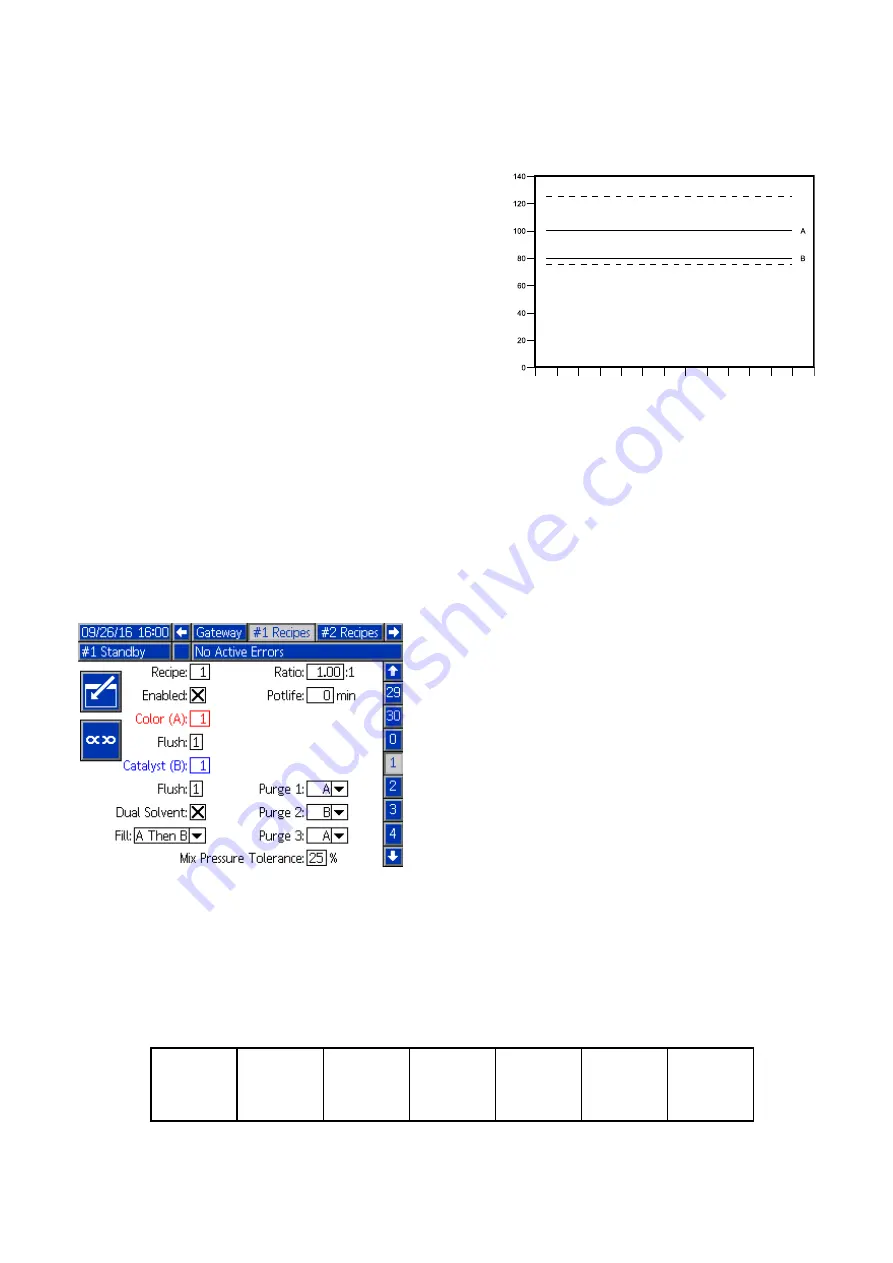
pressure. For example: In the following figure, if the
spray pressure (A-side pump outlet pressure) is 100
psi, and the Mix Pressure Tolerance is set to 25%,
the B-side outlet pressure is allowed to float between
75 and 125 psi (100 psi ± 25%) without generating
an alarm.
0
20
40
60
80
B
100
A
120
140
Figure 49 The acceptable B-side pump outlet
pressure range for a system with a target spray
pressure (A) of 100 psi and a Mix Pressure Tolerance
of 25%.
It is recommended that you keep the Mix Pressure
Tolerance set point as low as possible to alert the
user of anything affecting the mix ratio accuracy.
However, if your system is generating several
differential pressure alarms, or will be mixing a wide
variety of materials at different mix ratios, you may
need to increase the Mix Pressure Tolerance.
Dual
Dual
Dual Solvent
Solvent
Solvent
Figure 50 Dual Solvent Recipe Screen
If Mix-at-Wall is enabled on System Screen 3, Dual
Solvent becomes an option on the Recipe screen.
Selecting ‘Dual Solvent’ enables the sequencing of
flushing mixed material for a system using two types
of solvent (i.e., water and solvent based) that should
not be mixed together.
Purge
Purge
Purge 1,
1,
1, 2,
2,
2, and
and
and 3
3
3
Select the sequence for purging the mixed material
from the mix hose and spray device. Each stage
of the sequence can be set to either ‘A’ or ‘B’.
The solvent corresponding to each material will be
dispensed out the spray device for the Gun Purge
Time of the Flush sequence assigned to that material
for each stage. See Table 6 for a progression of the
successive stages of the purge sequence.
Fill
Fill
Fill
Select the sequence for dispensing material into the
mix hose and spray device. The choices are: ‘A
then B’, ‘B then A’, and ‘Parallel’, if no fill sequencing
is necessary. The fill sequence is typically dictated
by the last material used in the purge sequence.
See Table 6 for a progression of the fill sequence
following the last stage of the purge sequence.
Table
Table
Table 6
6
6 The
The
The Progression
Progression
Progression of
of
of Purge
Purge
Purge Sequence
Sequence
Sequence and
and
and Fill
Fill
Fill Sequence
Sequence
Sequence in
in
in a
a
a Dual
Dual
Dual Solvent
Solvent
Solvent System
System
System
➜
Mixed
Material
2nd Fill
Material
(if appli-
cable)
1st Fill Ma-
terial (If
applica-
ble)
Purge 3
Solvent
Purge 2
Solvent
Purge 1
Solvent
Mixed
Material
➜
78
3A4486D


