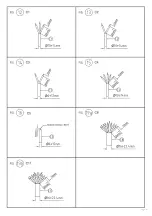
24
collegare i conduttori di Fase e Neutro ai poli L e
N del morsetto “M1”. Per versione con tensione
di alimentazione bifase da 400V, collegare i
conduttori di Fase 1 e Fase 2 ai poli L1 e L2
del morsetto “M1”. Serrare il serracavo “S1”.
Per il collegamento del cavo di terra unipolare
allentare la ghiera “Y” del pressacavo “G3” ed
estrarre il relativo tappo. Per cavi con diametro ≤
8mm utilizzare apposito gommino ridotto fornito
in dotazione nel sacchetto presente all’interno
della scatola dell’apparecchio (vedere
figura
24
). Far passare il cavo di Terra unipolare “C5”
(vedere
figura 16
) attraverso il pressacavo “G3”
e sotto il serracavo “S3”. Collegare il conduttore
al polo di Terra del morsetto “M1”. Serrare il
serracavo “S3”.
3.3 Per versione con tensione di
alimentazione 230V con collegamento DALI
3.3.1 Versione con cavo di alimentazione
separato dal cavo DALI
(vedere
figura
31
).
Far passare il cavo di alimentazione tripolare
“C1” (Fase, Neutro, Terra, vedere
figura
12
) attraverso il pressacavo “G1” e sotto il
serracavo “S1”. Collegare i conduttori di Fase,
Neutro e Terra ai poli L, N e Terra del morsetto
“M1”. Serrare il serracavo “S1”. Allentare la
ghiera “Y” del pressacavo “G2” ed estrarre il
relativo tappo. Far passare il cavo di controllo
DALI bipolare “C3” (DA, DA, vedere
figura
14
)
attraverso il pressacavo “G2” e sotto il serracavo
“S2”. Collegare i conduttori del cavo di controllo
DALI ai poli DA/DA nel morsetto “M2”. Serrare il
serracavo “S2”.
3.3.2 Versione cavo di aliment cavo
DALI pentapolare
(vedere
figura
31
). Far
passare il cavo pentapolare “C4” (Fase, Neutro,
Terra, DA, DA, vedere
figura
15
) attraverso
il pressacavo “G1” e sotto il serracavo “S1”.
Collegare Fase, Neutro e Terra ai poli L, N e Terra
del morsetto “M1 e i conduttori DALI ai poli DA/
DA del morsetto “M2”. Serrare il serracavo “S1”.
3.5 Collegamento cavi DMX separati da
cavo di alimentazione per driver 230 o 400V
(vedere
figure
32
-
34
). Per il collegamento del
cavo di alimentazione vale quanto detto al punto
3.1 per cavo tripolare. Per il collegamento del
cavo di alimentazione vale quanto detto al punto
3.2 per cavo bi terra separata. Per il
collegamento del cavo DMX l’apparecchio viene
fornito con connettori maschio “W” (connettore
maschio_OUT) e femmina “K” (connettore
femmina_IN) tipo XLR già montati ed in uscita
dall’apparecchio; altri due connettori maschio e
femmina tipo XLR vengono forniti in un sacchetto.
Per il collegamento alla linea DMX occorre
montare i connettori presenti nel sacchetto sui
cavi di collegamento (non forniti da FAEL) tra gli
apparecchi eseguendo una saldatura come in
figura
37
. Per la protezione dei cavi di controllo
DMX è opportuno inserire tali cavi in apposite
tubazioni di protezione separate dal cavo di
potenza. Utilizzare un cavo DMX ad impedenza
costante a 2 poli interni schermati, specifico per
la connessione di apparecchiature che utilizzano
il protocollo DMX512 con impedenza nominale di
120 Ohm. Scegliere un cavo con guaina esterna
consona alle temperature ambientali della zona
di installazione.
Parte comune per tutti i capitoli sopra
In base al pressacavo utilizzato (G1, G2
e/o G3): verificare il serraggio, con chiave
inglese, del corpo “X” (vedere
figura
11
) del/i
pressacavo/i applicando un momento torcente
di 4Nm; serrare con cura e a fondo, con chiave
inglese, la ghiera “Y” (vedere
figura
11
) del/i
pressacavo/i applicando un momento torcente
di 3.5Nm. Una volta collegato elettricamente
l’apparecchio, richiudere il coperchio della
cassetta di derivazione serrando le 4 viti V”
(vedere
figura
1b
) in acciaio inox applicando un
momento torcente di 5.2Nm assicurandosi che
la guarnizione sia perfettamente nella sua sede.
Verificare che il coperchio sia perfettamente in
battuta sulla cassetta di derivazione.
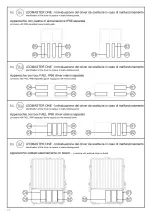
4. Apparecchio con gruppi di alimentazione
montati su staffa (versione ASIMMETRICA)
SOLUZIONE SU RICHIESTA
•
a. box FAEL IP66 con driver interni
(Tamb. max. = 50°C)
;
Disponibile per versioni:
230V
DALI;
400V
NON DIMMERABILE.
the
figure 13
) through the cable gland “G1”
and beneath the cable clamp “S1”. As regards
the version supplied 230V voltage, connect
the Phase and Neutral conductors to the L
and N poles of the terminal “M1”. As regards
the version supplied 400V voltage, connect
the Phase 1 and Phase 2 conductors to the L1
and L2 poles of the terminal “M1”. Tighten the
cable clamp “S1”. To connect the cable to the
single-pole grounding cable, loosen the nut “Y”
of the cable gland “G3” and remove the related
plug. For cables having diameter ≤ 8mm, use
a suitable grommet supplied in the bag fitted
inside the appliance housing (check the
figure
24
). Pass the single-pole Ground cable “C5”
(check the
figure 16
) through the cable gland
“G3” and under the cable clamp “S3”. Connect
the conductor to the Ground pole of the terminal
“M1”. Tighten the cable clamp “S3”.
3.3 Version supplied 230V voltage with DALI
connection
3.3.1 Version with power cable separated
from the DALI cable
(check the
figure 31
). Pass
the three-pole power supply cable “C1”(Phase,
Neutral, Ground; check the
figure 12
) through
the cable gland “G1” and beneath the cable
clamp “S1”. Connect the Phase, Neutral and
Ground conductors to the L, N and Ground poles
of the terminal “M1”. Tighten the cable clamp
“S1”. Loosen the nut “Y” of the cable gland “G2”
and remove the related plug. Pass the two-pole
control cable DALI “C3” (DA, DA, check the
figure 14
) through the cable gland “G2” and
beneath the cable clamp “S2”. Connect the
conductors of the DALI control cable to the DA/
DA poles on the terminal “M2”. Tighten the cable
clamp “S2”.
3.3.2 Version with power cable + 5-pole
DALI cable
(check the
figure 31
). Pass the
5-pole cable “C4” (Phase, Neutral, Ground,
DA, DA, check the
figure 15
) through the cable
gland “G1” and beneath the cable clamp “S1”.
Connect the Phase, Neutral and Ground to the
L, N and Ground poles of the terminal “M1 and
the DALI conductors to the DA/DA poles of the
terminal “M2”. Tighten the cable clamp “S1”.
3.5 Connecting the DMX cables separated
from the power cables for 230 or 400V
drivers
(check the
figures 32
-
34
). Follow
the indications related to the three-pole cable
provided in the paragraph 3.1 to connect the
power cable. Follow the indications related to
the two-pole cable + separated ground provided
in the paragraph 3.2 to connect the power cable.
The appliance features XLR type male “W”
(male connector_OUT) and female “K” (female
connector_IN) connectors already mounted,
available at the appliance output, meant for the
connection of the DMX cable; other two XLR
type male and female connectors are supplied
in a bag. For the connection to the DMX line,
fit on the connection cables (not supplied by
FAEL), between appliances, the connectors
supplied in the bag and seal as shown in
figure
37
. To protect the control DMX cables it is
recommended to have them inserted in special
protection pipes separated from the power cable.
Use a 2 inner shielded poles DMX cable having
constant impedance specific for the connection
of the appliances that require DMX512 protocol
with 120 Ohms nominal impedance. Use a cable
with outer sheath suitable to the environmental
temperatures of the installation area.
Part shared by all previous chapters
Depending on the cable gland used (G1, G2 and/
or G3): using a spanner, apply a torque 4Nm to
check the tightening of the housing “X” (check
the
figure 11
); use a spanner and apply a torque
of 3.5Nm to tighten carefully and completely
the ring nut “Y” (check the
figure 11
). Once the
appliance is connected, close back the cables
box cover and tighten the 4 “V” stainless steel
screws (check
figure 1b
) by applying 5.2Nm
torque, making sure the gasket is perfectly
fit. Ensure the cover is perfectly abutted to the
cables box.
4. Appliance with the power supply units
mounted on bracket (ASYMMETRIC version)
SOLUTION ON DEMAND
• a. FAEL IP66 box with internal driver
(Tamb. max. = 50°C)
;
Available for versions:
230V
DALI;
400V
NON-DIMMABLE;
câble “G1” et sous le serre-câbles “S1”. Pour
version avec tension d’alimentation de 230V,
brancher les conducteurs de Phase et de Neutre
aux pôles L et N de la borne “M1”. Pour version
avec tension d’alimentation biphasée de 400V,
brancher les conducteurs de Phase 1 et de
Phase 2 aux pôles L1 et L2 de la borne “M1”.
Serrer le serre-câbles “S1”. Pour brancher le
câble de terre unipolaire, desserrer la bague “Y”
du presse-câbles “G3” et en extraire le bouchon.
Pour les câbles de diamètre ≤ 8mm, utiliser le
petit tampon fourni en dotation dans le sachet
présent à l’intérieur de la boite de l’appareil
(voir
figure 24
). Faire passer le câble de Terre
unipolaire “C5” (voir
figure 16
) à travers le
presse-câble “G3” et sous le serre-câbles “S3”.
Brancher le conducteur au pôle de Terre de la
borne “M1”. Serrer le serre-câbles “S3”.
3.3 Pour version avec tension d’alimentation
230V avec branchement DALI
3.3.1 Version avec câble d’alimentation
séparé du câble DALI
(voir
figure
31
).
Faire passer le câble d’alimentation tripolaire
“C1” (Phase, Neutre, Terre, voir
figure
12
) à
travers le presse-câble “G1” et sous le serre-
câbles “S1”. Brancher les conducteurs de
Phase, de Neutre et de Terre aux pôles L et N
et de Terre de la borne “M1”. Serrer le serre-
câbles “S1”. Desserrer la bague “Y” du presse-
câbles “G2” et en extraire le bouchon. Faire
passer le câble de contrôle DALI bipolaire “C3”
(DE, DE, voir
figure 14
) à travers le presse-câble
“G2” et sous le serre-câbles “S2”. Brancher les
conducteurs du câble de contrôle DALI aux pôles
DE/DE à la borne “M2”. Serrer le serre-câbles
“S2”.
3.3.2 Version câble d’alimen câble
DALI pentapolaire
(voir
figure
31
).
Faire passer le câble d’alimentation “C4” (Phase,
Neutre, Terre, DE, DE, voir
figure
15
) à travers le
presse-câble “G1” et sous le serre-câbles “S1”.
Brancher Phase, Neutre et Terre aux pôles L,
N et Terre de la borne “M1 et les conducteurs
DALI aux pôles DE/DE de la borne “M2”. Serrer
le serre-câbles “S1”.
3.5 Branchement câbles DMX séparés de
câble d’alimentation pour driver 230 ou 400V
(voir
figure
32
-
34
). Pour le branchement du
câble d’alimentation, se référer au point 3.1
pour câble tripolaire. Pour le branchement du
câble d’alimentation, se référer au point 3.2
pour câble bip terre séparée. Pour le
branchement du câble DMX, l’appareil fourni
avec des connecteurs mâle “W” (connecteur
mâle_OUT) et femelle “K” (connecteur
femelle_IN) type XLR déjà montés et en sortie
de l’appareil; deux autres connecteurs, mâle et
femelle de type XLR sont fournis en sachet. Pour
le branchement à la ligne DMX, il faut monter les
connecteurs présents dans le sachet des câbles
de branchement (non fournis par FAEL) entre
les appareils et les souder, comme l’indique la
figure 37
. Pour protéger les câbles de contrôle
DMX, il convient de les insérer dans des
tuyauteries de protection séparées du câble de
puissance. Utiliser un câble DMX à impédance
constante à 2 pôles internes blindés, spécifique
pour connecter les appareillages utilisant le
protocole DMX512 avec impédance nominale
de 120 Ohm. Choisir un câble muni de gaine
externe adaptée aux températures ambiantes
de la zone d’installation.
Partie commune à tous les chapitres ci-
dessus
Selon le presse-câbles utilisé (G1,
G2 et/ou G3): Vérifier le serrage du corps “X”
(voir
figure 11
) du/des serre-câbles avec une
clé anglaise, en appliquant un moment de
torsion de 4Nm. Toujours avec la clé anglaise,
serrer bien à fond le collier de serrage “Y” (voir
figure
11
) du/des serre-câbles en appliquant un
moment de torsion de 3.5Nm. Une fois l’appareil
branché électriquement, refermer le couvercle
de la boite de dérivation en serrant les 4 vis V”
en acier inox (voir
figure
1b
) en appliquant un
moment de torsion de 5.2Nm tout en contrôlant
que la garniture loge parfaitement dans son
emplacement. Vérifier que le couvercle est
parfaitement en butée sur la boite de dérivation.
4. Appareil avec groupes d’alimentation
montés sur étrier (version ASYMÉTRIQUE)
SOLUTION SUR DEMANDE
• a. box FAEL IP66 avec drivers internes
(Tamb. max. = 50°C)
Disponible pour versions:
230V
DALI;
400V
NON DIMMABLE.
Kabelverschraubung “G1” und unter dem
Kabelbaum “S1” durchführen. Für Version
mit Versorgungsspannung von 230V, die
Phasenleiter und Neutralleiter an die Pole L und N
in der Klemme „M1“ anschließen. Für Version mit
zweiphasiger Versorgungsspannung von 400V,
die Phasenleiter 1 und Phasenleiter 2 an die Pole
L1 und L2 in der Klemme “M1“ anschließen. Den
Kabelbaum “S1“ anziehen. Für den Anschluss
für das einpolige Erdungskabel, die Schraube
“Y“ der Kabelverschraubung “G3“ lösen und den
entsprechenden Verschluss herausziehen. Für
Kabel mit Durchmesser ≤ 8mm geeignete kleine
Gummidichtungen verwenden, die im Beutel im
Inneren der Schachtel des Gerätes mitgeliefert
werden (siehe
Abbildung 24
). Das einpolige
Erdungskabel “C5” (siehe
Abbildung 16
) durch
die Kabelverschraubung “G3” und unter dem
Kabelbaum “S3” durchführen. Den Leiter in
den zentralen Pol der Erdung der Klemme “M1“
einsetzen. Den Kabelbaum “S3“ anziehen.
3.3 Für die Version mit Versorgungsspannung
230V mit Anschluss DALI
3.3.1 Version mit Stromkabel getrennt vom
Kabel DALI
(siehe
Abbildung
31
).
Das dreipolige Stromkabel “C1” (Phase,
Neutral, Erdung, siehe
Abbildung
12
) durch
die Kabelverschraubung “G1” und unter dem
Kabelbaum “S1” durchführen. Die Phasenleiter,
Neutralleiter und Erdungsleiter an die Pole L, N
und Erdung in der Klemme “M1“ anschließen.
Den Kabelbaum “S1“ anziehen. Die Schraube
“Y“ der Kabelverschraubung “G2“ lösen und
den entsprechenden Verschluss herausziehen.
Das zweipolige DALI Steuerkabel “C3”
(Phase, Neutral, siehe
Abbildung
14
) durch
die Kabelverschraubung “G2” und unter dem
Kabelbaum “S2” durchführen. Die Leiter des
Steuerkabels DALI an die Pole DA/DA der
Klemme „M2“ anschließen. Den Kabelbaum
“S2“ anziehen.
3.3.2 Version 5-poliges Stro Kabel
DALI
(siehe
Abbildung
31
). Das 5-polige Kabel
“C4” (Phase, Neutral, Erdung, DA, DA, siehe
Abbildung
15
) durch die Kabelverschraubung
“G1” und unter dem Kabelbaum “S1”
durchführen. Die Phasenleiter, Neutralleiter
und Erdungsleiter an die Pole L, N und Erdung
in der Klemme “M1“ und die Leiter DALI an die
Pole DA/DA der Klemme “M2“ anschließen. Den
Kabelbaum “S1“ anziehen.
3.5 Anschluss Kabel DMX getrennt von
Stromkabel für Treiber 230 oder 400V
(siehe
Abbildungen
32
-
34
). Für den Anschluss des
Stromkabels gelten die Angaben aus Punkt 3.1
für dreipolige Kabel. Für den Anschluss des
Stromkabels gelten die Angaben aus Punkt 3.2
für getrenntes zweip Erdungskabel. Für
den Anschluss des Kabels DMX wird das Gerät
mit Steckern „W“ (Stecker_OUT) und Buchse “K“
(Buchse_IN) vom Typ XLR bereits montiert und
am Ausgang des Gerätes geliefert; Zwei weitere
Stecker und Buchsen vom Typ XLR werden in
einem Beutel geliefert. Um eine Verbindung
mit der DMX-Leitung herzustellen, müssen die
Verbinder im Beutel an den Verbindungskabeln
(nicht von FAEL geliefert) zwischen den Geräten
durch Schweißen angebracht werden, wie in
Abbildung 37
gezeigt. Zum Schutz von DMX-
Steuerkabeln empfiehlt es sich, diese Kabel
in vom Stromkabel getrennten Schutzrohren
zu verlegen. Verwenden Sie ein DMX-Kabel
mit konstanter Impedanz mit 2 abgeschirmten
internen Polen, speziell für den Anschluss
von Geräten mit dem DMX512-Protokoll mit
einer Nennimpedanz von 120 Ohm. Wählen
Sie ein Kabel mit einem Außenmantel,
der den Umgebungstemperaturen des
Installationsbereichs entspricht.
Gemeinsamer Teil für alle oben
aufgeführten Kapitel
Basierend auf der
verwendeten Kabeldurchführung (G1, G2
und/oder G3): Überprüfen Sie, mit einem
Drehmomentschlüssel, den Anzug des
Gehäuses “X“ (siehe
Abbildung 11
) der
Kabeldurchführung/en mit einem Drehmoment
von 4Nm. Ziehen Sie die Schraube “Y” (siehe
Abbildung 11
) der Kabeldurchführung/
en mit Drehmoment 3.5Nm vorsichtig an.
Wenn das Gerät elektrisch angeschlossen ist,
die Abdeckung des Verteilerkastens wieder
schließen indem die 4 Schrauben „V“ (siehe
Abbildung 1b
)aus Edelstahl mit einem
Drehmoment von 5,2 Nm angezogen werden,
um sicherzustellen, dass die Dichtung perfekt
sitzt. Stellen Sie sicher, dass die Abdeckung
perfekt am Verteilerkasten anliegt.
4. Gerät mit an Bügel montierten
Stromversorgungseinheiten
(ASYMMETRISCHE Version)
LÖSUNG AUF ANFRAGE
• a. Box FAEL IP66 mit internen Treibern
(Tamb. max. = 50°C);
Verfügbar für die Versionen:
230V
DALI;
400V
NICHT DIMMBAR.
27
Summary of Contents for 514084500
Page 1: ...Glamox O92 O93 ASY User manual ...
Page 6: ...3 3 6 ...
Page 7: ...4 7 ...
Page 8: ...5 5 8 ...
Page 14: ...11 14 ...
Page 16: ...13 13 16 ...
Page 17: ...14 17 ...
Page 18: ...15 18 ...
Page 20: ...17 20 ...
Page 22: ...19 22 ...
Page 24: ...21 24 ...
Page 26: ...23 26 ...
Page 28: ...25 28 ...
Page 31: ...28 31 ...
Page 32: ...29 32 ...
Page 33: ...30 33 ...
Page 35: ...32 35 ...
Page 36: ...33 36 ...
Page 38: ...35 Note 38 ...
Page 39: ...39 ...


