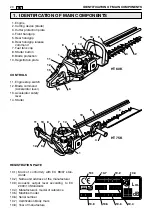
MAINTENANCE AND PRESERVATION
29
EN
on the contrary ask your Retailer to check the
carburettor and the engine.
•
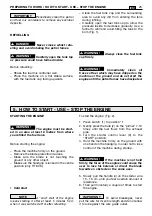
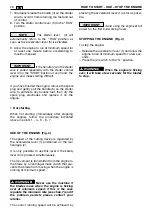
Tuning minimum speed (Fig. 11)
The minimum speed must
only be tuned if the blades move when the
engine is ticking over.
Reduce the speed by turning the screw (1)
counter-clockwise until the blades come to a
halt and function correctly.
If the engine does not tick over regularly, turn the
screw (1) clockwise to increase the speed.
The blades must not move
when the engine ticks over; contact your
retailer if you are not able to tune it to your
satisfaction.
LUBRICATING THE REDUCTION GEAR (Fig.
12)
Every 20 working hours, top up the level with
special molybdenum bisulphur lubrication,
injecting it into the lubricator (1).
ADJUSTING THE BLADES
The blades are subject to progressive wear,
which is noticed by a decrease in the trimming
performance due to excessive play of the unit.
Switch off the engine and
wait until the blades come to a halt before
performing any adjustments.
Proceed with the adjustment by (Fig. 13):
– Loosen the nuts (1).
– Carefully remove any dust or debrit from the
screw (3) slots (2).
– Tighten the screws (3) as far as possible, with-
out over-tightening, and then unscrew them
by 1/4 - 1/2 a turn.
– Then tighten the nuts (1).
– Lubricate the blades.
– Start the engine and let it run at maximum
speed for about 1 minute.
!
WARNING!
!
WARNING!
!
WARNING!
– Switch off the engine and wait for the blades
to come to a halt and then touch them with
your hand; if you can manage to touch them
with your hand without them being too hot,
the blades are adjusted correctly.
– If they have overheated, slightly loosen the
nuts (1) and the screws (3) and repeat the test
until you achieve satisfactory results.
Always check that the nuts
(3) are tightened as far as possible before
starting work.
SHARPENING THE BLADES
It is necessary to sharpen the blades when the
trimming performance decreases and the
branches tend to stick together.
Always replace and never
repair a blade which has blunt cutting edges
We recommend you take
your machine to your Retailer for sharpening as
he has the required tools and suitable experi-
ence.
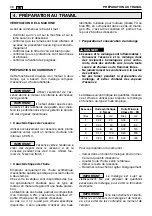
In order to sharpen the blades, it is recommend-
ed to use a fine grain file and proceed as follows
(Fig. 14):
– Place the file (1) on the blade (2) at a 45° angle,
and proceed with upward strokes towards the
cutting edge.
– Make sure that you put pressure on the file
only when stroking upwards and raise it from
the blade when you move it back towards you.
– Only remove a smallest amount of material.
– Eliminate any burr with a grinding stone.
– Eliminate all grinding traces and lubricate the
blades before reassembling them.
EXTRAORDINARY INTERVENTIONS
All maintenance operations not foreseen in this
manual must be performed exclusively by your
Retailer.
All and any operations performed in unautho-
rised centres or by unqualified persons will total-
ly invalidate the warranty.
IMPORTANT
!
WARNING!
!
WARNING!
Summary of Contents for HT60K
Page 3: ...2 1 2 3 4 5 1 I 1 I 5 5 2 3 4 4 1 2 3 1 3 2 1 1 2 2 O O 1 1 1 2 3...
Page 4: ...3 6 8 9 10 11 12 14 7 1 2 3 0 75 mm 1 2 3 3 2 1 1 13 1 2 3 1 2 45 5 10...
Page 5: ...4...
Page 19: ...18...
Page 33: ...32...
Page 47: ...46...
Page 61: ...60...
Page 75: ...74...
Page 89: ...88...
Page 103: ...102...
Page 104: ...103 EL...
Page 106: ...105 EL 1 2 3 85 dB A 4 5 LWA 2000 14 6 7 2 1 2 3 4 6 7 5...
Page 107: ...106 EL 1 2 3 4 5 6 1 2 4 5 6 C 1 2 3 3...
Page 108: ...107 EL 4 3 5 6 7 8 9 D 1 2 3 4 5 6 7 8 9 E 1 2 F...
Page 110: ...109 EL 1 2 1 1 I 2 2 7 10 3 3 START 4 5 4 10 15 cm 6 3 HT 60K 5 5...
Page 111: ...7 4 8 3 RUN 3 RUN 5 9 1 4 3 START 5 1 4 5 6 7 3 1 2 3 7 1 6 8 4 1 2 O 110 EL...
Page 112: ...111 EL 5 HT 60K 1 5 2 1 2 3 6 7 5 10 5 6...
Page 113: ...112 EL 8 10 8 1 2 3 3 3 3 2 1 9 1 2 3 a 3 b 2 10 100 7...
Page 114: ...113 EL 11 1 1 12 20 1 13 1 2 3 3 1 4 1 2 1 1 1 3 3 14 1 2 45...
Page 115: ...2 3 114 EL 8 1 2 3 4 5 7 7 7 7 4...
Page 117: ...116...
Page 131: ...130...
Page 145: ...144...
Page 159: ...158...
Page 173: ...172...
Page 187: ...186...
Page 201: ...200...
Page 215: ...214...
Page 229: ...228...
Page 230: ...229 RU...
Page 232: ...231 RU 1 2 3 85 A 4 5 2000 14 CE 6 7 2 2 1 2 3 4 6 7 5...
Page 233: ...232 RU A A 1 2 3 4 5 6 B B 1 2 4 5 K 6 C C K K 1 2 3 4 3 3...
Page 237: ...7 4 8 3 3 5 9 1 4 3 K 5 1 4 5 6 7 3 3 1 2 3 7 7 1 6 8 K K 4 4 1 2 O 236 K K K K RU...
Page 238: ...237 RU K K K K 5 5 H HT T 6 60 0K K 1 5 2 1 2 3 3 K K V V 6 6 7 7 5 10 K K K K 5 6 6...
Page 239: ...238 RU K K K K 8 10 8 1 2 3 3 3 3 2 1 K K K K K K 9 9 1 2 3 a 3 b 2 K K 00 100 K K K 7 7...
Page 240: ...239 RU 1 11 1 1 1 K K K K 1 12 2 20 1 13 1 2 3 3 1 4 1 2 1 1 1 3 3 3 14 1 2 45...
Page 241: ...2 3 240 RU 8 8 K K 1 1 2 2 3 3 4 4 5 7 7 7 7 4...
Page 243: ...242...
Page 257: ...256...
Page 271: ...270...
Page 272: ...271 MK...
Page 274: ...273 MK 1 2 3 85 dB A 4 5 LWA 2000 14 6 7 2 I 1 2 3 4 6 7 5...
Page 275: ...274 MK 1 2 3 a o 4 5 6 B 1 2 4 5 6 C 1 2 3 3...
Page 276: ...275 MK 4 3 5 6 7 8 9 D 1 2 3 4 5 6 7 8 9 E 1 2 F...
Page 278: ...277 MK 1 2 1 1 I 2 2 7 10 3 3 START 4 5 4 10 15 cm 6 3 HT 60K 5 5...
Page 279: ...7 4 8 3 RUN 3 RUN 5 9 1 4 3 START 5 1 4 5 6 7 3 1 2 3 7 1 6 8 4 1 2 O 278 MK...
Page 280: ...279 MK 5 HT 60K 1 5 2 1 2 3 6 7 5 10 5 6...
Page 281: ...280 MK 8 10 8 1 2 3 3 3 3 2 1 9 1 2 3 a 3 b 2 10 100 7...
Page 282: ...281 MK 11 1 1 12 20 1 13 1 2 3 3 1 4 1 2 1 1 1 3 3 14 1 2 45...
Page 283: ...2 3 282 MK 8 1 2 3 4 5 7 7 7 7 4...
Page 285: ...284...
Page 299: ...298...
Page 313: ...312...


