background image

PRINTED IN U.S.A.

59

50960066/AP0813

1. Remove the engine

belly pan.

2. Loosen the radiator

cap to its stop. This
will release any sys-
tem pressure.
Remove the cap
when all pressure is
bled off.

3. Attach a 3/8” hose to

the drain cock and
route it through the
belly pan opening to
a collection contain-
er positioned below
the radiator.

4. Loosen the radiator drain cock to drain the radia-

tor.

5. Remove the coolant hose from the engine oil cool-

er to allow coolant to drain from the engine block. 

6. When all coolant is drained, flush the system with

clean fresh water to remove any rust, scale and
contaminants. Allow the radiator and engine block
to drain completely.

7. Replace all drain plugs and tighten the radiator

drain cock. Clean the cooling fins in the radiator
with compressed air or water pressure.

IMPORTANT:

Fill the cooling system with a low-

silicate ethylene glycol based coolant mixed with

quality water and supplemental coolant additives
(SCAs) suitable for heavy-duty diesel engines.
See the engine manual for additional information.

8. Pour the coolant slowly into the radiator until the

coolant is at the bottom of the filler neck. Remove
the cap of the expansion tank and add coolant to
the full mark.

9. Inspect the radiator cap seal before installing it.

Replace it if it appears to be damaged.

10. Run the engine until it reaches operating tempera-

ture. Check the coolant level in the expansion tank.
Add coolant to the expansion tank to bring the
level up to the full mark.

NOTE:

Check the engine temperature gauge

every minute or two after coolant has been
changed. Air pockets can form and it may be nec-
essary to refill the cooling system after a short
period of use, as the air bleeds out of the system.

CHECKING ALTERNATOR AND FAN
BELT CONDITION

Refer to the engine manual for proper belt tension
adjustment and replacement procedures. If the belt
shows wear or cuts, or cracks, it should be replaced.
Order replacement belt from your engine dealer. 

CHECKING EXHAUST SYSTEM

Examine the muffler and tail pipe for possible holes.
Re-tighten any loose clamps and make sure the mani-
fold outlet gasket is not leaking. Examine the exhaust
insulating blanket for holes or tears. To prevent exces-
sive heat build up in the engine compartment the insu-
lating blanket should be replaced when it is damaged.

IMPORTANT:

To prevent damaging the insulating

blanket, do not spray it with high pressure water
blast when cleaning the engine.

Perform all other service requirements up to this point,
as well as the following.

CHECKING HYDRAULIC SYSTEM
RELIEF PRESSURES

Pressure settings for relief valves are pre-set at the fac-
tory. A test port is provided under the engine cover.

Service Every 2000 Hours or Two Years

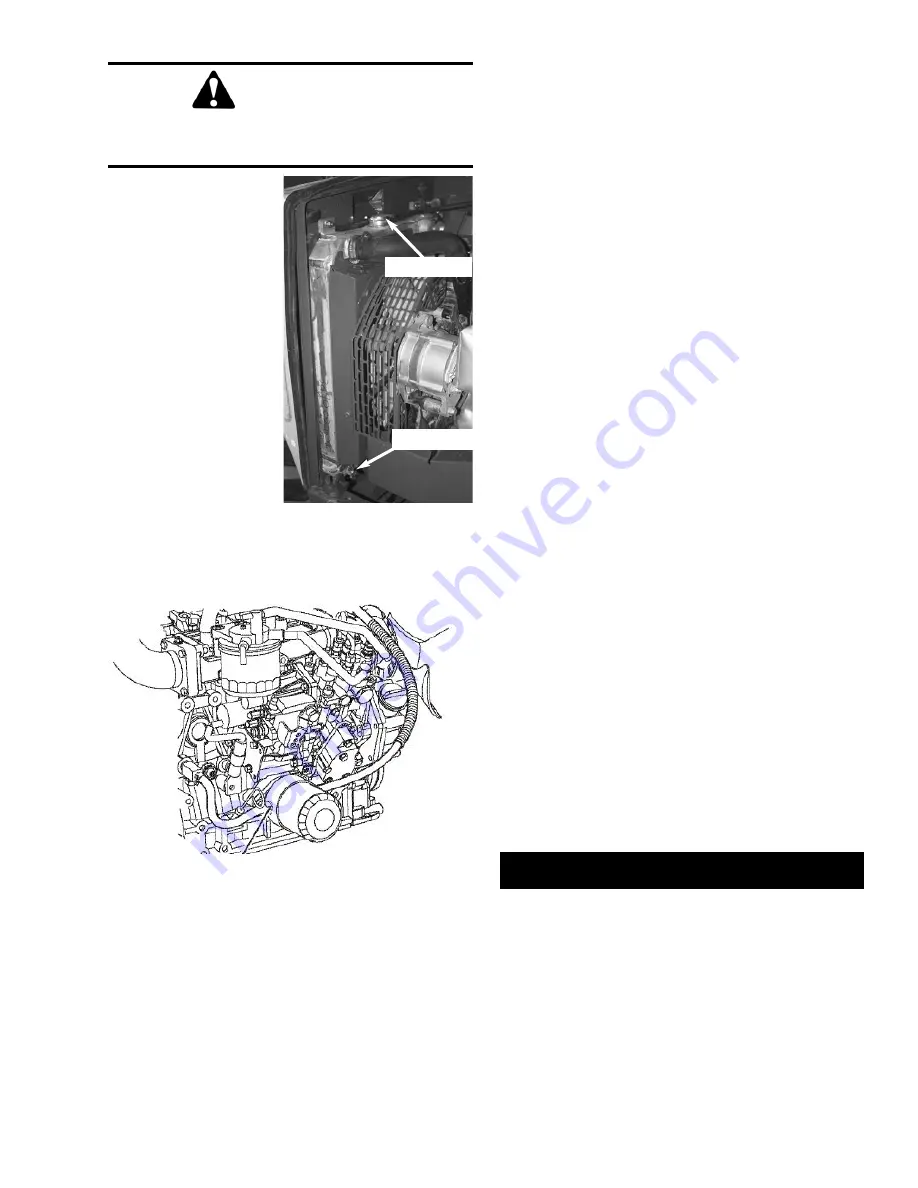
Oil Cooler

Coolant Hose

WARNING

Remove the radiator cap only when the engine
is cool, or painful burns could result.

Radiator Cap

Drain Cock

Summary of Contents for RS5-19

Page 1: ...Operator s Manual RS5 19 Telescopic Handler Beginning with Serial Number 50951 Form No 50960066 Revision A August 2013...

Page 2: ...Hourmeter Retract Load Volume Empty Engine Electrical Preheat Tilt Rearward Wiper Washer Extend Load Tilt Forward Hydraulic Oil Engine Start Horn Ignition Off Ignition ON Brake Failure Diesel Fuel Fas...

Page 3: ...61 10 Maintenance 65 Engine Diagnostic Codes EDC s 69 Electrical Schematics 71 Hydraulic Schematics 72 Load Zone Charts 73 Standard Hardware Torque Data 75 Index 76 Warranty Inside Back Cover IDENTIFI...

Page 4: ...ng the manual please return it to the pocket and keep it with the unit at all times If this machine is resold GEHL Company rec ommends that this manual be given to the new owner If this machine was pu...

Page 5: ...tach System Tilt Cylinder Slave Cylinder Dash Indicators and Controls Seat Fuel Tank Behind Access Cover Rear Boom Access Cover Lift Cylinder Hydraulic Tank Filler under Engine Cover Extend Cylinder I...

Page 6: ...ng automatic with engine off Electrical System Type 12 volt negative ground Battery 950 minimum cold cranking amps Circuit protection Fuse panel Backup alarm 107 dB A Horn 111 dB A Alternator 95 amp S...

Page 7: ...bnormal noises or vibrations if detected deter mine their cause and repair as necessary I acknowledge that the pre delivery procedures were per formed on this unit as outlined above Dealership s Name...

Page 8: ...50960066 AP0813 6 PRINTED IN U S A INTENTIONALLY BLANK To be removed as Dealer s file copy...

Page 9: ...rmal noises or vibrations if detected deter mine their cause and repair as necessary I acknowledge that the pre delivery procedures were per formed on this unit as outlined above Dealership s Name Dea...

Page 10: ...lish It is the responsibility of the operator to read and understand the Operator s Manual and other informa tion provided and use the correct operating procedure Machines should be operated only by q...

Page 11: ...hoes gloves reflector type vests respirators and ear protection are exampes of types of equipment that may be required DO NOT wear loose fitting clothing long hair jewelry or loose personal items whil...

Page 12: ...ts prior to attempting lift and placement with this machine DO NOT exceed the machine s rated operating capacity for the type of attachment tool being used DO NOT allow minors or any unqualified perso...

Page 13: ...is regulation is in addition to the OSHA regulation that requires specific forklift operator training 1910 178 l When a forklift telescopic handler is config ured and used for hoisting the employer mu...

Page 14: ...resistant material be used to cushion the blow Failure to heed could lead to serious injury to the eyes or other parts of the body DO NOT refill the fuel tank when the engine is hot Allow engine to c...

Page 15: ...ged accordingly All attachment tools MUST be marked to identify the attachment tool and the total capacity with the attachment tool at maximum elevation with the load laterally centered ALWAYS be sure...

Page 16: ...50960066 AP0813 14 PRINTED IN U S A SAFETY L65927 L65928 L65927 L65927 L66613 072798 L65933 L70305 L65942...

Page 17: ...PRINTED IN U S A 15 50960066 AP0813 SAFETY L65933 L65927 L70305 072798 RED L66613 L65928 L65942...

Page 18: ...50960066 AP0813 16 PRINTED IN U S A L70307 L70306 101506 101506 L65926 L70306 L70307 L65926 L65932 L65928 100359 L65928 100359 L65932 SAFETY...

Page 19: ...er become familiar with and know how to use ALL safety devices and controls Know how to stop the machine operation before operating it This Gehl machine is designed and intend ed to be used ONLY with...

Page 20: ...When the key is turned one posi tion clockwise from the vertical OFF position power from the battery is supplied to all controls and multi function display panel electrical circuits Indicators on the...

Page 21: ...ne Failure This lamp when lit alerts the operator of a fault condition Refer to the multi func tion display screen for error codes D Engine Oil Pressure Lamp This lamp indicates when the engine lubric...

Page 22: ...ator determines the machine is not in a safe location for high exhaust temperatures and disables auto cleaning B2 Auto Cleaning Disabled Indicator This indicator will illuminate when the operator has...

Page 23: ...d Press the top of the switch to select low speed used for load pickup and placement or when ever low speed operation is desired Press the bottom of the switch to select high speed used for road trave...

Page 24: ...er Controls Temperature Control This is the upper knob located to the left of the steering wheel This knob is used to adjust the temperature output of the cab heater Turning the knob clockwise will in...

Page 25: ...speeds at slow er operating speeds while maintaining power to the hydraulic system Seat Positioning The seat is mounted on rails for for ward and rearward repositioning to accommodate the operator s...

Page 26: ...toward the front just to the left of the air clean er Coolant Level The coolant expansion tank is located under the engine cover forward of the radiator on the backwall Engine Oil Dipstick Hydraulic O...

Page 27: ...rd the front of the engine compartment directly to the rear of the air cleaner Backup Alarm Located under the frame above the rear axle it produces a loud warning sound whenever the machine is in reve...

Page 28: ...er Relay park brake R3 20 AMP Relay lights R4 20 AMP Relay top wiper R5 20 AMP Relay front wiper Engine Compartment Fuses Relays and Solenoids Located inside the engine compartment on the firewall Tur...

Page 29: ...d material handling applications Contact your Gehl dealer for specifications and order ing information ACCESSORIES Gehl offers a range of special accessories for this machine Contact your Gehl dealer...

Page 30: ...hment Tool Mount No loose or missing parts no visible damage Lock pins plate in the locked position 3 Attachment Tool Mounting Pins No visible damage pin fit is secure and properly lubricated 4 Boom S...

Page 31: ...and running the machine refer to the Indicators and Controls chapter and become familiar with the various operating controls indicators and safety features STARTING THE ENGINE The following procedure...

Page 32: ...checking for smooth response Apply the service brakes stop the machine and move the travel lever to the opposite direction IMPORTANT To prevent damage to the trans mission the Telescopic Handler shou...

Page 33: ...speed to low idle and apply the parking brake 3 Press the top of the exhaust filter cleaning switch for approximately 3 seconds until the indicator in the switch illuminates The cleaning indicator in...

Page 34: ...notification to advise the operator to perform the exhaust filter cleaning The 3 levels are as follows 1 The Exhaust Filter Indicator will illuminate indicating the the soot level in the filter is sli...

Page 35: ...ach System forward then slowly back the machine until the attachment tool is free from the boom nose SELF LEVELING The machine is equipped with a hydraulic self leveling feature This feature is design...

Page 36: ...ound clearance When ascending or descending grades in excess of 5 or 3 the machine should be driven with the load upgrade An unloaded machine should be operated on all grades with the load handling at...

Page 37: ...or marked Permanent or temporary protrusion of loads equip ment material and construction facilities into the usual operating area must be guarded clearly and distinc tively marked or clearly visible...

Page 38: ...oad 10 feet high and can only get to within 5 feet of the load placement point Can it be done within the capacity of the machine WARNING NEVER exceed the rated operating capacity of the Telescopic Han...

Page 39: ...one to direct you Maintain ground speeds consistent with ground conditions and which permit stopping in a safe manner Elevating and Placing the Load For ground level load placement be sure the area un...

Page 40: ...orizontally 5 Use multiple lift points and taglines to restrain the load from swinging or rotating WARNING Be sure that the surrounding ground has ade quate strength to support the weight of the machi...

Page 41: ...and slowly raise the load 4 As the load approaches the landing point feather the boom control at minimum speed until the load is just above the landing point 5 With the assistance of a signal person c...

Page 42: ...cables 7 If necessary adjust the machine so that the wheels are in line and centered with the ramps 8 Slowly at the lowest engine speed possible and carefully drive the machine down the ramps LIFTING...

Page 43: ...n the hydrostatic transmission must be unlocked and the SAHR parking brake must be released Hydrostatic Transmission Unlocking Procedure 1 Remove the plastic caps on the high pressure lim iters WARNIN...

Page 44: ...locked THEFT DETERRENTS Gehl has recorded all major component part numbers and serial numbers Users should take as many of the following actions as possible to discourage theft to aid in the recovery...

Page 45: ...ter of this manual for detailed information regarding periodic checking and replenishing of lubricants Chapter 7 LUBRICATION WARNING NEVER lubricate or service this unit when any part of the machine i...

Page 46: ...2 4 Drive shaft slip joint front axle 1 5 Base end lift cylinder pivot pin 1 6 Base end slave cylinder pivot pin 1 BOOM AREA 7 Boom to frame upright pivot pin 2 8 Rod end slave cylinder pivot pin 1 9...

Page 47: ...PRINTED IN U S A 45 50960066 AP0813 Grease Fittings Locations 1 2 11 12 3 3 4 5 6 8 10 9 13 10 7...

Page 48: ...rain DEALER SERVICES The following areas of internal components service replacement and operating adjustments should only be by or under the direction of an authorized Gehl Telescopic Handler dealer I...

Page 49: ...ide for service refer ence as required OPERATOR SERVICES Some of the operator related services will require access to components located inside the superstructure under shields hoods and covers The ch...

Page 50: ...ate protec tive clothing gloves and shoes Keep feet clothing hands and hair away from moving parts Always wear safety glasses or goggles for eye protection from electric arcs from shorts flu ids under...

Page 51: ...d with quality water and supple mental coolant additives SCAs suitable for heavy duty diesel engines to the coolant expansion tank See the engine manual for additional information Replace the cap secu...

Page 52: ...n matter enters the hydraulic system DO NOT OVERFILL CHECKING BRAKE RESERVOIR LEVEL Remove the cover on the front of the frame Remove the reservoir cover to check the fluid level If low fill to the pr...

Page 53: ...4 turn clock wise to the horizontal position 3 Loosen the drain screw at the bottom of the fuel filter water seperator to drain the acumulated water 4 Tighten the drain screw and open the fuel shutof...

Page 54: ...following procedure 1 With the engine warm open the cover under the engine to access the drain plug Remove the crankcase drain plug IMPORTANT DO NOT discharge oil onto ground Catch and dispose of per...

Page 55: ...to the filter body by tight ening the cup to the right 9 Close the drain screw and open the fuel shutoff valve 10 Prime the fuel system by turning the ignition key ON for 10 15 seconds Priming the Fue...

Page 56: ...the following procedure The second per son is needed for removing the jumper cables so that the operator does not have to leave the operator s compartment while the engine is running NEVER connect the...

Page 57: ...ernator to build up a charge in the battery before operating the machine or shutting off the engine NOTE If the battery frequently becomes dis charged have the battery checked for possible dead cells...

Page 58: ...r the engine cover behind the radiator Open the engine cover to access the hydraulic filter Initial replacement is after the first 100 hours The hydraulic filter element should be replaced every 500 h...

Page 59: ...and drain out the old oil Replace the drain plug see illustration IMPORTANT DO NOT discharge oil onto ground Catch and dispose of per local waste disposal regulations The air filter restriction indic...

Page 60: ...he oil runs out install the drain fill plug Repeat this procedure on the other three hubs CHANGING HYDRAULIC RESERVOIR OIL Clean all dirt and debris from around the drain plug area 1 Remove the drain...

Page 61: ...il it reaches operating tempera ture Check the coolant level in the expansion tank Add coolant to the expansion tank to bring the level up to the full mark NOTE Check the engine temperature gauge ever...

Page 62: ...3 Change engine oil as outlined in the Service and Storage chapter of this manual 4 If the machine will not be operated for a month or longer apply grease to all exposed hydraulic cylin der rod areas...

Page 63: ...To apply a solid formed decal remove the smaller portion of the decal backing paper and apply this part of the exposed adhesive backing to the clean surface while maintaining proper position and align...

Page 64: ...927 03 WARNING JUMP START L65933 04 ANTI FREEZE 056859 05 COOLANT UNDER PRESSURE 072798 06 HYDRAULIC OIL 137632 07 GEHL 1 50 X 6 37 104408 08 RS5 19 RH 104900 09 GEHL 3 7 X 15 92 184043 10 GEHL 2 75 X...

Page 65: ...5927 02 QUICKATTACH DIAGRAM L65937 03 DANGER PERSONNEL INJURY L65928 04 BRAKE FLUID L63474 05 Gehl 8 00 X 33 95 102025 06 QUICKATTACH UNLOCKED L66613 07 DIESEL FUEL 50301416 08 RS5 19 LH 104899 09 GEH...

Page 66: ...104399 ROTATING CARRIAGE LOAD CHART 104400 BUCKET LOAD CHART 104401 TRUSS BOOM LOAD CHART 104402 FORK SHIFT LOAD CHART 105804 SIDE SHIFT LOAD CHART 210011 08 ATTACHMENT TILT AUXILIARY 100400 09 BOOM...

Page 67: ...ly or Quarterly Checking Fuel Tank Level l Checking Fuel Filter Water Separator l Checking Engine Oil Level l Checking Coolant Level l Checking Radiator for Debris l Checking Hydraulic Oil Level l Che...

Page 68: ...ng Hydraulic Restriction Indicator l Changing Hydraulic Return Filter Element l Checking Air Filter Restriction Indicator l Changing Air Filter Element l Changing Axle Differential and Planetary Oil l...

Page 69: ...PRINTED IN U S A 67 50960066 AP0813 Date Hours Service Procedure MAINTENANCE LOG...

Page 70: ...50960066 AP0813 68 PRINTED IN U S A Date Hours Service Procedure MAINTENANCE LOG...

Page 71: ...lerator Pedal Position Sensor B 15 Accelerator Pedal Position Sensor B 000091 00 Accelerator Pedal Position Sensor A 01 Accelerator Pedal Position Sensor A 02 Accelerator Pedal Position Sensor A 03 Ac...

Page 72: ...Motor C 522254 03 EGR Stepping Motor D 04 EGR Stepping Motor D 522314 00 Engine Coolant Temperature 522323 00 Air Cleaner 522329 00 Oily Water Seperator 522402 04 Auxiliary Speed Sensor 522727 12 E E...

Page 73: ...PRINTED IN U S A 71 50960066 AP0813 Electrical Schematic...

Page 74: ...50960066 AP0813 72 PRINTED IN U S A Hydraulic Schematic...

Page 75: ...PRINTED IN U S A 73 50960066 AP0813 Load Zone Charts Standard Carriage Decal 104399 1 0 Cu Yd Bucket Decal 104401 Rotating Carriage Decal 104400 5 Ft Truss Boom Decal 104402...

Page 76: ...50960066 AP0813 74 PRINTED IN U S A Load Zone Charts Fork Shift Carriage Decal 105804 Side Shift Carriage Decal 210011...

Page 77: ...1 2 13 35 35 75 55 110 80 1 2 20 40 40 90 65 120 90 9 16 12 55 55 110 80 150 110 9 16 18 60 60 120 90 170 130 5 8 11 75 75 150 110 220 170 5 8 18 85 85 180 130 240 180 3 4 10 130 130 260 200 380 280...

Page 78: ...on Indicators 24 Servicing 55 C Capacities See Chapter 2 Checklists pre delivery and delivery 5 7 Controls Dash Panel Area 18 Floor and Seat Area 23 Function Indicators 24 Right Side Panel 23 Cylinder...

Page 79: ...46 Hydraulic Oil Changing 58 Checking Level 50 Recommended Type 43 Hydraulic Maintenance Oil Filters replacing 56 Pressure Checking 59 Restriction Indicator Lamp 19 Hydraulic Pump servicing 46 Hydrau...

Page 80: ...59 As Required 60 Shields 17 Side View Mirror 25 Specifications 4 Steering See Controls Steering Relief Pressure Check 60 Storing the Machine 60 Suspended Loads 38 Suspended Load Safety Reminders 11...

Page 81: ...MS WILL CONTINUE TO APPLY SOME STATES DO NOT PERMIT THE EXCLUSION OR LIMITATION OF THESE WARRANTIES AND YOU MAY HAVE GREATER RIGHTS UNDER YOUR STATE LAW GEHL WARRANTY DOES NOT INCLUDE 1 Transportation...

Page 82: ...this machine contact your dealer or the service department of Gehl Company before starting or continuing operation Manitou Americas P O Box 179 West Bend WI 53095 0179 USA www gehl com 50960066 AP0813...

Reviews: