9-6
Transport Pro
Revision A
2012659-042
Checkout: Electrical Safety Tests
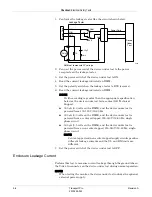
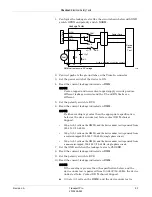
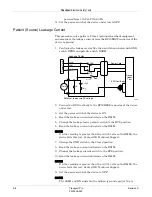
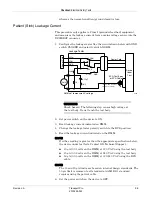
1. Configure the leakage tester like the circuit shown below.
2. Connect the power cord of the device under test to the power
receptacle on the leakage tester.
3. Set the power switch of the device under test to ON.
4. Read the current leakage indicated on DMM.
5. Set the polarity switch on the leakage tester to RVS (reverse).
6. Read the current leakage indicated on DMM.
NOTE
If either reading is greater than the appropriate specification
below or the device under test fails, contact GE Technical
Support.
300 µA (0.3 volts on the DMM), and the device under test is
powered from 100-120 V/50-60 Hz
300 µA (0.3 volts on the DMM), and the device under test is
powered from a centered-tapped 200-240 V/50-60 Hz, single
phase circuit
500 µA (0.5 volts on the DMM), and the device under test is
powered from a non-center-tapped, 200-240 V/50-60 Hz, single-
phase circuit
NOTE
Center-tapped and non-center-tapped supply circuits produce
different leakage currents and the UL and EN limits are
different.
7. Set the power switch of the device under test to OFF.
Enclosure Leakage Current
Perform this test to measure current leakage through the ground tabs on
the Video In connector on the device under test during normal operation.
NOTE
When testing the monitor, the device under test includes the optional
external power supply.
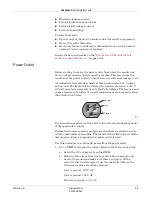
Power Cord
Leakage Tester
NORM
RVS
HIGH
LOW
GND
1K
0.15µF
10
Power Cord
Device
Under
Test
DMM set to measure AC voltage
GND
DMM
003A
Summary of Contents for Transport Pro
Page 1: ...Transport Pro Patient Monitor Service Manual Software Version 2 2024579 018 Revision A ...
Page 9: ...Revision A Transport Pro 1 1 2012659 042 1 Introduction ...
Page 12: ...1 4 Transport Pro Revision A 2012659 042 Introduction Safety Message Definitions ...
Page 13: ...Revision A Transport Pro 2 1 2012659 042 2 Equipment Overview ...
Page 28: ...2 16 Transport Pro Revision A 2012659 042 Equipment Overview Theory of Operation ...
Page 29: ...Revision A Transport Pro 3 1 2012659 042 3 Installation ...
Page 33: ...Revision A Transport Pro 4 1 2012659 042 4 Configuration ...
Page 38: ...4 6 Transport Pro Revision A 2012659 042 Configuration Monitor Settings ...
Page 39: ...Revision A Transport Pro 5 1 2012659 042 5 Maintenance ...
Page 47: ...Revision A Transport Pro 6 1 2012659 042 6 Troubleshooting ...
Page 57: ...Revision A Transport Pro 7 1 2012659 042 7 Ordering Parts ...
Page 59: ...Revision A Transport Pro 7 3 2012659 042 Ordering Parts Exploded View Exploded View 622A ...
Page 62: ...7 6 Transport Pro Revision A 2012659 042 Ordering Parts Hardware ...
Page 63: ...Revision A Transport Pro 8 1 2012659 042 8 Disassembly ...
Page 83: ...Revision A Transport Pro 9 1 2012659 042 9 Checkout ...
Page 97: ...Revision A Transport Pro A 1 2012659 042 A Technical Specifications ...
Page 100: ...A 4 Transport Pro Revision A 2012659 042 Technical Specifications External Power Supply ...
Page 101: ...Revision A Transport Pro B 1 2012659 042 B Electromagnetic Compatibility ...
Page 109: ......

