GE H
EALTHCARE
O
PTIMA
XR200
AMX
/XR220
AMX
D
IRECTION
5336113-1EN, R
EVISION
10
I
NSTALLATION
M
ANUAL
Page 98
Section 4.10 Installing hardware options
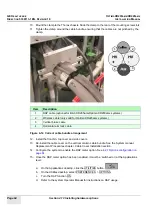
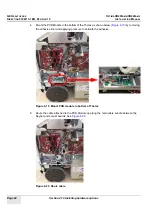
17. Continue routing the cable along the side of the PC and down through the hole in the sheet
metal of the Thorax and between the Locust and Spyder boards. Plug the cable into the
connector on the PCB Module. See
. Zip tie the cables as necessary.
Figure 4-32 Route cable to PCB Module
18. Re-install the top cover and the side covers.
19. Mount the cradle (in the customer’s desired location) by removing the adhesive liner and
applying pressure to activate the adhesive.
20. Power up the system.
21. Press the collimator light button on the wireless handswitch.
If the collimator light on the system goes on, the wireless handswitch is ready for use.
22. Confirm that the system will take exposures using the wireless handswitch.
23. Apply the rating plate:
Summary of Contents for Optima XR200amx
Page 129: ......

