background image

Alliance System

User Manual

2

Alliance system keypads

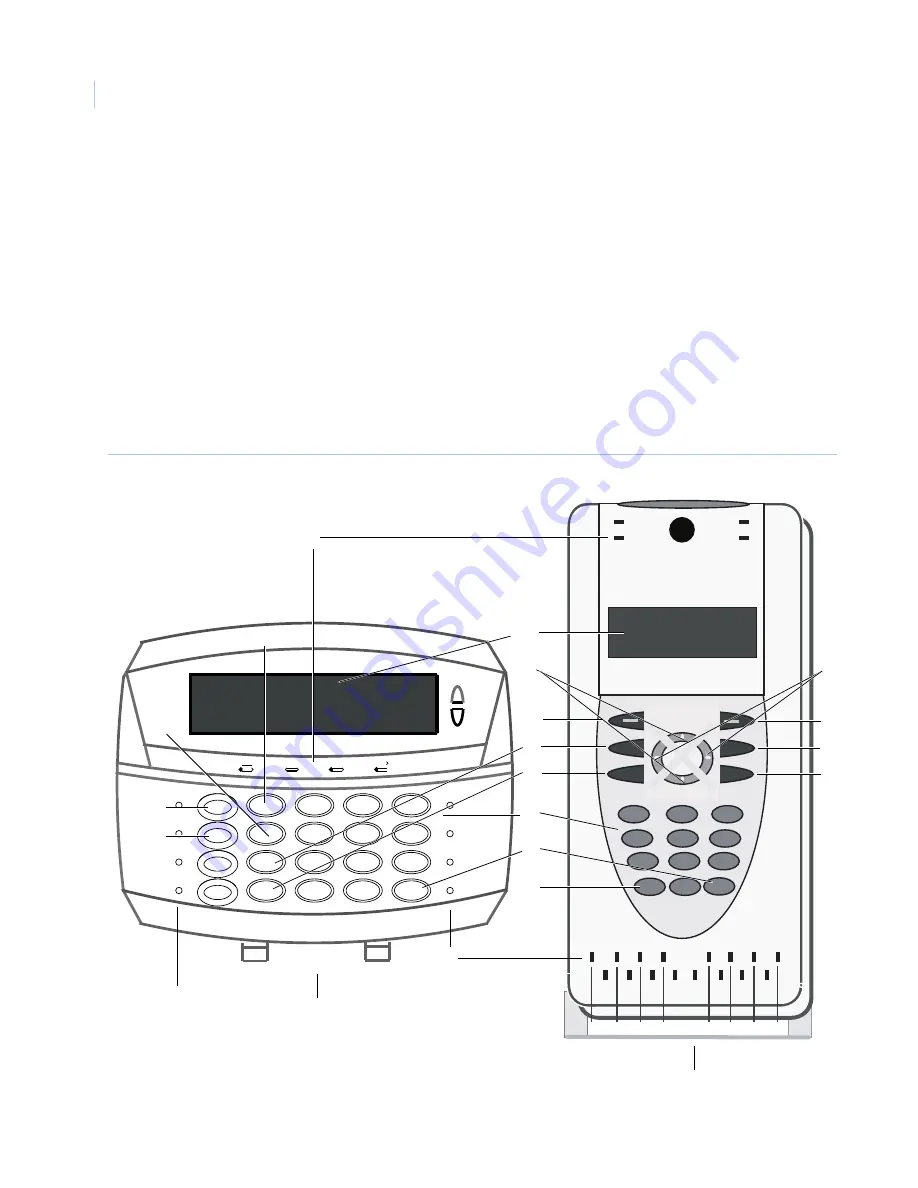
The Alliance system remote arming stations (RAS) keypads (See 

Figure 1 

) combine sophisticated design with 

versatility, making it the leader in its field.

Your system has been programmed to meet your requirements. Therefore, all of the features described in this 
guide may not apply to your system. Depending on how the system has been programmed, some of the system 
features may not be authorized to all users.

This guide explains how to use the Alliance system if you are responsible for managing the system. This guide 
details all the procedure variations, including the different responses from the system.

The terminology used to describe the various parts of your premises or Alliance system has been programmed 
specifically for your requirements.

Note:  

Regularly test your system to ensure that all installed equipment is operating properly.

 Figure 1. Alliance system keypads

1

2

3

4

5

6

7

8

9

10 11

12 13

14 15

16

1

abc

ON

CLEAR

OPEN

OFF

0

def

2

3

4

5

6

7

8

9

0

ghi

jkl

mno

pqr

stu

vwx

yz

Menu

Enter

Power

Fault

Access

Alarm

Power

Fault

Alarm

Access

Clear

Menu

On

Off

F1

F2

F3

F4

ENTER

1

2

3

4

5

6

7

8

9

0

*

A

C

B

L

K

D
J
I

H

G

C

N

E
M
B

AL-1103 LCD keypad

AL-111X LCD keypad

E

D

F

F

Summary of Contents for AL-1103

Page 1: ...Alliance System User Manual ...

Page 2: ...E SOFTWARE OR IF ALREADY INSTALLED IMMEDIATELY CEASE ALL USE OF THE SOFTWARE AND PROMPTLY UNINSTALL ALL COMPONENTS OF THE SOFTWARE 1 License In this Agreement you the purchaser of the rights granted by this Agreement are referred to as You or Your whether an individual or a business entity of any kind Subject to the terms and conditions of this Agreement GE Security Inc a Delaware corporation GE S...

Page 3: ...e in the sole discretion of GE SECURITY To obtain a repair or replacement of nonconforming Software contact GE SECURITY Customer Service toll free at 888 GESECURity or online at www gesecurity com during the Software Warranty Period Your exclusive remedy under this limited warranty for defective media is replacement of the defective media To receive replacement media under this limited warranty re...

Page 4: ...stricted as provided by paragraphs b 2 and b 3 of the Rights in Noncommercial Technical Data and Computer Software Small Business Innovative Research SBIR Program clause at DFARS 252 227 7018 YOU ACKNOWLEDGE THAT YOU HAVE READ AND UNDERSTAND THIS AGREEMENT AND AGREE TO BE BOUND BY ITS TERMS YOU FURTHER AGREE THAT THIS AGREEMENT IS THE COMPLETE AND EXCLUSIVE STATEMENT OF THE AGREEMENT BETWEEN YOU A...

Page 5: ...g doors 9 Open a door 9 Arming the system 10 Arm the system 10 Arming conditions and options 10 Disarming your system 13 Disarm the system 13 Active zones 15 Types of alarms 16 Local alarm 16 Alarm 16 System alarm 16 What to do when an alarm occurs 18 Resetting a local alarm 18 Resetting a zone In alarm 19 Additional information about alarms 20 Listing past alarm events 21 List past alarm events 2...

Page 6: ...10 Bypass zone 38 System menu option 11 Unbypass zone 40 System menu option 12 Test zone 41 System menu option 13 Start auto disarm test 42 System menu option 14 Program users 44 System menu option 15 Time and date 51 System menu option 16 Bypass unbypass RAS DGP 55 System menu option 17 Enable disable service technician 56 System menu option 18 Reset cameras 56 System menu option 20 Door and floo...

Page 7: ...ional operational features The chapter also contains a description of how to arm and disarm the system and the system alarm functions In this chapter Alliance system keypads 2 User identification 6 Duress signal 8 Opening doors 9 Arming the system 10 Disarming your system 13 Active zones 15 Types of alarms 16 What to do when an alarm occurs 18 Listing past alarm events 21 ...

Page 8: ... are responsible for managing the system This guide details all the procedure variations including the different responses from the system The terminology used to describe the various parts of your premises or Alliance system has been programmed specifically for your requirements Note Regularly test your system to ensure that all installed equipment is operating properly Figure 1 Alliance system k...

Page 9: ...ypass instant Used to bypass active zones when you arm the system and for instant arming STAY Used when arming the system to autobypass the interior zones and arm all of the perimeter zones for access Area LED Used to display the status of the areas ENTER Used when information is to be processed similar to the Enter key on a computer Scroll forward in the menu Alphanumeric buttons Used to enter in...

Page 10: ...e Area LEDs One area LED in each of the possible security areas indicates the status for that area Table 1 describes the area LEDs for the AL 1103 keypad When the AL 111x Remote Arming Stations RAS cover is opened or removed and the system is armed 16 area LEDs are visible see Figure 1 Each LED represents an area and the indications are as shown in Table 2 Record the area names on a label inside t...

Page 11: ...re in the communications between the control panel and a central station RAS fail A Remote Arming Station RAS is off line DGP fail A Data Gathering Panel DGP is off line Battery fail The auxiliary battery power is low Trouble Indicates a trouble in the system RAS fail low battery etc AC fail Indicates an AC power loss Line fail Indicates a failure in the telephone line or connection between the co...

Page 12: ...menu options that their PIN code has been authorized to access When you try to access an option that you are not authorized to access the message You are not authorized to enter displays Function access The Alliance system combines options for alarm and access control Alarm controls monitor zone inputs and determine if an alarm should occur when an intruder is detected Access controls monitor and ...

Page 13: ...ecified time zone Example A door group for a night shift worker allows their PIN code to be used to only open a door between 23 00 and 07 00 Floor groups There are up to 128 floor groups in your system for controlling access to floors Each floor group is allocated specific floor numbers and each floor number is allotted a time zone during which you can access the floor Your user number is assigned...

Page 14: ... Contact your central station company to ensure that they take no further action if duress was activated under conditions that are no longer valid false alarm and it has been reset Example PIN 1234 Duress digit 5 if the last digit of your PIN code is 9 the duress digit is 0 To activate duress do the following 1 Enter your PIN code without the last digit 1 2 3 in the example above Note Using your P...

Page 15: ...cate that the door is no longer shunted If the door is not closed at the end of the shunt time the keypad displays Shunting Ends The keypad sounds the warning buzzer for a preset time to let you close the door or re enter your PIN code to extend the suppression time 1 The bottom line of the display shows the access code entry Figure 2 2 Enter your door code Note In most systems with access control...

Page 16: ...n if a zone input is open Arm the system To arm the system do the following The AL 1103 indicates successful arming by illuminating an area LED The AL111x LED goes from green to red when the arming procedure has been successful Arming conditions and options The Bypass instant key see Figure 1 provides the ability to bypass active zones and arm the system in instant mode Press the MENU see Figure 1...

Page 17: ... be ignored when arming the system in STAY mode To arm the system in the STAY mode do the following 1 Enter your PIN code 2 Press STAY key Programmed not to display areas assigned to your PIN code If your system has not been programmed to display the areas assigned to your PIN code all areas that were disarmed are now automatically armed provided zone were not programmed for tamper The display ret...

Page 18: ...iginal display Enter 0 and press ENTER Figure 1 Arm the selected area If there are more disarmed areas they will be displayed Enter area number and press ENTER When finished arming press ENTER again Exit the menu option and return to the original display Areas already armed will stay armed Press CLEAR see Figure 1 Display the next disarmed area in the list You can then select an area to be armed o...

Page 19: ...m specific areas in the premises because Your keypad has been programmed to disarm only specific areas in the premises Make sure you know which keypad to use if there is more than one present in the premises Your PIN code has been programmed to disarm only specific areas of the premises Make sure you know which areas you can disarm Disarm the system If there are no alarms in the area the display m...

Page 20: ...signed to your PIN code is displayed all armed areas are now listed For example Table 5 lists the display options Table 5 Disarm the system display options Option Action Disarm all areas at once and return to the original display Enter 0 and press ENTER Figure 1 Disarm the selected area If there are more armed areas they will display Enter area number and press ENTER When finished disarming press ...

Page 21: ...is disabled then a list of zone numbers will be displayed at the RAS Press the zone number and press ENTER see Figure 1 to see its description One at a time List of numbers Table 6 lists the display options After determining the active zones check those zones and correct the problem Exit this display and try to arm the system If you are unable to close the zone refer to System menu option 10 Bypas...

Page 22: ...r switch is open The exact type of alarm siren flashing light and so forth depends on how the system has been programmed The area LEDs on the RAS indicate the areas in alarm See What to do when an alarm occurs on page 18 for the procedure to reset an alarm System alarm Alliance defines a system alarm as the state of a security system when an Alliance system device control panel RAS or DGP is tampe...

Page 23: ... 1 Latching System Alarms A PIN code that is authorized to reset system alarms must be entered to reset a system alarm The procedure to identify and reset latching system alarms is the same as described for What to do when an alarm occurs on page 18 2 Non Latching System Alarms The system alarm resets automatically as soon as the condition causing the alarm is rectified The procedure to identify a...

Page 24: ...able 7 lists the display options Local alarms for certain zone types can only be acknowledged by entering USER CODE OFF AREA ENTER These are 21 Day night with user code 30 Day night with auto reset 42 Entry exit fire door with code 44 Day night with alarm group restriction 56 Day night if no time zone 41 Table 7 RAS keypad actions for local alarms Option Action Acknowledge the local alarm see note...

Page 25: ...ne at a time Figure 6 or as a list Figure 7 according to system programing If Display Zones is enabled then one zone and its description will be displayed at the RAS Press NEXT see Figure 1 MENU see Figure 1 to see the next active zone and its description If Display Zones is disabled then a list of zone numbers will be displayed at the RAS Press the zone number and press ENTER to see its descripti...

Page 26: ...se of a faulty zone refer to System menu option 10 Bypass zone on page 38 You can only reset an alarm for an area that is assigned to your PIN code If you are unable to reset the alarm ensure that the flashing area LED is for an area you can disarm with your PIN code If not your attempt to reset the alarm might result in your arming disarming your system If you are unable to reset a system alarm b...

Page 27: ...hows the past alarm details Figure 9 of each alarm with the most recent alarm shown first 2a The time the alarm occurred as hour and minutes HH MM 2b The date the alarm occurred as day and month DD MM 2c The type and location of the alarm Figure 9 Past alarm details Table 8 RAS keypad actions for past alarms Option Action Scroll forward through the alarm history one by one Press ENTER Scroll backw...

Page 28: ...Alliance System User Manual 22 ...

Page 29: ...stem menu options The chapter includes description of and an operating procedure for each menu A set of tables for recording the details of data programmed for your systems is provided In this chapter Alliance system menu 24 Access a menu option 25 Programming records 62 ...

Page 30: ... times out the functions they use would be logged against your PIN code If you attempt to select an option that is not authorized to your PIN the display will show the message You Are Not Authorized To Enter Although you might be authorized to access a menu option you might not be allowed to access all the information it provides You will only be allowed to access information on the areas assigned...

Page 31: ...r your user PIN code and press ENTER Figure 1 The keypad displays the menu options Figure 11 Figure 11 Keypad menu options Table 9 Access menu options Option Action Scroll forward through the menu options one by one Press ENTER Scroll backward through the menu options one by one Press MENU Jump to a specific menu number Enter the menu number and press ENTER Exit a menu option Press ENTER Exit the ...

Page 32: ...mbers Or Table 11 lists the display options Table 10 Panel status menu 1 codes Code Zone status Meaning A Alarm An alarm has occurred at this zone and must be acknowledged and reset T Tamper alarm An alarm has occurred at this zone due to tamper or accidental damage The alarm must be acknowledged and reset i Bypassed The zone has been excluded from functioning as part of the security system It is ...

Page 33: ...original display Press CLEAR 1 Press MENU Figure 1 enter your user PIN code and press ENTER Figure 1 2 Enter 1 for menu 1 and press ENTER 3 The display that appears depends on the status of the zones 3a If no zones are active the The keypad displays no active zones Figure 13 Figure 13 No active zones 3b If zones are active one of the following displays will show with a list of zones either one at ...

Page 34: ... option and return to the original display Press CLEAR 1 Press MENU Figure 1 enter your user PIN code and press ENTER Figure 1 2 Enter 3 for menu 3 and press ENTER 3 The display that appears depends on the status of the zones 3a If no zones are in alarm the display shows no alarms Figure 16 3b If zones are in alarm the display will shows either a list of zones or one at a time Figure 17 or as a li...

Page 35: ...s ENTER Update the zone list and display the next zone on the list if any Press ON NEXT Exit menu 3 Press ENTER Exit the menu option and return to the original display Press CLEAR 1 Press MENU Figure 1 enter your user PIN code and press ENTER Figure 1 2 Enter 4 for menu 4 and press ENTER 3 The display that appears depends on the status of the zones 3a If no zones are bypassed the display shows no ...

Page 36: ...stem history To list past events of the system history do the following Table 14 Bypass zones menu options Option Action Display the complete zone name Enter the zone number and press ENTER Update the zone list and display the next zone on the list if any Press ON NEXT Exit menu 4 Press ENTER Exit the menu option and return to the original display Press CLEAR 1 Press MENU Figure 1 enter your user ...

Page 37: ...esults of the camera tests are only displayed if the user doing the disarm test has been programmed to test cameras The area being tested must also be assigned to the user alarm group Arm Test Report This test indicates if specific zones are operating correctly The zones need to be programmed to be included in the test and operate when areas are armed Note If a zone is displayed as untested it cou...

Page 38: ...NTER The keypad displays the test results opening window Figure 24 3 Select the test report 3a Enter 1 and press ENTER for Disarm Test Or 3b Enter 2 and press ENTER for Arm Test 4 Press ENTER to exit this men Figure 24 Test results opening window 1 Press ENTER Figure 1 to view the camera test report 2 If untested zones are reported the display shows a list of untested zones either one at a time Fi...

Page 39: ...le 16 Disarm test report options Option Action Display the complete zone name Enter the zone number and press ENTER Update the zone list and display the next zone on the list if any Press ON NEXT Exit this menu option Press ENTER Exit the menu option and return to the original display Press CLEAR 1 Press ENTER Figure 1 to exit the menu 2 If untested zones are reported the displays shows a list of ...

Page 40: ...the connection to management software 3 Dial Management Software The control panel dials the programmed service telephone number and attempts to connect to the remote service modem in order to allow programming changes to be made over the telephone network If it fails on the first try it will not redial The panel automatically drops the line if there have been no keys pressed by the remote service...

Page 41: ...NTER Figure 1 The keypad displays the request service technician window Figure 32 The control panel then sends a Service Requested message to the central station 2 Enter 1 and press ENTER to confirm the request for service technician Or 3 Enter 0 and press ENTER to return to the menu 4 Press ENTER to return to the menu Figure 32 request service technician 1 Enter 3 and press ENTER Figure 1 The key...

Page 42: ...s the dial temporary management software window Figure 34 2 Enter the temporary service telephone number up to 10 digits and press ENTER And Or 3 Press ENTER to save the displayed telephone number Note If this option is used to make the connection to the remote computer the computer operator will not be required to use the security password to gain access to the control panel Figure 34 Dial tempor...

Page 43: ...following 1 Press MENU Figure 1 enter your user PIN code and press ENTER Figure 1 2 Enter 9 for menu 9 and press ENTER 3 The keypad displays the zone names with a list of zones either one at a time Figure 37 or as a list of zone numbers Figure 38 Figure 37 Zone names displayed one at a time Figure 38 Zone names displayed as a list of numbers Zone 1 Rear Door Zone No Zone 1 2 3 4 5 6 7 Zone No ...

Page 44: ...l the list one by one Press ON NEXT Exit menu 9 Press ENTER Exit the menu option and return to the original display Press CLEAR 1 Press MENU Figure 1 enter your user PIN code and press ENTER Figure 1 2 Enter 10 for menu 10 and press ENTER 3 The display that appears depends on the status of the zones 3a If no zones are active the display shows all zones are normal Figure 39 Figure 39 All zones are ...

Page 45: ...ed As soon a zone that is in alarm is bypassed the alarm is reset Table 20 Bypass zone display options Option Action Bypass the selected zone This removes the zone from the display and replaces it with the next active zone in the list Enter the zone number and press ENTER Update the list of active zones and display the next zone on the list if any Press ON NEXT Exit menu 10 Press ENTER Exit the me...

Page 46: ...igure 42 Figure 42 All zones are bypassed 3b If the zones are unbypassed the display shows either a list of zones or one at a time Figure 43 or as a list of zone numbers Figure 44 4 Press ENTER to exit menu 11 Figure 43 Bypassed zones listed one at a time Figure 44 Bypassed zones listed by number Table 21 Unbypassed zone options Option Action Unbypass the selected zone This removes the zone from t...

Page 47: ...indow Figure 45 Note If the zone is bypassed when a test is requested the system unbypasses the zone conducts the test then returns the zone to bypassed Figure 45 Test a zone 3 Enter the zone number for one of the following four responses and press ENTER 3a The zone is normal Figure 46 Figure 46 Normal test zone 3b The zone is active Figure 47 Figure 47 Active test zone 3c There is a faulty condit...

Page 48: ...ure 49 Cable tampering short 1 Press MENU Figure 1 enter your user PIN code and press ENTER Figure 1 2 Enter 13 for menu 13 and press ENTER The display shows the start auto disarm test window 3 Press ON NEXT Figure 1 to display the untested zones Or Enter 0 and press ENTER to cancel the disarm test and move to the test completed not completed displays 4 If you pressed ON NEXT the untested zones wi...

Page 49: ...e tested during disarm test have been tested or the time allowed for the disarm test has expired Figure 52 Displayed camera information 7 Verify that the display indicates that the test is completed Figure 53 or not Figure 54 8 Press ENTER to exit menu 13 Figure 53 Test complete Figure 54 Test not complete All Cameras Have Tested Successfully Press Enter Test Completed Press ENTER Test Not Complet...

Page 50: ...an be programmed for an Alliance panel depends on the panel s memory configuration In addition to the total number of users the panel s memory configuration also affects the quantity of users with names and PIN codes Contact your system installer for details of your system s configuration The system s capabilities are as follows No memory expansion 50 Users No memory expansion with SIUM 50 Users s...

Page 51: ...TER to return to the menu Figure 55 Second user access code Figure 56 Two user option 1 Press MENU Figure 1 enter your user PIN code and press ENTER Figure 1 2 Enter 14 for menu 14 and press ENTER The keypad displays the delete a user window Figure 57 Figure 57 Select delete a user 3 Enter 1 and press ENTER to delete a user 4 Enter the system user number and press ENTER Figure 58 This will delete ...

Page 52: ...oup 5 Press ENTER The display shows the user s door group Figure 62 Figure 62 Display user door group 6 Press ENTER The display shows the user s floor group Figure 63 7 Press ENTER 8 If your system is programmed to assign special user flags to users the display will now show the user flags in sequence See Create or change a user on page 47 for user flag details Figure 63 Display user floor group 9...

Page 53: ...to YES and your alarm group has all the Areas and User Menu Options of the alarm group you wish to assign If the alarm group you wish to assign has Alarm System Control and Modem Access set to YES then your alarm group must also have these options set to YES Figure 67 User alarm group 5 The next display shows the user s door group Figure 68 Card users must always have a valid door group assigned i...

Page 54: ... are programming is higher than 1000 then all options available have been programmed and the display returns to step 1 Note You cannot program a user number that already exists Table 23 Create or change a user options Option Action Select the number of the alarm group to be issued to this user Enter the alarm group number and press ENTER Display the list of alarm groups that you can issue a user i...

Page 55: ...Guard Change 0 Skip Visitor If set to YES the user s code card can only perform functions at doors 17 to 64 when used in conjunction with a Guard code card YES Visitor Change 0 Skip Trace User If set to YES all alarm and access functions performed by the user at doors 17 to 64 will leave a Trace message to be sent to the management computer YES Trace User Change 0 Skip Card Only If set to YES the ...

Page 56: ...d to enter a 16 characters user name 3 Enter each letter of the user s name followed by ENTER 4 Move the cursor to the position after the name and press ENTER 5 When the name is entered press MENU to save the displayed setting If the name has been changed only letters preceding the cursor are saved Figure 70 Enter user name Table 26 User name character codes Key Key press to get character 1ST 2ND ...

Page 57: ... are visible during normal use of the Alliance system and all internal functions rely on them A new date or time only needs to be programmed when the Alliance system is first installed or if the time needs to be adjusted for daylight saving time 1 Press ENTER Figure 1 The keypad displays the enter a user pin code window Figure 71 2 Enter the PIN code for the user and press ENTER Note A user who is...

Page 58: ...igits and press ENTER Figure 74 Figure 74 Enter correct hours 5 Enter the correct minutes 2 digits and press ENTER Figure 75 Figure 75 Enter correct minutes 6 Enter the correct seconds 2 digits and press ENTER Figure 76 Figure 76 Enter correct seconds 7 Enter the correct day 2 digits and press ENTER Figure 77 Figure 77 Enter correct day 8 Enter the correct month 2 digits and press ENTER Figure 78 ...

Page 59: ...ss ENTER to change the DST Figure 80 Change to daylight savings time 4 The display shows the date the time changes to DST Figure 81 5 Enter one of the following 0 no DST 1 DST starts on first Sunday of the month 2 DST starts on the second Sunday of the month 3 DST starts on the third Sunday of the month 4 DST starts on the fourth Sunday of the month 5 DST starts on the last Sunday of the month 6 P...

Page 60: ...s the end month DST Figure 84 13 Enter the month to end DST 2 digits 14 Press ENTER ENTER Figure 84 DST end month 1 Press MENU Figure 1 enter your user PIN code and press ENTER Figure 1 The keypad displays the adjust internal clock window Figure 85 2 Enter 15 for menu 15 and press ENTER Figure 85 Adjust internal clock 3 Enter 4 and press ENTER to change the daily adjustment Figure 86 4 Press MENU ...

Page 61: ... Figure 87 2 Enter 16 for menu 16 and press ENTER Figure 87 Enter Access Code screen 3 Enter 1 for RAS Figure 88 and 2 for DGP Figure 89 and press ENTER Note Bypassing a DGP does NOT bypass the alarm zones on that DGP but does disable DGP off line on line reporting tamper switch Note Bypassing a RAS or DGP also resets any system alarms generated by the RAS or DGP 4 Enter the RAS DGP number to be b...

Page 62: ... PIN code and press ENTER Figure 1 2 Enter 17 and press ENTER The keypad displays the enable disable the service technician code opening screen Figure 90 3 Enter one of the options listed in Table 27 Figure 90 Enable disable service technician code Table 27 Enable disable the service technician code options Enable the service technician s code for the programmed time period and exit this menu opti...

Page 63: ...the original display Figure 92 Display film count Table 28 Reset camera options Option Action Reset the frame count for all cameras to zero Enter 0 and press ENTER Display the frame count of an individual camera Enter the camera number and press ENTER Exit this menu option Press MENU Exit the menu option and return to the original display Press CLEAR 1 Press MENU Figure 1 2 Enter your user PIN cod...

Page 64: ...or number window Figure 95 Figure 95 Enter door number 6 Enter the door number and press ENTER The display shows the details of four doors starting with the door number selected Figure 96 Figure 96 Door detail display Table 29 Program door options Disable the door for this door group Press MENU Enter the time zone number and return to step 3 Enter the time zone number and press ENTER Return to ste...

Page 65: ...month 2 digits and press ENTER The display shows the new month Figure 100 6 Enter the new year 2 digits and press ENTER The display returns to step 3 to input a new holiday Press ENTER again to exit the menu option Note Always remember to update your holidays list when any changes are made Figure 100 Record a holiday new month 1 Press MENU Figure 1 enter your user PIN code and press ENTER Figure 1...

Page 66: ...lock at 08 00 again the next morning Unlock lock disable or enable a door via the arming station To unlock lock disable or enable a door via the arming station do the following 1 Press MENU Figure 1 enter your user PIN code and press ENTER Figure 1 2 Enter 23 for menu 23 and press ENTER The keypad displays the opening screen Figure 102 Figure 102 Unlock lock disable or enable a door 3 Enter the do...

Page 67: ...R Figure 104 or press ENTER to skip this field If 00 is entered as the day of the month the printer will start printing from the last printed history Figure 104 Complete history entry screen day 4 Enter the new month 2 digits from which to start printing and press ENTER Figure 105 or press ENTER to skip this field Figure 105 Complete history entry screen month 5 Enter the year 2 digits from which ...

Page 68: ...or Groups System Menu 20 Holidays System Menu 21 It is recommended that you complete the tables in pencil so that corrections can be made to keep the records current and accurate Make copies of programming record sheets that do not provide adequate space for the number of records needed User Record System Menu 14 User Number Alarm Group Door Group Name ...

Page 69: ..._______ 14 _________ 30 _________ 46 _________ 62 _________ 15 _________ 31 _________ 47 _________ 63 _________ 16 _________ 32 _________ 48 _________ 64 _________ Door No Time Zone Door No Time Zone Door No Time Zone Door No Time Zone 1 _________ 17 _________ 33 _________ 49 _________ 2 _________ 18 _________ 34 _________ 50 _________ 3 _________ 19 _________ 35 _________ 51 _________ 4 _________...

Page 70: ...__ 30 _________ 46 _________ 62 _________ 15 _________ 31 _________ 47 _________ 63 _________ 16 _________ 32 _________ 48 _________ 64 _________ Door No Time Zone Door No Time Zone Door No Time Zone Door No Time Zone 1 _________ 17 _________ 33 _________ 49 _________ 2 _________ 18 _________ 34 _________ 50 _________ 3 _________ 19 _________ 35 _________ 51 _________ 4 _________ 20 _________ 36 _...

Page 71: ... Date __________ __________ __________ Day Month Year Holiday Number __________ Date __________ __________ __________ Day Month Year Holiday Number __________ Date __________ __________ __________ Day Month Year Holiday Number __________ Date __________ __________ __________ Day Month Year Holiday Number __________ Date __________ __________ __________ Day Month Year Holiday Number __________ Date...

Page 72: ...Alliance System User Manual 66 ...

Page 73: ...ntrol over alarm functions Area A section of a premise which has specific security requirements The Alliance system allows any premise to be divided into 16 areas of different security requirements Each area has its own zone inputs Each area is identified with a number and a name e g Area 1 Office Area 2 Workshop Area 3 Boardroom etc Armed The condition of an area where a change in the status of a...

Page 74: ...mand on doors 1 to 16 or shunt condition The main purpose of an event flag is to activate an output History A list of past alarm and access control events stored in memory that can be viewed on an LCD arming station or sent to a printer Hold up An alarm silent triggered by a hold up button only sends a message to a central station Installer A company that installs and services security equipment K...

Page 75: ...urity functions for areas or for access points doors The RAS can be a console LCD keypad reader or any other device that can be used to perform security function such as arm disarm open doors etc Reader A device used for access control that can read cards to allow access Depending on the needs and the type of cards the reader can be a magnetic swipe reader or a proximity reader RTE zone Request to...

Page 76: ......

Reviews: