6
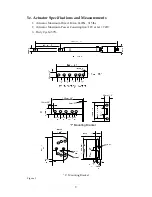
Dimensions
and
Weight:
300
x
245
x
90
mm,
4.6kgs
11.8”x9.65”x3.5”,
10.1
lbs
4.
Necessary
Tools
and
Equipment
The
following
tools
may
be
necessary
to
install
the
YG
‐
5602/1
Gate
opener.
Standard
and
Philips
screw
drivers
Electric
drill
Wire
cutters
Wire
stripper
Socket
set
Welder
5.
Site
Preparation
Before
you
begin
the
opener
installation,
check
the
following.
1.
The
gate
should
be
mounted
and
moving
freely
with
little
resistance
in
movement.
2.
The
gate
and
post
must
be
suitable
for
being
automated.
Check
that
the
structure
is
sufficiently
strong
and
rigid,
and
that
its
dimensions
and
weights
conform
to
those
listed
in
the
specifications
table
of
this
document.
(page
5)
3.
Make
sure
that
the
gate
is
plumb
and
level.
4.
The
fence
posts
must
be
mounted
in
concrete.
5a.
Standard
Power
The
YG
‐
5602
is
normally
powered
by
U/E
standard
power
(U
model
110V/60Hz
AC
;
E
model
240V/50Hz
AC
power)
If
you
have
not
already
done
so,
wire
a
waterproof
outlet
near
the
gate
following
proper
safety
standards
for
your
area.
If
you
are
not
experienced
with
this
type
of
wiring
or
if
your
area
requires
it,
hire
a
professional
electrician
to
perform
this
as
well
as
wire
in
the
YG
‐
5602
in
the
electrical
section.
The
YG
‐
5602
requires
at
least
a
15A
service.
Make
sure
your
electrician
takes
into
account
the
voltage
drop
involved
in
running
many
feet
of
wire
to
your
installation
location.
If
an
insufficient
gauge
of
wire
is
used,
there
will
be
insufficient
power
at
the
site
to
operate
the
opener.
5b.
Solar
Power
If
you
plan
to
use
solar
panels
to
power
your
gate,
verify
that
you
have
sufficient
solar
power
to
charge
the
battery
and
provide
power
for
the
number
of
openings
and
closings
you
plan
to
need.
Different
areas
of
the
planet
receive
varying
amounts
of
sunlight,
and
that
amount
varies
on
the
time
of
the
year.
Make
sure
you
account
for
all
this
in
any
solar
installation.
If
insufficient
power
is
available,
the
opener
battery
can
be
permanently
damaged
and
this
is
not
covered
under
the
warranty.


