Part # P128 Rev 5 (05/29/09)
Page 7
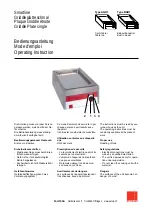
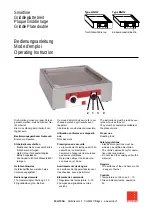
OPERATION INSTRUCTIONS
Lighting Instructions
"EFRVBUFNFBOTNVTUCFQSPWJEFEUPMJNJUNPWFNFOUPG
the appliance without depending on the connector and
RVJDLEJTDPOOFDUEFWJDFPSBTTPDJBUFQJQJOH5IJTDBOCF
accomplished by attaching restraining chains/cables from
øPPSPSSFBSXBMMUPSFBSPGVOJU
0OVOJUTFRVJQQFEXJUIDBTUFSTFOTVSFUIBUGSPOUDBTUFSTBSF
JOUIFMPDLFEQPTJUJPOBOEUIBUUIFNPWFNFOUSFTUSBJOUJT
connected to the appliance.
During an electrical power interruption, turn power switch
to the “OFF” position. This unit cannot be made to operate
without electrical power.
'JSTUNBLFDFSUBJOUIBUBMMQPXFSTXJUDIFTBOEUIFSNPTUBU
switches are set to “OFF”.
2. Connect an electrical power cord to 120 volt supply.
3. Turn the gas shut off valve to the “OPEN” position (valve
handle in line with piping).
4. Turn the main power switch to “ON”, power switch green
indicator should illuminate. Wait until gas pilot, green
indicator illuminate.
NOTE: Should pilot ignition fail after a few minutes turn the
main power switch to “OFF”.
8BJUNJOVUFTUIFOUVSOUIFNBJOQPXFSTXJUDICBDLUPi0/w
5. When the green indicators for their respective zones are
illuminated, turn the zone power switch for each zone to
“ON” and set the thermostats to the desired temperature
settings.
6. The amber burner indicators cycle with the thermostat
operation.
Shut down Instructions
1. Turn all zone and power switches to “OFF” (thermostat
dial settings may be left at their set point if preferred) at
the end of daily operations.
2. For extended shut down, turn all zone power switches to
“OFF”, turn main power switch to “OFF”, close the manual
gas shut off valve and unplug the electrical cord set.
/05& %POPUXBTUFHBTPSBCVTFFRVJQNFOUCZMFBWJOH
UIFSNPTUBUTBUBIJHIUFNQFSBUVSFJGOPUSFRVJSFE%VSJOH
idling periods, set thermostats to a low temperature setting.
'PSFYBNQMF¡' ¡$UP¡' ¡$UPLFFQHSJEEMF
XBSN4FUUIFSNPTUBUTBTSFRVJSFEGPSQFSJPETPGIFBWZMPBE
INSTALLATION Continued
2. Large objects should not be placed in front of the
BQQMJBODFXIJDINJHIUPCTUSVDUUIFBJSøPXUISPVHI
UIFGSPOU%POPUPCTUSVDUUIFøPXPGDPNCVTUJPOBOE
ventilation air.
3. Do not permit fans to blow directly at the appliance, and
wherever possible, avoid open windows adjacent to the
BQQMJBODFTJEFTBOECBDLBMTPXBMMUZQFGBOTXIJDIDSFBUF
air crosscurrents within the room.