background image

8

5. E

LECTRICAL


SAFETY

n

Voltage:

 make sure your machine is cor-

rect for your mains supply

n

Current:

 your machine is suitable for AC

supply only.

n

Plugs/extension leads:

 we recom-

mend the use of PVC or rubber covered
plugs, connectors and leads with your
machine.

n

Power point:

 the machine must be con-

nected to a power point and not a lighting
socket.

6. D

ESCRIPTION


OF


MACHINE


PARTS

N

F

IG

. 1

The packing contains:

1.

Rear handle

2.

Safety lock-off button

3.

Trigger

4.

Oil filler cap

5.

Guide bar with sprocket

6.

Chain

7.

Front handle

8.

Motor and air slots

9.

Electric power lead

10.

Chain cover with safety chain brake
trigger

11.

Chain carter

12.

Clamp knob

13.

Chain tension screw

14.

Locking pin

15.

Sprocket

16.

Small end of chain tension lever

17.

Screwdriver

n

Instructions handbook, warranty, chain
cover

NOTE:

 make sure that the power tool and

accessories in the package are not damaged

NOTE:

 read these operative instructions

carefully before attempting to operate the
drill

7. B

AR


AND


CHAIN


ASSEMBLY

N

F

IG

. 1 - 2 - 3 - 4

n

Check that the chain brake (10) is not ac-
tive, brake trigger in position ‘1’.

n

Remove the clamp nut (12) and the chain
carter (11).

n

Put the bar (5) on the locking pin (14) and
push it to the sprocket (15).

n

Put the chain (6) on the bar, beginning
from the top, ensure cutter teeth are fac-
ing direction of chain rotation.

n

Ensure chain fits around sprocket (15)
and check that small end of chain tension
lever (16) fits into bottom hole of bar.

n

Position the carter chain and clamp the
nut (12) finger tight.

n

Adjust chain tension screw (13) so that
when lifting the chain, an entire drive link
is just visible. Ensure chain rotates

smoothly on bar. Fully tighten nut.

n

Do not over tension the chain as this will
reduce life of chain, bar and motor.

n

Do not under tension the chain as this will
make it fall down while working.

8. L

UBRIFICATION


SYSTEM

n

An automatic pump allows the chain lubri-
cation.

n

Use only new oil for  chains. The choice
of the oil viscosity depends on the air
temperature. Never use waste oil or sec-
ond rate oil that could damage the pump,
the bar and the chain.

n

Contact an authorised service centre in
order to choose good oil.

n

Never use the chainsaw without oil.
Check oil level regularly, refill if less than
¼ full.

n

If the lubrication system doesn’t work
properly, check that the oil filter is clean,
eventually contact an authorised service
centre.

9. S

AFETY


CHAINBRAKE

N

F

IG

. 2 - 5

n

This area shows the part of chainsaw
most likely to cause kickback (fig. 5).

n

In the event of kickback, the left hand will
come into contact With chain brake lever,
that incorporates a separate electrical
switch to cut out the current to the motor,
stopping the chain immediately (‘O’ posi-
tion).

n

To reset after operation of the chain
brake, disconnect from power supply and
release the brake by pulling the brake le-
ver into the rearward position (‘1’ posi-
tion).

n

Check chain tension before restarting.

10. S

WITCHING


ON

/

OFF

S

WITCH


ON

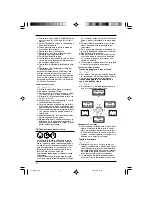
Have a firm grip on the handles. To operate,
ensure both the trigger and the safety lock-
off (2) on the side are depressed simultane-
ously (3).

S

WITCH


OFF

To stop the chainsaw, release the trigger.

E

LECTRIC


MOTOR


SAFETY


SYSTEM

This chainsaw has a device that protects
the motor by disconnecting it when the ef-
fort is too high. To restart, release the trig-
ger. Check that the chain is able to rotate.
Push the trigger and the lock-off button to
start again.

11. M

AINTENANCE

The following suggestions deal with the
daily maintenance of the chainsaw. If they
could not be exhaustive, contact an author-
ised service centre.

02_inglese.p65

25/07/06, 11.40

8

Summary of Contents for SG2000/40ES

Page 1: ...t before using this machine ATTENTION lire attentivement le manuel avant d utiliser cette machine ACHTUNG vor Inbetriebnahme des Ger ts die Gebrauchsanleitung aufmerksam lesen I UK F D Motosega Chain...

Page 2: ...7 9 1 3 5 2 8 6 4 1 1 1 1 1 1 1 1 1 1 1 2 10 11 12 17 0 1...

Page 3: ...1 1 1 1 1 3 1 1 1 1 1 4 15 14 13 16...

Page 4: ...1 1 1 1 1 6 1 1 1 1 1 7 1 1 1 1 1 9 1 1 1 1 1 5 1 1 1 1 1 8 1 1 1 1 1 10...

Page 5: ...right to modify characteristics and data in this manual at any moment and without prior notice Le fabricant se r serve le droit de modifier tout moment et sans pr avis les caract ristiques et les info...

Page 6: ...intenance 8 12 General suggestions for cutting 9 SOMMAIRE F 1 Informations g n rales 11 2 Devis descriptifs 11 3 Symboles 11 4 Mesures de s curit g n rales 11 5 Regles de secutite electriques 12 6 Des...

Page 7: ...i per avere scelto un nostro prodotto per il giardino L elettrosega stata costruita tenendo con to delle norme di sicurezza vigenti a tutela del consumatore In questo manuale sono descritte e illustra...

Page 8: ...pelli vestiti e guanti lonta ni da pezzi in movimento Vestiti lar ghi gioielli o capelli lunghi potranno impi gliarsi nei componenti in movimento Indossare un abbigliamento ed un equipaggiamento di si...

Page 9: ...nerando un peri colo per l utilizzatore 8 SISTEMA DI LUBRIFICAZIONE n La lubrificazione della catena assicura ta da una pompa automatica n Si raccomanda di utilizzare olio nuovo per catene La scelta d...

Page 10: ...o modo l elettrosega tende a muoversi verso il tronco diminuendo il peri colo per l operatore Al contrario se si ta gliasse con la parte superiore della lama tecnica della catena a spingere l elettros...

Page 11: ...del l abbattimento e prevenire cos il bloccag gio della barra durante il taglio n Il taglio di abbattimento deve finire paralle lo alla linea di taglio direzionale con una distanza tra i due di almen...

Page 12: ...Electrical engine no load speed rpm 5800 5800 Bar length cm 40 45 Weigth Kg 5 5 5 65 LpA Soundingpressure dB A 93 5 91 2 LWA Soundingpower dB A 106 106 Vibration level front handle m s2 5 0 4 1 rear h...

Page 13: ...e the switch is in the off position before plugging in Carrying power tools with your finger on the switch or plugging in power tools that have the switch on in vites accidents n Keep the cable away f...

Page 14: ...e chain as this will reduce life of chain bar and motor n Do not under tension the chain as this will make it fall down while working 8 LUBRIFICATION SYSTEM n An automatic pump allows the chain lubri...

Page 15: ...auge height every 5 chain sharpenings Use depth gauge measuring instrument to check the height of the depth gauge 12 GENERAL SUGGESTIONS FOR CUTTING We suggest to cut utilizing the bottom of the bar t...

Page 16: ...10 02_inglese p65 25 07 06 11 40 10...

Page 17: ...Tojours porter chaussures robus tes pas glissantes Tojours porter gants de protection Lire attentivement les instructions Ne pas exposer la pluie D brancher imm diatement si le c ble d alimentation e...

Page 18: ...ux N ap prochez pas les cheveux v tements ou gants des parties de l outil en ro tation Les v tements amples les bijoux ou les cheveux longs peuvent tre attra p s dans les pi ces en mouvement Mettre de...

Page 19: ...tension correcte est synonyme de bonne capacit de coupe et de longue dur e de vie 8 SYSTEME DE LUBRIFICATION n La cha ne est lubrifi e automatiquement n Nous recommandons l usage d huile nou velle po...

Page 20: ...essus du guide n Faire attention la longuer de coupe n Attention en legant les petites branches et viter de scier un bosquet Les branchettes peuvent se coincer dans la cha ne tre projet es vers l oper...

Page 21: ...locage du guide et de la cha ne n L entaille d abattage doit s achever paral l lement au trait de chute l espace entre les deux tant 1 10 du diam tre du tronc La partie non coup e s appelle la char ni...

Page 22: ...sollten die im vorliegenden Handbuch angef hr ten Hinweise nicht eingehalten werden Stromschlaggefahr Immer Schutzhelm Geh rschutz Schutzbrille oder Gesichtsschirm tragen Immer robustes und rutschfest...

Page 23: ...me Stellen Sie sicher da sich der Schalter in der Aus Stellung befindet bevor das Ger t mit dem Netz verbunden wird Durch das Tragen des Ger tes mit dem Finger am Schalter oder durch das Verbinden ein...

Page 24: ...bei ganz zum Ritzel 15 schieben n Die Kette 6 in die Nutung des Schwerts einsetzen und dabei hinten beginnen So vorgehen dass der Zahnschliff nach vorne gerichtet ist auf den Oberteil der Klinge n Die...

Page 25: ...se zie hen n Arbeitshandschuhe anziehen n Pr fen dass die Kette so gespannt ist dass sie sich beim Schleifen nicht be wegt n Die Kette klemmen und dazu den Brems hebel 10 nach vorne schieben n Eine Fe...

Page 26: ...und dem oberen Schnitt wird als Kerbschnittlinie bezeichnet Die Linie muss perfekt horizontal und um 90 bezogen auf die Fallrichtung ausgerichtet sein F llschnitt N ABB 10 n Den F llschnitt auf der a...

Page 27: ...21 DEUTSCH 04_tedesco p65 25 07 06 11 41 21...

Reviews: