background image

TR-CL180 Lens Controller - User Manual

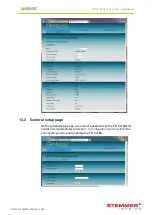
13.3 General setup page

On the general setup page, you can set a password for the TR-CL180 and
send it commands. Refer to

Section 14, Configuration commands

for the

commands you can use to operate the TR-CL180.

26

TR-CL180 Lens Controller - User Manual

14

Configuration commands

In addition to configuring the TR-CL180 using its web page interface, you
can configure it using the Ethernet or RS232 connections. Both of these
methods are described in this section.

14.1 Ethernet configuration

You can configure the TR-CL180 through the Ethernet connection using
UDP or TCP/IP. You can download GardasoftMaint from
www.gardasoft.com/downloads, which allows you to send commands to
configure your TR-CL180.

Commands sent in UDP or TCP/IP from a computer to the TR-
CL180must be sent to destination port 30313. Replies to the source port
have the source port and destination port identities exchanged.

TCP/IP connections time out and close if they remain idle for more than 10
seconds. The host must send regular commands or ‘keep alive’ packets of
data to keep the connection open.

A carriage return (ASCII 13) character must be sent to terminate the
command line in case multiple TCP packets become joined.

14.2 RS232 configuration

When using RS232 to configure the TR-CL180, the COM port should be
set to 115200baud, 8 data bits, no parity, 1 stop bit, no handshaking.

A carriage return (ASCII 13) character should be sent to terminate the
command line.

14.3 Command structure

Commands are sent by the host (a PC connected to the network). The
command is returned by the TR-CL180, together with any reply generated
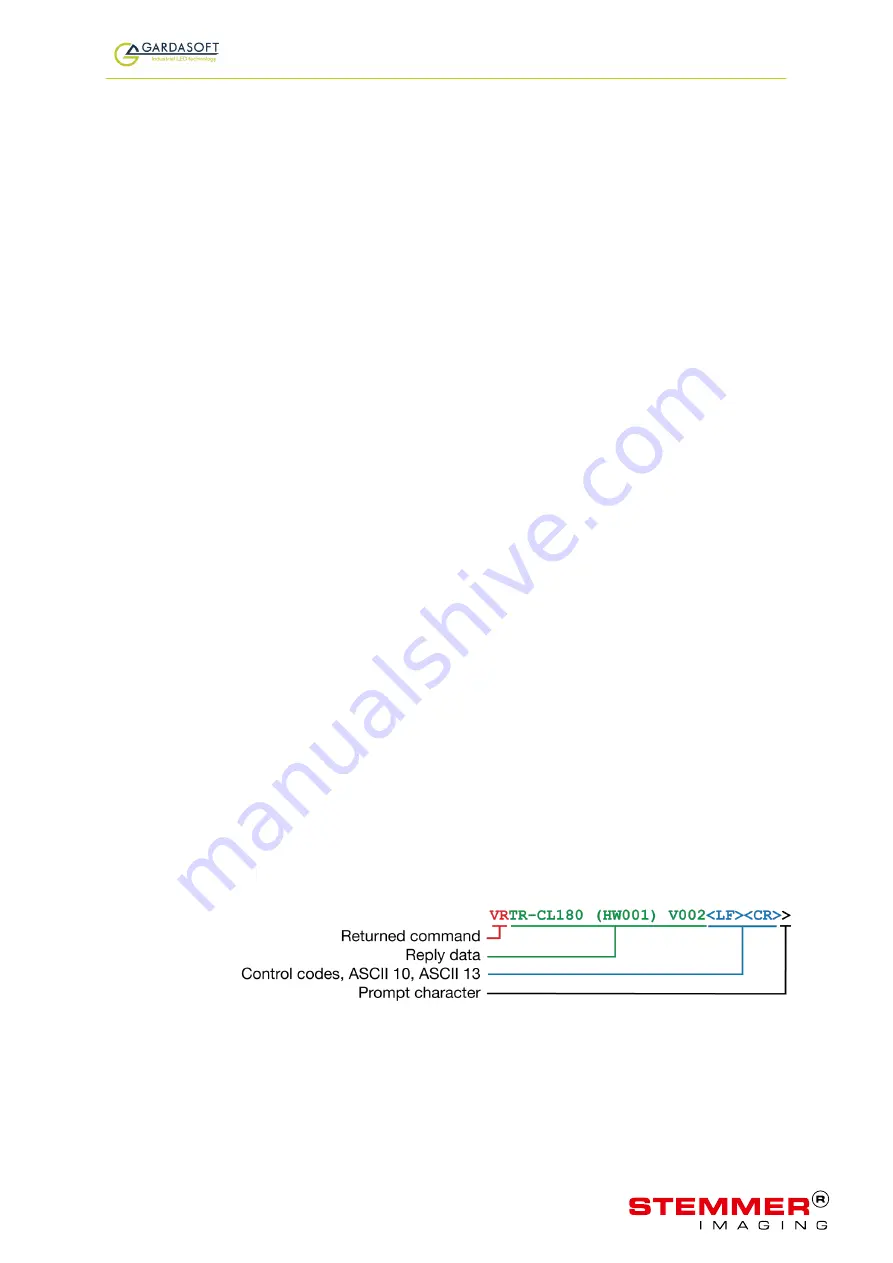
by that command, in UDP or TCP/IP packets followed by

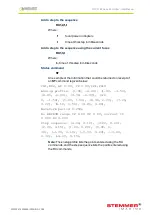
<LF> <CR>

.

The last character sent is the

>

prompt. Once this has been received, the

host knows the command has been completed.

For example, sending the

VR

command might get this reply:

27

WWW.STEMMER-IMAGING.COM
Summary of Contents for TR-CL Series

Page 1: ...TR CL180 Lens Controller Issue 003 User manual www gardasoft com WWW STEMMER IMAGING COM ...

Page 2: ...not cause any dangerous situation or significant financial loss to occur Deliberate acts of endangerment and vandalism are not covered by this document and must be considered by the installer While care has been taken in the preparation of this document Gardasoft Vision Ltd will not accept any liability for consequential loss of any kind except those required by law All trademarks acknowledged Har...

Page 3: ...description 14 10 1 Triggering 14 10 1 1 Trigger input options 15 10 2 Flags 16 10 3 Factory settings 17 11 Front panel commands 17 11 0 1 Startup 17 11 0 2 Setting up continuous optical power 18 11 0 3 Setting up switched output 19 11 0 4 Setting up analog control 20 11 0 5 Setting numerical values 20 11 0 6 Using the key lock 21 11 0 7 Viewing the output current 22 12 Ethernet address 23 12 1 IP...

Page 4: ...4 General commands 29 14 5 Analog mode commands 32 14 6 Waveform commands 34 14 7 Programmable step commands 39 14 8 Command summary 41 15 TR CL180 reference information 42 15 1 Specifications and ratings 42 15 2 Restrictions 43 15 3 Event codes 43 15 4 Error codes 44 WWW STEMMER IMAGING COM ...

Page 5: ... information on trouble shooting problems 4 1 TR CL180 features a summary The TR CL180 product is a single channel lens controller for use in machine vision applications It works with the following ranges of Optotune lenses EL 10 30 EL 16 40 4 2 GigE VisionTM The TR CL180 is GigE Vision compatible This means that any compatible GigE Vision client image processing software for example CVB LabVIEW H...

Page 6: ... taken 5 1 Electrical The user must ensure that the potential difference between any combination of applied signals does not exceed the supply voltage The TR CL180 does not have complete tracking isolation of inputs and outputs Transients caused by inductive loads must be suppressed externally to the TR CL180 5 2 General The TR CL180 must not be used in an application where its failure could cause...

Page 7: ...sichtsmaßnahmen 6 1 Elektrik Der Benutzer muss sicherstellen dass der Potenzialunterschied zwischen jeder beliebigen Kombination an angelegten Signalen die Versorgungsspannung nicht überschreitet Die TR CL180 verfügt über keine vollständige Nachlauf Isolierung der Ein und Ausgänge Spannungsspitzen am TR CL180 aufgrund von induktiven Ladungen müssen extern unterdrückt werden 6 2 Allgemeines Die TR ...

Page 8: ... 1 Électricité L utilisateur doit s assurer que la différence de potentiel entre toute combinaison des signaux appliqués ne dépasse pas la tension de fourniture Le TR CL180 ne dispose pas de système complet d isolation des entrées et sorties Les transitoires causés par les charges inductives doivent être supprimés à l extérieur du TR CL180 7 2 Général Le TR CL180 ne doit pas être utilisé dans une ...

Page 9: ...vironmental considerations Mount the TR CL180 unit vertically or horizontally on the DIN rail to allow the display to be read easily The TR CL180 has an ingress rating of IP20 and it should be sited so that water or dirt cannot enter the unit 9 WWW STEMMER IMAGING COM ...

Page 10: ...own below 9 1 Power Any power supply derived from mains electricity must have a Safety Extra Low Voltage SELV output Route low voltage wiring to the TR CL180 controller separately from mains electricity wiring If this is not possible make sure the low voltage wiring has an insulation rating that is appropriate or supplementary insulation is used The connections are shown below 10 WWW STEMMER IMAGI...

Page 11: ... provides the clocking pulses to the lens and the SDA connection is data 9 3 Trigger input The trigger input is a Smart Input it accepts a range of trigger sources with minimal extra circuitry Refer to Section 10 General description for further information Note The Smart Input is not isolated it is ground referenced to the power supply negative connection 11 WWW STEMMER IMAGING COM ...

Page 12: ...wn below 9 4 Ethernet The RJ45 connector fitted to the TR CL180 requires a straight through cable to connect to a network switch hub or router The connection is 10Base T and operates at 10MBits per second 9 5 RS232 The RS232 connection fitted to the TR CL180 is a standard female 9 way DSUB connector The pin connections are as follows Pin Function 2 Tx 3 Rx 5 Ground 12 WWW STEMMER IMAGING COM ...

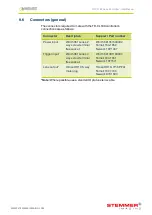
Page 13: ...r input Würth 351 series 2 way screw terminal free socket Würth 691351500002 Farnell 164 1952 Newark 19P1467 Trigger input Würth 361 series 4 way screw terminal free socket Würth 691361100004 Farnell 184 1351 Newark 16T1571 Lens output Hirose HR10 6 way male plug Hirose HR10 7P 6P 73 Farnell 107 7704 Newark 97K1594 Note Where possible use a standard Optotune lens cable 13 WWW STEMMER IMAGING COM ...

Page 14: ...and program a timed sequence of optical power settings see Section 14 7 Programmable step commands The set up is non volatile so the TR CL180 resumes the same operation after a power cycle 10 1 Triggering Trigger pulses should have a minimum pulse width of 2µs You can set the sense of the TR CL180 trigger input Do this by setting the P flag from the front panel see Section 14 Configuration command...

Page 15: ...ver a 3 3V TTL signal only works if it can drive 8kohm without dropping below 2 7V If the P flag is set to 1 the TR CL180 output turns on when the TTL driver goes HIGH To reverse this set the P flag to 0 see Section 10 1 Triggering NPN signal You can connect an NPN open collector drive to the TR CL180 s input Use the connections shown opposite If the P flag is set to 1 the TR CL180 output turns on...

Page 16: ...driving transistor turns on To reverse this set the P flag to 0 see Section 10 1 Triggering Analog signal A 0V to 10V analog signal is input to control the lens optical power when the controller is in Analog mode This can be linear or non linear see Section 14 5 Analog mode commands 10 2 Flags You can set flags on the TR CL180 controller to alter its operation They can be set from the unit s front...

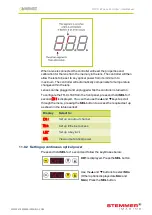
Page 17: ...ent rating The TR CL180 features a protective clear plastic cover over the display and push buttons see above You can open this cover by pressing in the tab on the right of the cover with a fingernail or screwdriver With this cover open the operation of the unit is unaffected by static discharges up to 2kV With the protective cover closed the EMC requirements of EN61326 are fully met The unit is t...

Page 18: ...To configure the TR CL180 from the front panel press and hold SEL for 1 second CH1 is displayed You can then use the p and q keys to scroll through the menu pressing the SEL button to access the required set up as shown in the table overleaf Display Select to CH1 Set up an output channel Eth Set up Ethernet access LOC Set up a key lock UAL View output optical power 11 0 2 Setting up continuous opt...

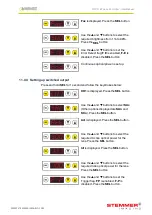
Page 19: ... and follow the keystrokes below CH1 is displayed Press the SEL button Use the p and q buttons to select SAc Other options displayed are SAn and SCo Press the SEL button Act is displayed Press the SEL button Use the p and q buttons to select the required Active optical power for the lens Press the SEL button Idl is displayed Press the SEL button Use the p and q buttons to select the required Idle ...

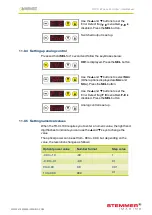
Page 20: ...e SAc and SCo Press the SEL button Use the p and q buttons to set the Error Detect flag F E is enabled F E is disabled Press the SEL button Analog control is set up 11 0 5 Setting numerical values When the TR CL180 requires you to enter a numeric value the right hand digit flashes to indicate you can use the p and q keys to change the value The optical power can be set from 99 to 99 9 but dependin...

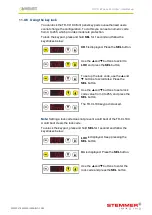
Page 21: ... to LOC and press the SEL button To set up the lock code use the p and q buttons to scroll to Lc Press the SEL button Use the p and q buttons to set a lock code value from 0 to 255 and press the SEL button The TR CL180 keypad is locked Note Setting a lock code does not prevent a cold boot of the TR CL180 A cold boot clears the lock code To unlock the keypad press and hold SEL for 1 second and foll...

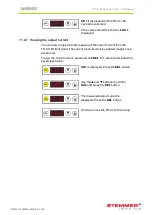
Page 22: ...e of the output current from the TR CL180 front panel The current measurement is updated roughly once per second To view the output current press and hold SEL for 1 second and follow the keystrokes below CH1 is displayed Press the SEL button Use the p and q buttons to scroll to UAL and press the SEL button The measured output current is displayed Press the SEL button Continue to use the TR CL180 n...

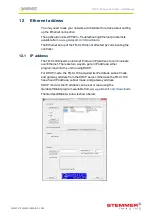
Page 23: ...1 IP address The TR CL180 needs an Internet Protocol IP address to communicate over Ethernet There are two ways to get an IP address either programmed into the unit or using DHCP For DHCP mode the TR CL180 acquired its IP address subnet mask and gateway address from the DHCP server Otherwise the TR CL180 has a fixed IP address subnet mask and gateway address DHCP mode or the IP address can be set ...

Page 24: ...on Select Properties iv From the list select Internet Protocol TCP IP press Properties If Obtain an IP address automatically is set then DHCP is probably used However there may be an alternative fixed IP address on the Alternative Configuration tab You can find out what IP address is being used by a PC at any time by following the steps below i Go to the Control Panel ii Select Network Connections...

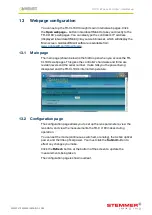
Page 25: ...cess the TR CL180 s webpages This gives the controller s hardware and firmware revision levels and the serial number It also tells you the power being dissipated and the TR CL180 s internal temperature 13 2 Configuration page The configuration page allows you to set up the lens parameters view the lens data and view the measurements the TR CL180 makes during operation You can set the mode continuo...

Page 26: ...er User Manual 13 3 General setup page On the general setup page you can set a password for the TR CL180 and send it commands Refer to Section 14 Configuration commands for the commands you can use to operate the TR CL180 26 WWW STEMMER IMAGING COM ...

Page 27: ... if they remain idle for more than 10 seconds The host must send regular commands or keep alive packets of data to keep the connection open A carriage return ASCII 13 character must be sent to terminate the command line in case multiple TCP packets become joined 14 2 RS232 configuration When using RS232 to configure the TR CL180 the COM port should be set to 115200baud 8 data bits no parity 1 stop...

Page 28: ... The TR CL180 replies to the commands individually separating them with LF CR and adding the prompt after the final command reply All commands comprise a code of two letters followed by any parameter necessary All spaces in the command are ignored Numeric parameters are separated by a comma Time periods are specified in milliseconds by default but you can add s ms or us to the parameter to specify...

Page 29: ...de and allows the brightness to be set RS1 s Where s optical power within the range of the lens Set switched mode This command sets the output to switched mode and allows the optical power to be set RU1 a i Where a the Active optical power within the range of the connected lens i the Idle optical power within the range of the connected lens Set the option flags This command sets the flags for erro...

Page 30: ...RP and AW commands are cleared Show configuration This command shows the configuration of the TR CL180 Type in ST A typical reply to this command might be CH1 MD0 AF 3 95 IF 0 00 IP1 FL0 Mn0 0 Mx0 Where CH Channel number this is always 1 MD Mode 0 continuous 1 switched 2 analog AF Active optical power in the range of the connected lens IF Idle optical power in the range of the connected lens IP Al...

Page 31: ...isplayed on the TR CL180 is cleared If there are no outstanding events or errors the prompt is returned Set Clear the webpage password This command sets the webpage password Up to six characters can be chosen Type in EYasc1 asc2 asc3 asc4 asc5 asc6 Where asc1 to asc6 are decimal ASCII values for the letters of your password For example a value of 65 is A 66 is B and so on up to 90 for Z Note When ...

Page 32: ...wer of the lens connected to the TR CL180 The translation from input voltage to focal power can be linear or can be a non linear profile The non linearity is set up by the number of steps in a translation table and the value associated with each The commands are described below Set analog mode This command sets the output to analog mode so that the optical power is set by an analog input voltage T...

Page 33: ...he profile 2 to 10 This command sets a point within the non linear translation RA1 d f a Where d the point to be set 0 to number of points 1 a analog input voltage f equivalent focal power for the input voltage The translation points are assumed to be valid Voltages below the first voltage are set to the focal power of the first point Voltages above the last voltage are set to the focal power of t...

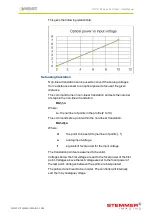
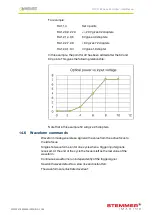
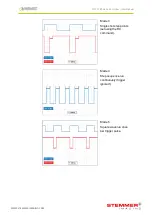
Page 34: ...s the following relationship Note that in this example 5V will give 2 5 diopters 14 6 Waveform commands Waveform mode generates a signal with a value from the active focus to the idle focus Single shot waveforms run for one cycle when a trigger input signal is received At the end of the cycle the focus is left as the last value of the waveform Continuous waveforms run independently of the trigger ...

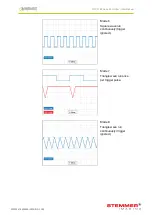
Page 35: ...Lens Controller User Manual Mode 3 Single shot step points set using the RX command Mode 4 Step sequence run continuously trigger ignored Mode 5 Square wave run once per trigger pulse 35 WWW STEMMER IMAGING COM ...

Page 36: ... Lens Controller User Manual Mode 6 Square wave run continuously trigger ignored Mode 7 Triangle wave run once per trigger pulse Mode 8 Triangle wave run continuously trigger ignored 36 WWW STEMMER IMAGING COM ...

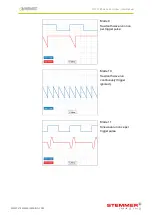
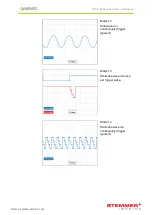
Page 37: ...180 Lens Controller User Manual Mode 9 Sawtooth wave run once per trigger pulse Mode 10 Sawtooth wave run continuously trigger ignored Mode 11 Sine wave run once per trigger pulse 37 WWW STEMMER IMAGING COM ...

Page 38: ...Lens Controller User Manual Mode 12 Sine wave run continuously trigger ignored Mode 13 Staircase wave run once per trigger pulse Mode 14 Staircase wave run continuously trigger ignored 38 WWW STEMMER IMAGING COM ...

Page 39: ... 10 seconds RU1 2 0 RN1 10 200 Set a continuous sawtooth wave at 5Hz from 0 to 2 diopters with a slow fall and fast rise RU1 2 0 RN1 10 200 Set a continuous sawtooth wave at 5Hz from 0 to 2 diopters with a slow rise and fast fall 14 7 Programmable step commands Use this command to set up a sequence of steps where different optical powers can be set up for a programmed period of time Set the number...

Page 40: ...an ST command is given below CH1 MD2 AF 0 00 IF 0 00 IP1 FL14 Analog profile 1 00 4 00 1 90 3 50 2 80 3 20 3 70 2 00 4 6 0 1 50 5 40 1 50 6 30 2 00 7 20 3 20 8 10 3 50 9 00 4 00 Waveform period 0 050s No EEPROM range IF 0 00 XF 0 00 current IC 0 000 XC 0 000 Step sequence 4 00 0 10 3 00 0 20 2 00 0 15 1 00 0 20 0 00 0 30 1 00 0 10 2 00 0 20 3 00 0 30 4 00 0 15 Note The analog profile lists the poi...

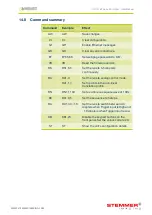
Page 41: ...iopters continuously RA RA1 0 RA1 1 4 Set the lens to analog control mode Set 4 points in the non linear translation profile RN RN1 1 100 Set a continuous square wave at 10Hz RX RX1 0 5 Set the sequence to 5 steps RU RU1 4 3 1 8 Set the lens to switch between 4 3 diopters when Trigger input is High and 1 8 diopters when Trigger input is Low KB KB1 23 Disable the keypad buttons on the front panel S...

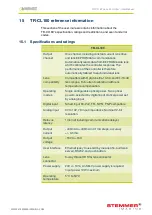
Page 42: ...tune EL 10 30 and EL 16 40 lens ranges Full current calibration with lens temperature compensation Operating modes Single configurable optical power Two optical powers selected by digital input Optical power set by analog input Digital input Smart input 3V 24V TTL NPN PNP compatible Analog input 0V to 10V 7K input impedance Nominal 12 bit resolution Refocus latency 1ms not including communications...

Page 43: ...sent by the TR CL180 over its Ethernet link when a light is connected or an error occurs The message format is Evt1 event code Some event codes are displayed on the TR CL180 s front panel these are shown in red Event number Reason 1 to 127 An error has occurred See Section 15 4 Error codes 130 FAt An over temperature error has occurred 190 A lens has been connected 191 A lens has been disconnected...

Page 44: ... Err 8 12 EEPROM corrupt The configuration has been cleared Err 9 20 Settings could not be saved to EEPROM Err 27 Ethernet settings cannot be read from EEPROM They may be incorrect Err 44 FAt Fatal error The TR CL180 is too hot The unit has a thermal cut out which operates at approximately 65 C to 70 C depending on conditions Err 192 Unable to read EEPROM in lens Err 193 194 195 Lens EEPROM format...

Page 45: ...TR CL180 Lens Controller User Manual This page is left blank for your notes 45 WWW STEMMER IMAGING COM ...

Page 46: ...Copyright 2016 Gardasoft Vision Ltd Gardasoft Vision Ltd Trinity Court Buckingway Business Park Cambridge CB24 4UQ UK tel 44 1954 234970 fax 44 1954 231567 Gardasoft LLC Oak Ridge Road Weare New Hampshire 03281 USA tel 1 603 657 9026 www gardasoft com WWW STEMMER IMAGING COM ILL GARD32 10 2019 Subject to technical change without notice No liability is accepted for errors which may be contained in ...

Reviews: