background image

22

en

       Home Connect

Home Connect settings

Home Connect can be adapted to your specific needs at 
any time.

Note: 

You will find the Home Connect settings in the 

basic settings for your appliance. Which settings the 
display shows will depend on whether Home Connect 
has been set up and whether the appliance is 
connected to your home network.

Remote diagnostics

Customer Service can use Remote Diagnostics to 
access your appliance if you contact them, have your 
appliance connected to the Home Connect server and if 
Remote Diagnostics is available in the country in which 
you are using the appliance.

Note: 

For further information and details about the 

availability of Remote Diagnostics in your country, 
please visit the service/support section of your local 
website: www.home-connect.com

About data protection

When your appliance is connected for the first time to a 
WLAN network, which is connected to the Internet, your 
appliance transmits the following categories of data to 
the Home Connect server (initial registration):

Unique appliance identification (consisting of 
appliance codes as well as the MAC address of the 
installed WiFi communication module).

Security certificate of the WiFi communication 
module (to ensure a secure IT connection).

The current software and hardware version of your 
domestic appliance.

Status of any previous resetting to factory settings.

This initial registration prepares the Home Connect 
functions for use and is only required when you want to 
use these Home Connect functions for the first time.

Note: 

Ensure that the Home Connect functions can be 

used only in conjunction with the Home Connect app. 
Information on data protection can be accessed in the 
Home Connect app.

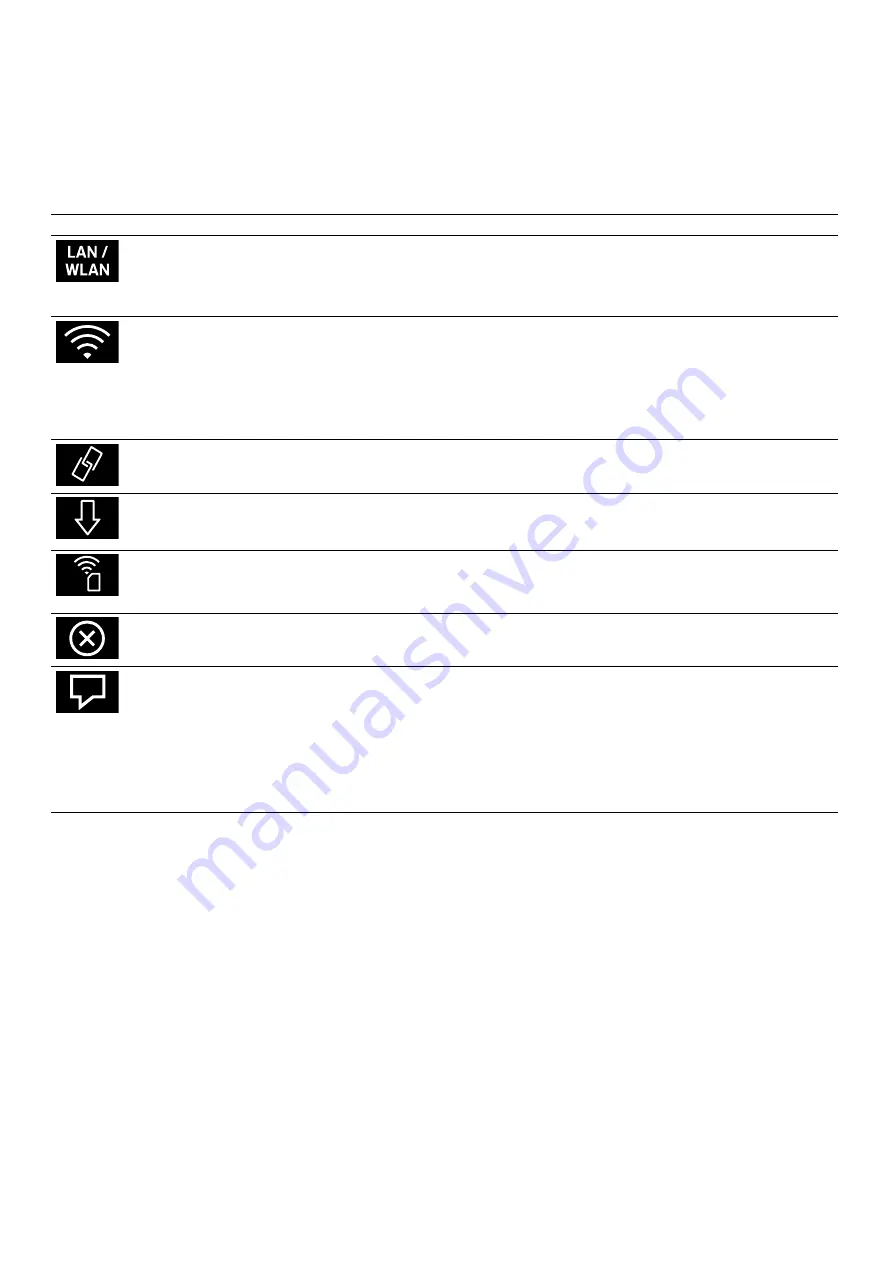
Basic setting

Permitted settings

Explanation

Connection type

LAN/Wi-Fi

You can switch between connection types (LAN cable and 
Wi-Fi).

Follow the instructions for setting up the relevant connection 
type.

~

 "Setting up" on page 21

Connecting

Connect/disconnect

Switch the network connection on or off as required (e.g. for 
holiday).

Network information is retained after the appliance is 
switched off.After switching on the appliance, you will need 
to wait for a few seconds while it reconnects to the network.

In networked standby mode, the appliance requires max. 2 W.

Connect to app

Start the connection process between the app and the appli-
ance.

Software update

As soon as a new software version is available, a message 
appears in the display. You can install the new software in the 
Home Connect menu 

Í

.

Remote control

Activate/deactivate

Access the appliance's functions via the Home Connect app.

When deactivated, only the appliance's operating statuses 
will be displayed in the app.

Delete network set-
tings

All network settings can be deleted from the appliance at any 
time.

Appliance information

The display shows:

MAC address COM module

Serial number of the appliance

Software version

You can view more information – such as the SSID (network 
name), although this depends on the connection type – by 
touching the arrow button.

Summary of Contents for BOP 220 1 2 Series

Page 1: ...Instruction manual BOP 220 221 1 2 Oven...

Page 2: ...imer 15 Stopwatch 16 Cooking time 16 End of cooking time 17 FLong term timer 18 Setting the long term timer 18 Individual recipes 19 Recording a recipe 19 Programming a recipe 19 Entering names 19 Sta...

Page 3: ...ed under warranty This appliance is intended for domestic use only The appliance must only be used for the preparation of food and drink The appliance must be supervised during operation Only use this...

Page 4: ...4 en Intended use Always slide accessories into the cooking compartment correctly See description of accessories in the instruction manual...

Page 5: ...arge quantities of drinks with a high alcohol content Only use small quantities of drinks with a high alcohol content Open the appliance door with care Risk of burns Bulbs become very hot when switche...

Page 6: ...fire The appliance will become very hot on the outside during the pyrolytic cleaning cycle Never hang combustible objects e g tea towels on the door handle Do not place anything against the front of...

Page 7: ...not sit on the appliance door or place or hang anything on it Do not place any cookware or accessories on the appliance door Inserting accessories depending on the appliance model accessories can scra...

Page 8: ...nel and the individual operating controls are explained You will find information on the cooking compartment and the accessories Oven Display and operating controls These instructions are valid for di...

Page 9: ...on selector is used to select the type of heating the cleaning function or the basic set tings Symbol Function I Start Stop H Pause End Cancel Delete Confirm save settings C Selection arrow Call up ad...

Page 10: ...al The symbol appears for important information and indicates that an action is required Important information on safety and operating status is also occasionally displayed automatically These message...

Page 11: ...ple grilling fruit flan with meringue 6 L Bottom heating 50 300 C Default temperature 170 C For adding extra baking time such as for moist fruit flans for boiling down for dishes in a bain marie 7 K H...

Page 12: ...t been connected to a power supply for a number of days Once the appliance has been connected to a power supply the GAGGENAU logo will appear first for approximately 30 seconds The Initial settings me...

Page 13: ...eal for this Cleaning accessories Before using the accessories for the first time clean them thoroughly using hot detergent solution and a soft cloth 1Operating the appliance OperatingtheapplianceCook...

Page 14: ...preconfigured in the factory settings You can select Rapid heating or Heat up in the basic settings Basic settings on page 25 Safety shut off For your protection the appliance is equipped with an aut...

Page 15: ...Stopwatch function 3 Touch I to start The timer menu is closed and the timing begins The p symbol and the elapsed time are shown in the display Pausing and restarting the stopwatch 1 Call up the timer...

Page 16: ...time of 40 minutes You want it to be ready at 15 30 Enter the cooking time and delay the cooking time end until 15 30 The electronics system calculates the start time The appliance starts automatical...

Page 17: ...cooking time the cooking time end the switch off date and the temperature 3 Changing the cooking time 6 Touch the symbol Set the required cooking time using the rotary selector 4 Changing the cooking...

Page 18: ...eached the set temperature Each phase must last at least 1 minute During the first minute of a phase you can change the type of heating or the temperature Programming a recipe You can programme and sa...

Page 19: ...s does not change the saved recipe Change recipe You can change the settings of a recorded or programmed recipe 1 Turn the function selector to the any type of heating The i symbol is displayed 2 Touc...

Page 20: ...available in every country You can find more information on this at www home connect com Notes Ensure that you follow the safety instructions in this instruction manual and that you comply with these...

Page 21: ...tructions in the app If the display shows Network connection successful the connection process is complete Follow the instructions in the app Connecting the appliance to the app Connect your appliance...

Page 22: ...me Connect functions for use and is only required when you want to use these Home Connect functions for the first time Note Ensure that the Home Connect functions can be used only in conjunction with...

Page 23: ...that the ap pliance with Home Connect functionality is in compli ance with relevant statutory requirements 1 A detailed Declaration of Conformity can be found on line at www gaggenau com gb among the...

Page 24: ...e desired display The selection is displayed Display Reduced Standard If the Reduced setting has been selected only the most important information will be shown on the display after a short time Touch...

Page 25: ...ode On Off Only for presentation purposes The appliance does not heat up in demo mode all other func tions are available The Off setting must be activated for normal operation The setting is only poss...

Page 26: ...one go Removing the insert grids The insert grids can be removed for cleaning Area Cleaning products Door panels Glass cleaner Clean with a soft cloth or a microfibre cloth Do not use glass scrapers...

Page 27: ...ays and tins is destroyed and noxious gases are released Never let non stick baking trays and tins go through the pyrolytic cleaning cycle Only enamelled accessories may be cleaned at the same time m...

Page 28: ...m is opened as soon as the temperature falls below 200 C Depending on the type of soiling white deposits may remain on the enamel surfaces These deposits are residue from the food and are harmless The...

Page 29: ...ulb unplug the appliance from the mains or switch off the circuit breaker in the fuse box m Warning Risk of burns Bulbs become very hot when switched on There is still a risk of burning for some time...

Page 30: ...t advice The rating plate bearing these numbers can be found when you open the appliance door To save time you can make a note of the number of your appliance and the telephone number of the after sal...

Page 31: ...e the glass may crack Some operating modes are not available on all oven models or are only available in conjunction with certain optional accessories Eco hot air Energy saving hot air mode for cakes...

Page 32: ...H 30 Recipe tip Drizzle balsamic vinegar over the vegetables while they are still hot and season them 3 4 250 Q 15 20 Escalivada Mediterranean oven roasted vegeta bles Ovenproof dish 4 5 250 Q 15 Reci...

Page 33: ...a little oil season with salt and paprika or curry powder after cook ing Chips frozen Baking tray greaseproof paper 3 4 220 H 14 Potato gratin Ovenproof dish 2 3 180 H 35 2 3 190 I 55 60 No need to pr...

Page 34: ...10 minutes and leave to brown for a further 10 minutes Cheese sp tzle Swabian noodle dish Ovenproof dish 2 3 180 220 H 30 Gradually layer the freshly cooked sp tzle in the dish sprinkling each layer w...

Page 35: ...he oven Quiche Tart tin or dish 2 3 200 N 20 20 Pre bake the base for 20 minutes pour the mixture onto the base and then bake for a further 20 minutes Onion tart Baking tray 2 3 200 N 30 40 Meal Acces...

Page 36: ...H 25 35 Recipe tip Delicious with B arnaise sauce or sliced cold with remoulade and roast potatoes medium rare Glass dish grill tray 2 3 230 180 H 30 40 well done Glass dish grill tray 2 3 230 180 H 5...

Page 37: ...Recipe tip Marinate overnight in a mixture of olive oil garlic rosemary and sliced lemon well done Glass dish grill tray roaster 2 3 180 190 H 120 Lamb knuckle Glass dish grill tray roaster 2 3 180 20...

Page 38: ...g time mins Comments Sear on all sides in a frying pan roasting dish on the hob first Sear the meat at a high temperature set the lower temperature after 15 20 minutes Cook the meat at a low temperatu...

Page 39: ...d the side with more skin should be at the top This makes it nice and crispy Marinate in a mixture of oil rosemary sliced lemon and garlic 3 4 220 Z 30 Chicken breast Wire rack Grill tray 2 3 200 H 20...

Page 40: ...samic vinegar honey garlic Worcester sauce tomato pur e and Tabasco sauce 3 4 220 Z 30 Chicken satay Wire rack grill tray 3 4 250 Z 10 14 Serve with satay sauce Halloumi cheese grill cheese Wire rack...

Page 41: ...55 60 Bundt cake ring cake Ring cake tin 1 2 165 H 30 Recipe tip Stick to a traditional Bundt cake recipe or add bacon and walnuts 1 2 170 I 55 No need to preheat do not open the appli ance door Tray...

Page 42: ...la custard choco late mousse fruit cream or mocha cream 2 3 180 N 40 2 3 180 K 35 Biscuits piped cookies Baking tray 2 3 160 170 H 15 2 3 160 170 N 18 Small baked puff pastry items Baking tray greasep...

Page 43: ...nce with EN60350 1 Appliance width 76 cm Glass tray 3 150 H 26 32 Preheat Baking tray Glass tray 4 2 150 H 30 32 Preheat Applies to baking on two levels Glass tray 4 160 N 23 24 Preheat Piped cookies...

Page 44: ...Baking tray greaseproof paper 2 3 200 H 20 25 Recipe tip Fill with sheep s cheese and feta cheese Plaited loaf Baking tray greaseproof paper 2 3 165 H 20 2 3 170 I 30 35 No need to preheat do not ope...

Page 45: ...a crumble topping equally delicious with berries or mirabelles 2 3 200 O 25 30 For soft apple varieties 2 3 200 M 25 30 For firm apple varieties Baked apple Ovenproof dish 2 3 190 200 H 20 30 Recomme...

Page 46: ...l need a baking stone and heating element these are optional accessories Whether you are baking crispy pizza or fresh bread with the baking stone you will achieve results that are comparable to or eve...

Page 47: ...stone 1 250 200 T 50 60 Olive and tomato bread Baking stone 1 175 T 45 Pizza fresh Baking stone 1 275 T 5 8 The cooking time varies depending on the type and thickness of the dough and top ping Pizza...

Page 48: ...ausger te GmbH Carl Wery Stra e 34 81739 M nchen GERMANY www gaggenau com Valid within Great Britain Imported to Great Britain by BSH Home Appliances Ltd Grand Union House Old Wolverton Road Wolverton...

Reviews: