background image

EN

6

PREPARATION FOR USE

Antenna Connection

1

Connect an RF cable to 

(aerial)

 Input jack at the 

rear of this unit.

2

Plug this unit into an AC outlet.

3

When the 

STAND BY

/

POWER

 indicator on the front 

panel lights red, then press 

Q

 to turn on the unit.

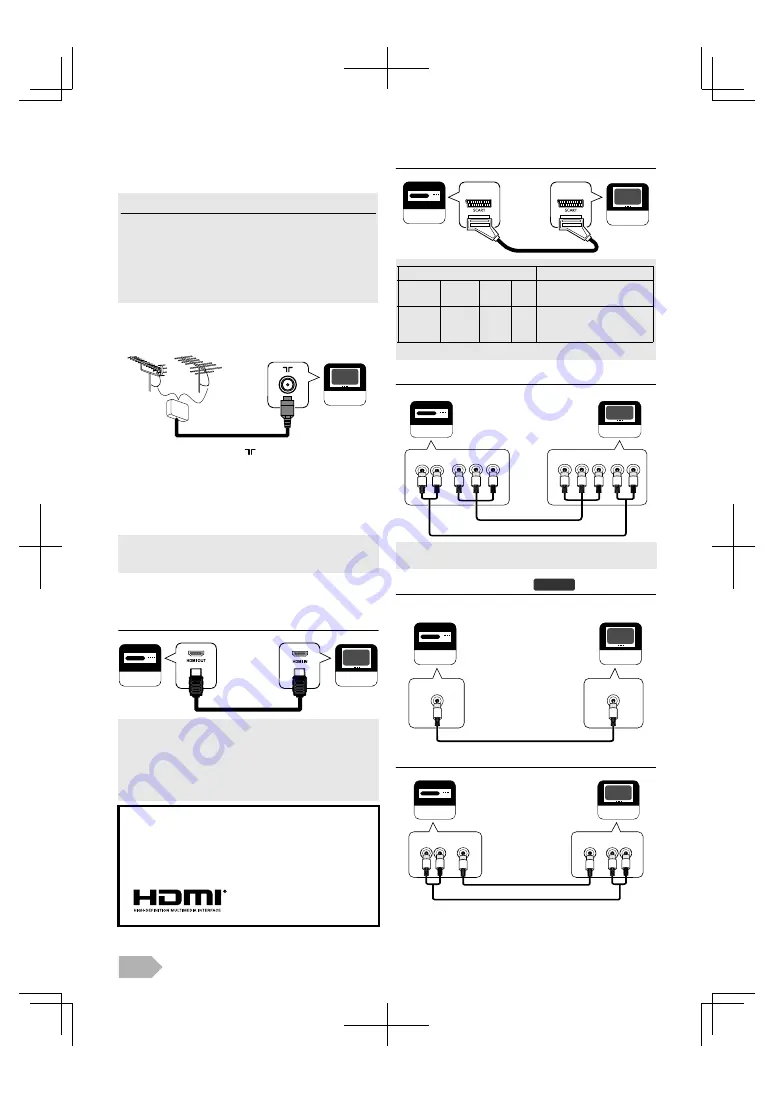
External Connection

HDMI Connection (HDMI 1 / HDMI 2)

SCART Connection

Component Video Connection

Audio output connection 

For digital broadcasting only

Composite Video Connection

• Make sure the rest of Component Video jacks (Pb/Pr) are 

unplugged completely when you plug the Composite Video 
jack to Y/VIDEO terminal.

Read this first

• No supplied cables are used with these connection. Please 

purchase the necessary cables at your local store.

• Illustration in the following connection are example. Read 

the manual accompanying your device for more detail.

• Before you connect, be sure your antenna or other device 

is connected properly before plugging in the AC power 
cord.

• If you like to connect an active DVB-T antenna, the 

antenna must have its own power supply.

• It is not possible to power the antenna from the TV.

• This unit accepts 480i / 480p / 576i / 576p / 720p /         

1080i / 1080p video signals and 32 kHz / 44.1 kHz / 48 kHz 
only 2 channel audio signals (LPCM).

• You need to select “PCM” for the digital audio output of 

the device you connect. Make sure the device outputs the 
digital audio. Audio sometimes makes no sound if you 
select “Bitstream”, etc.

Dear Customer,
By connecting an HDMI cable to your Funai LCD TV, you 
have to use only a certified HDMI cable to guarantee a 
sufficient immunity against parasitic frequency radiation.
A certified HDMI cable can be identified by the HDMI logo 
on the cable or the cable package.

Your TV

VHF/UHF 

MIXER

VHF

UHF

Your TV

Your device

HDMI cable

• Inappropriate output is not available.

• This unit accepts 480i / 480p / 576i / 576p / 720p / 1080i 

video signals for component connection.

Your TV

Your device

SCART cable

Input

Output

S-Video

Audio

(L/R)

CVBS RGB

Video and Audio (L/R)

Yes

Yes

Yes

Yes

Outputs the RF input  

signal converted as CVBS  

signal.

AUDIO IN

COMPONENT VIDEO IN

Y

Pb

Pr

AUDIO OUT

COMPONENT VIDEO OUT

L

R

Y

Pb

Pr

Your device

Your TV

audio cable

component video cable

L

R

DTV

DIGITAL AUDIO

COAXIAL OUT

DIGITAL AUDIO

COAXIAL IN

Your device

Your TV

digital audio coaxial cable

AUDIO IN

VIDEO IN

AUDIO OUT

VIDEO OUT

Your device

Your TV

L

R

L

R

Y/VIDEO

audio cable

composite video cable

Summary of Contents for LED19-H820M

Page 1: ...tina Pr ru ka pou vate a LCD telev zor Sloven ina Manuel du propri taire T l vision LCD Fran ais Kasutusjuhend LCD teler Eesti keel Lietot ja rokasgr mata LCD televizors Latvie u Owner s Manual LCD T...

Page 2: ...l instructions to ensure correct and safe installation and interconnection of the unit in multimedia systems 12 Keep a distance of 20 cm around the ventilation openings of the unit 13 Batteries batter...

Page 3: ...bol indicates that this product may not be treated as household waste By ensuring this product is disposed of correctly you will help prevent potential negative consequences for the environment and hu...

Page 4: ...rews are removed move the base in the opposite direction on step 2 to pull the base from the unit Be careful not to drop the base when you remove it Tilting the Unit Fixing the Unit on Your Furniture...

Page 5: ...p 8 PROG K L works same function as K L cursor on the menu 23 PICTURE MODE p 12 24 SOUND MODE p 13 25 subtitle p 16 Terminals 26 aerial Input jack p 6 27 PC Input jack p 7 28 HDMI HDMI 1 HDMI 2 Input...

Page 6: ...480i 480p 576i 576p 720p 1080i 1080p video signals and 32 kHz 44 1 kHz 48 kHz only 2 channel audio signals LPCM You need to select PCM for the digital audio output of the device you connect Make sure...

Page 7: ...tlet Your TV If you select the country except Spain or Portugal you can skip region setting Scan confirmation menu will appear If you press MENU during DTV channel scanning this operation will be stop...

Page 8: ...creen Information p 9 Read this first These operations are accessible by remote control Some may also be accessible by controls on the main unit e g If you want to select the channel 24 without pressi...

Page 9: ...ines use K L to scroll 11 Audio Description p 15 is displayed when the TV programme provides additional audio description for visually impaired 12 Teletext p 16 is displayed if the teletext of TV prog...

Page 10: ...ayback or slideshow SKIP H SKIP G Press to skip backward or forward the file PAUSE F Press to pause the playback or slideshow STOP C Press to stop the playback or slideshow To toggle between Play List...

Page 11: ...recorded under the following specifications MP3 Sampling frequency 32 kHz or 44 1 kHz or 48 kHz Constant bit rate 32 kbps 320 kbps JPEG Upper limit 24 Mpixel Auto Selects the TV screen display mode au...

Page 12: ...tting you want then press OK High Mid or Low CTI Colour Transient Intensity You can adjust the picture for colour errors 3 Use K L to select CTI then press OK 4 Use K L to select the setting you want...

Page 13: ...t s remote control Make sure FUN LINK Control is set to On 2 Use K L to select TV Speakers then press OK 3 Use K L to select the setting you want then press OK On Off or Ext Amp Digital Audio Output Y...

Page 14: ...g will start 3 Use K L to select Channel then press OK 4 Use K L or the Number buttons to select the channel number you want then press OK 5 Use K L to select Frequency then press OK 6 Use the Number...

Page 15: ...in You must select DTV at Switching the Input Mode p 8 1 Use K L to select OTHERS then press OK 2 Use K L to select TV Settings then press OK 3 Use K L to select Preferred Audio then press OK Main Aud...

Page 16: ...t Teletext Language then press OK 5 Use K L to select the language you want then press OK Decoding Page Language You can switch to the appropriate language group 4 Use K L to select Decoding Page Lang...

Page 17: ...unction allows you to operate the linked functions between our brand devices with a FUN LINK feature and this unit connecting through an HDMI cable 1 Use K L to select OTHERS then press OK 2 Use K L t...

Page 18: ...to select the time difference you want then press OK On Selects if you have connected an external device that is compatible with the FUN LINK function Off Disables all FUN LINK functions The followin...

Page 19: ...ress OK 4 Use K L to select On or Off then press OK Search for new software You can search for new version of software 3 Use K L to select Search for new software then press OK When this unit found a...

Page 20: ...used check for broken wire Adjust Contrast and Brightness control Surrounding temperature is too low Lines or Streaks in Picture Try a new channel if OK then possibly due to poor channel reception If...

Page 21: ...Television system DVB T MPEG4 H 264 PAL B G D K SECAM B G D K L Terminals Antenna UHF VHF 75 ohm Audio Input RCA jack L R x 1 Composite Video Input RCA jack shared terminal with Y of components 1 Comp...

Page 22: ...may cause damage and discoloration to the exposed surfaces Panel Cleaning If the LCD panel should require cleaning wipe it with a cotton or soft cloth Before cleaning the panel disconnect the power co...

Page 23: ...cense The Program below refers to any such program or work and a work based on the Program means either the Program or any derivative work under copyright law that is to say a work containing the Prog...

Page 24: ...tically receives a license from the original licensor to copy distribute or modify the Program subject to these terms and conditions You may not impose any further restrictions on the recipients exerc...

Page 25: ...it will be useful but WITHOUT ANY WARRANTY without even the implied warranty of MERCHANTABILITY or FITNESS FOR A PARTICULAR PURPOSE See the GNU General Public License for more details You should have...

Page 26: ...Web Site http www funai eu 1EMN27220 A0C78EP A0CN8EP...

Reviews: