


502
Upgrade and Maintenance Manual
RX2540 M4
System board and components
16.2.1.2 Replacing the defective CMOS battery
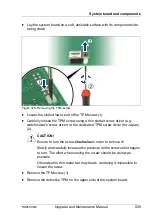
Figure 372: Replacing the CMOS battery
Ê
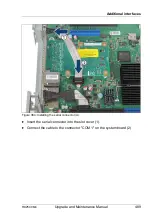
Press the locking spring into direction of the arrow (1), so that the CMOS
battery jumps out of its socket.
Ê
Remove the CMOS battery (2).
V
CAUTION!
Sharp tools such as screw drivers might damage system board
components in case of slipping.
If the CMOS battery cannot be ejected without the help of a tool, it is
recommended to use a tooth pick.
Ê
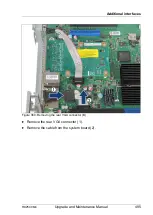
Insert a new CMOS battery of the same type into the socket (3) and (4).
16.2.1.3 Concluding steps
Ê
Dispose of the CMOS battery in accordance with local regulations
concerning special waste.
Ê
"Installing the air duct" on page 89
Ê
Ê
"Connecting the power cord" on page 67
Ê
"Switching on the server" on page 70
Ê
"Verifying the system time settings" on page 109
1
2
3
4
Summary of Contents for PRIMERGY RX2540 M4
Page 40: ...40 Upgrade and Maintenance Manual RX2540 M4 Before you start ...
Page 90: ...90 Upgrade and Maintenance Manual RX2540 M4 Basic hardware procedures ...
Page 136: ...136 Upgrade and Maintenance Manual RX2540 M4 Power supply unit PSU ...
Page 228: ...228 Upgrade and Maintenance Manual RX2540 M4 Hard disk drives HDD and solid state drives SSD ...
Page 344: ...344 Upgrade and Maintenance Manual RX2540 M4 Main memory ...
Page 362: ...362 Upgrade and Maintenance Manual RX2540 M4 Processor CPU ...
Page 390: ...390 Upgrade and Maintenance Manual RX2540 M4 Liquid cooling LC ...
Page 498: ...498 Upgrade and Maintenance Manual RX2540 M4 Additional interfaces ...
Page 572: ...572 Upgrade and Maintenance Manual RX2540 M4 Appendix A ...
Page 574: ...574 Upgrade and Maintenance Manual RX2540 M4 Appendix B ...
Page 582: ...8 RX2540 M4 Basic Serial RS 232 Cable plan System Board D3384 RS 232 onboard RS 232 rear C6 ...
Page 634: ...List of all used screws for PRIMERGY Servers Assembled in Germany and Japan January 2017 ...