


186
Upgrade and Maintenance Manual
RX2540 M4
Hard disk drives (HDD) and solid state drives (SSD)
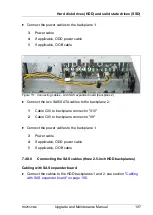
7.4.7.2
Removing a 2.5-inch HDD/SSD module
Ê
Pinch the green locking clip and open the locking lever (see figure
).
Ê
Pull the HDD/SSD module out a few centimeters.
Ê
Wait about 30 seconds to allow the HDD to spin down.
I
This is not necessary when removing an SSD.
I
This period is necessary for the RAID controller to recognize that an
HDD module has been removed and for the HDD to come to a stop.
Ê
Pull the HDD/SSD module completely out of its bay.
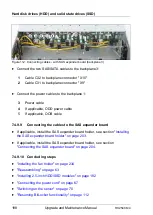
7.4.7.3
Installing a 2.5-inch dummy module
V
CAUTION!
If the removed HDD/SSD module is not replaced immediately, always
replace a dummy module into the unused HDD/SSD bay to comply with
applicable EMC regulations and satisfy cooling requirements.
Figure 101: Installing a 2.5-inch dummy module
Ê
Push the dummy module into the empty bay until it engages.
7.4.7.4
Concluding steps
Ê
No steps needed.
Summary of Contents for PRIMERGY RX2540 M4
Page 40: ...40 Upgrade and Maintenance Manual RX2540 M4 Before you start ...
Page 90: ...90 Upgrade and Maintenance Manual RX2540 M4 Basic hardware procedures ...
Page 136: ...136 Upgrade and Maintenance Manual RX2540 M4 Power supply unit PSU ...
Page 228: ...228 Upgrade and Maintenance Manual RX2540 M4 Hard disk drives HDD and solid state drives SSD ...
Page 344: ...344 Upgrade and Maintenance Manual RX2540 M4 Main memory ...
Page 362: ...362 Upgrade and Maintenance Manual RX2540 M4 Processor CPU ...
Page 390: ...390 Upgrade and Maintenance Manual RX2540 M4 Liquid cooling LC ...
Page 498: ...498 Upgrade and Maintenance Manual RX2540 M4 Additional interfaces ...
Page 572: ...572 Upgrade and Maintenance Manual RX2540 M4 Appendix A ...
Page 574: ...574 Upgrade and Maintenance Manual RX2540 M4 Appendix B ...
Page 582: ...8 RX2540 M4 Basic Serial RS 232 Cable plan System Board D3384 RS 232 onboard RS 232 rear C6 ...
Page 634: ...List of all used screws for PRIMERGY Servers Assembled in Germany and Japan January 2017 ...