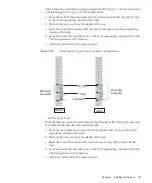
2U center
1U center
Mounting area
(4U)
REAR
Note
-
If
the
door
cannot
close
because
the
cable
support
fixing
bracket
or
the
cable
support
protrudes
from
the
rear
of
the
rack,
do
not
attach
the
cable
support
bracket.
However,
secure
the
rail
to
the
rack
with
two
M6
screws.
A (M5 screws)
REAR
FRONT
Figure
3-50
Securing
the
cable
support
fixing
brackets
and
the
rails
d.
After
attaching
the
cable
support
fixing
brackets,
confirm
that
the
rack
door
can
close.
8.
Secure
the
rail
sides
by
using
the
screws
(M5)
removed
in
step
5
(A
in
.
Figure
3-51
Securing
the
sides
of
rails
with
screws
9.
Mount
the
chassis
in
the
rack.
Mount
the
chassis
from
the
front
of
the
rack.
Fujitsu
M10/SPARC
M10
Systems
Installation
Guide
・
July
2015
112
Summary of Contents for M10 Series
Page 1: ...Fujitsu M10 SPARC M10 Systems Installation Guide Manual Code C120 E678 12EN July 2015 ...
Page 10: ...Fujitsu M10 SPARC M10 Systems Installation Guide July 2015 x ...
Page 156: ...Fujitsu M10 SPARC M10 Systems Installation Guide July 2015 142 ...
Page 176: ...Fujitsu M10 SPARC M10 Systems Installation Guide July 2015 162 ...
Page 208: ...Fujitsu M10 SPARC M10 Systems Installation Guide July 2015 194 ...
Page 240: ...Fujitsu M10 SPARC M10 Systems Installation Guide July 2015 226 ...
Page 252: ...Fujitsu M10 SPARC M10 Systems Installation Guide July 2015 238 ...
Page 290: ...Fujitsu M10 SPARC M10 Systems Installation Guide July 2015 276 ...
Page 310: ...Fujitsu M10 SPARC M10 Systems Installation Guide July 2015 296 ...
Page 336: ...Fujitsu M10 SPARC M10 Systems Installation Guide July 2015 322 ...
Page 368: ...Fujitsu M10 SPARC M10 Systems Installation Guide July 2015 354 ...
Page 374: ...Fujitsu M10 SPARC M10 Systems Installation Guide July 2015 360 ...


