5
2. Main Menu Screen
5-13
TS Se
rie
s Op
er
ations
5-1.
Date and Time Adjustment
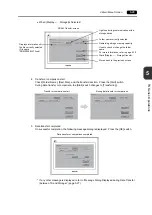
This screen is used for correcting the built-in clock of the TS series.
To use the built-in clock of the TS series, check [Use Built-in Clock] in the [SRAM/Clock Setting] dialog
that is displayed by selecting [System Setting]
→
[Unit Setting]
→
[SRAM/Clock] on the V-SFT-5 editor.
1. Move the cursor using the [
←
] and [
→
] switches. Correct the date and time using the [+] and [
−
]
switches.
2. Press the [Set] switch to determine the setting. The clock displayed on the upper right is modified.
3. Pressing the [Return] switch displays the Main Menu screen again.
5-2.
Formatting SRAM
An SRAM area can be formatted.
When the SRAM area is formatted, the contained data (historical data saved in SRAM, internal
memory $L, etc.) is cleared. Double-check before formatting the SRAM.
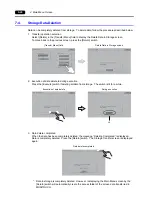
1. Press the [Format] switch and the [Execute] switch.
The SRAM area is formatted in the current screen data format. When formatting has been
completed, the message “
∗∗
Format Completed
∗∗
” is displayed.
2. Pressing the [Return] switch displays the Main Menu screen again.
After change
Before change
Format of the SRAM area completed
Before formatting the SRAM area
Summary of Contents for MONITOUCH TS Series
Page 1: ......
Page 10: ...11 Features 2 Models and Peripheral Equipment 3 System Composition Product Outline ...
Page 43: ...2 26 6 LAN Connector TS1100i TS1070i Only Please use this page freely ...
Page 44: ...31 Mounting Procedure 2 Power Supply Cable Connection Installation ...
Page 49: ...41 Coin type Lithium Battery 2 DIP Switches Handling of TS Series Components ...
Page 57: ...4 8 2 DIP Switches Please use this page freely ...
Page 58: ...51 Before Operation 2 Main Menu Screen 3 System Menu TS Series Operations ...
Page 102: ...5 44 3 System Menu Please use this page freely ...
Page 103: ...61 Error Messages 2 Troubleshooting Error Handling ...
Page 110: ...71 Inspection and Maintenance 2 Warranty Policy Inspection and Maintenance ...
Page 114: ...7 4 2 Warranty Policy Please use this page freely ...


