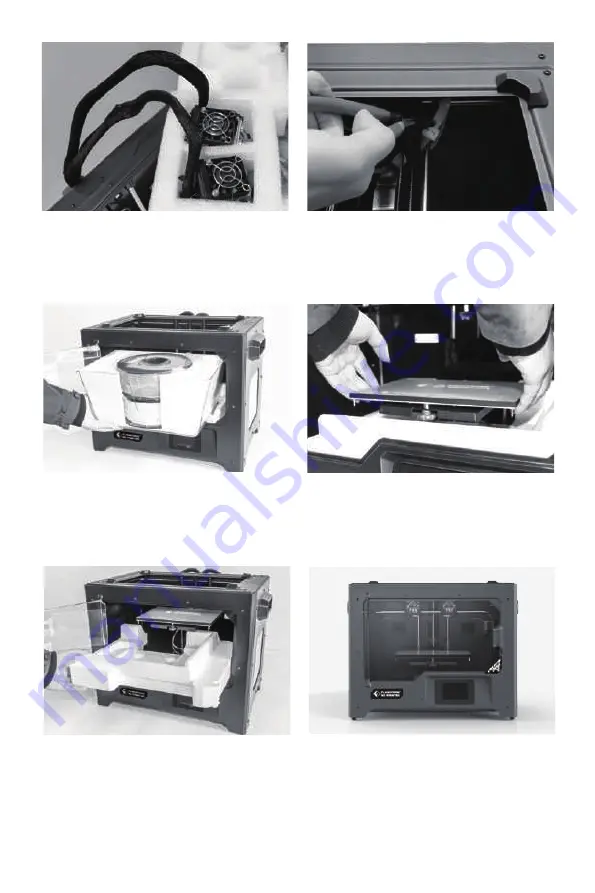
background image

2

6.

5.

Take out the foam with accessories. 
Shear two ties on the both sides of 
X-axis guide rod.

Take the extruder out and place the 
extruder carefully. Avoid the nozzle to 
touch the desk, which prevent the nozzle 
damage from scratch.

7.

Open the door, remove top cover of the 
printer and take filament out of the lid.

8.

Hold both sides of the printing platform, 
and slowly lift the platform from the 
bottom to facilitate the removal of the 
foam box below.

10.

Unpacking is complete. It is recom-
mended that you keep the packaging 
materials for later handling or storage.

9.

Take out the foam on the bottom of the 
platform, and then slowly press the 
platform down by hands to the lower 

position for easy subsequent installa

-

tion.

Summary of Contents for Creator Pro 2

Page 1: ...heating nozzle and heating build plate in operation Moving parts in printer may cause injury Do not wear gloves or other sources of entanglement in operation 1 2 WARNING Please refer to FlashForge o c...

Page 2: ...nt adhesive tape around the nozzle it has thermal insulation and high temperature resistance characteristics 1 2 3 Open box and remove top foam piece Firmly grasp the two side handles of FlashForge Cr...

Page 3: ...cover of the printer and take lament out of the lid 8 Hold both sides of the printing platform and slowly lift the platform from the bottom to facilitate the removal of the foam box below 10 Unpackin...

Page 4: ...put 19 Spool holder 2 Platform support 5 Z axis guide rod 8 Slot 11 Cooling fan 14 Extruder bracket 17 Filament guidetube buckle 20 Power input 3 Leveling nut 6 Extruder cable bunch 9 Nozzle cooling f...

Page 5: ...Tube Unclogging Pin Tool Grease Glue Stick Stamping Wrench Allen Wrench Top cover SD Card Spool Holder PTFE Tube Filament After sales Service Card Quick Start Guide Scraper Screw Driver Leveling Card...

Page 6: ...al extruder on the extruder seat Take the M2 5 Allen Wrench from the tool bag and four M3 bolts from the accessory kit Adjust the extruder location to align the bolt holes Secure the extruder onto the...

Page 7: ...t the end into the corresponding opening 2 Turn down the spool holder to make the holder bottom cleave to the printer back 3 Take a roll of lament then squeeze the spool holder top and mount the lamen...

Page 8: ...to extend the guide tube to the inside of the spool to prevent the lament from being entangled and being wrapped outside the spool 7 Install top cover for printing ABS remove the top cover for printi...

Page 9: ...s ejected from the nozzle it indicates that loading is completed 3 Tap unload the extruder starts to heat up After heating to the target temperature manually feed out a part of lament from the nozzle...

Page 10: ...distance between extruder and platform Gently move the paper and feel the fraction If move the paper with gent fraction it is a suitable distance between extruder and platform Finished the rst place a...

Page 11: ...nd insert the leveling card between the nozzle and the platform please click Z or Z to adjust the appropriate spacing The adjustment range is sliding leveling paper If you feel a little frictional res...

Page 12: ...right extruders print a line one by one 3 According to the actual printed lines click X X to adjust the bias of the extruders and remove the printed lines tap the verify button the left and right ext...

Page 13: ...ibration L 152 200 R 164 200 B 45 50 2 After heating left and right extruders print a line one by one 3 According to the actual printed lines click Y Y to adjust the bias of the extruders and remove t...

Page 14: ...2 Insert the SD card to the side of machine After installing loading lament and calibrating it start your rst print Tap Print SD card choose the test le to print Print Test sys ashforge Preheat 25MB 1...

Page 15: ...Creator Pro 2 1 2 1 2 3 4 14...

Page 16: ...6 5 X 7 8 10 9 15...

Page 17: ...16 1 4 7 X 10 13 16 USB 19 2 5 Z 8 11 14 17 20 3 6 9 12 15 SD 18 21 1 20 21 16 15 19 18 17 2 3 4 5 8 7 6 13 14 12 9 10 11...

Page 18: ...3D USB SD 3D CREATORPRO2 PRO2 17...

Page 19: ...1 M2 5 4 M3 1 2 3 4 18...

Page 20: ...2 1 2 3 19...

Page 21: ...1 2 20 ABS PLA 2 3 4 M3x8...

Page 22: ...1 2 3 75 220 21...

Page 23: ...1 2 3 22...

Page 24: ...XYZ 1 2 Z Creator Pro 2 Z 50 3 Z Z Z Z Z 0 08 Z Z Z Z Z X Y Z 23...

Page 25: ...1 2 X Z X X X 3 X X X X X L 152 200 R 164 200 B 45 50 X Y Z X X X X R L 0 00 X X R L X R L R L 24...

Page 26: ...1 2 Y X Y Y Y Y 3 Y Y Y Y Y L 152 200 R 164 200 B 45 50 X Y Z Y Y Y 0 00 Y Y R L Y R L Y L R L R 25...

Page 27: ...1 2 SD SD Test sys ashforge 25MB 1519MB 26...

Page 28: ...orge com After Sales Service support ashforge com Zhejiang Flashforge 3D Technology Co Ltd 400 886 6023 www sz3dp com 518 Tel 86 579 82273989 Web www ashforge com Add 2 F No 518 Xianyuan Road Jinhua Z...

Reviews: