


REPLACING THE BRUSH HEAD SPLASHGUARDS (SWEEPING VERSION)
If the splashguard rubber blades of the brush head side casing are damaged they cannot work properly, namely they cannot convey the
dirty detergent solution towards the squeegee, therefore the splashguard rubber blades need to be checked. To replace the brush head
splashguards, proceed as follows:
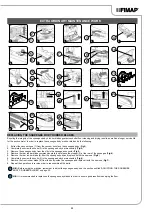
1. Open the machine's left lateral carter (7) (
Fig.8
).
2.
Remove the knobs (14) that fix the left-hand side carter (15) in place by turning anti-clockwise (
Fig.13
).
3. Remove the left lateral carter (
Fig.14
).
4.
Unscrew the nuts (16) that fix the rubber blade compression plate in place (
Fig.15
).
5. Remove the splashguard (18) from the left-hand side carter and replace with a new one or else turn it around (
Fig.16
).
6. Once the operation is complete, repeat the steps in reverse order to reassemble all the parts.
7. Repeat the operations just carried out also for the right side casing as well.
REPLACING THE SIDE SQUEEGEE SPLASHGUARD RUBBER BLADES
If the splashguard rubber blades of the side squeegee are damaged they cannot work properly, namely they cannot convey the dirty detergent
solution towards the squeegee, therefore the rubber blades need to be checked. To replace the brush head splashguards, proceed as follows:
1. Extract the vacuum hose (1) from the vacuum nozzle on the squeegee body (
Fig.1
).
2. Completely unscrew the knobs (2) in the squeegee body's pre-assembly (
Fig.2
).
3. Remove the squeegee body from the slits in the squeegee connector (
Fig.3
).
4. Using the right equipment (not supplied with the machine) remove the screw (19) (
Fig.17
).
5. Using the right equipment (not supplied with the machine) remove the nut (20) (
Fig.18
).
6. Remove the left side squeegee (21) from the machine (
Fig.19
).
7.
Using the right equipment (not supplied with the machine) remove the splashguard rubber blade fixing screws (22) (
Fig.20
).
8. Remove the rubber blade compression plates (23) and the splashguard rubber blades (24) and replace them with new ones (
Fig.21
).
9. Repeat the operations in the reverse order and reassemble all the parts, then move on to the right side squeegee.
N.B.:
remember to put the blade compression plate (23) between one splashguard rubber blade and the other (
Fig.21
).
N.B.:
when adjusting the side squeegee remember to leave about 10 mm of the threaded part beyond the self-locking flanged nut (20)
(
Fig.18
).
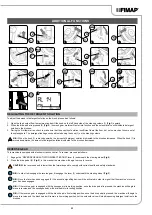
REPLACING THE SIDE BRUSH (SWEEPING VERSION)
Ensuring that the brush is intact guarantees better cleaning of the floor; to replace the brush, proceed as follows:
1. Stand on the right side of the machine.
2.
Remove the knob (25) that fixes the side brush to the gear motor by rotating the right brush clockwise and the left brush anti-clockwise
(
Fig.22
).
3. Remove the washer (26) holding the side brush in place (
Fig.23
).
4.
Pull out the worn brush and replace with the new one. Once the operation is complete, refit the brush and move onto the left-hand one.
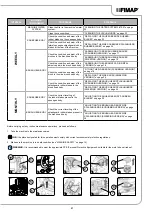
REPLACING THE BRUSH HEAD SPLASHGUARDS (SCRUBBING VERSION)
If the splashguard rubber blades of the brush head side casing are damaged they cannot work properly, namely they cannot convey the
dirty detergent solution towards the squeegee, therefore the splashguard rubber blades need to be checked. To replace the brush head
splashguards, proceed as follows:
1. Open the machine's left lateral carter (7) (
Fig.8
).
2. Remove the side splashguard support (8) by loosening the knobs (9) on it (
Fig.9
).
3. Remove the rear rubber blade compression plate (10), and release the stopper (11) on rubber blade compression plate (
Fig.10
).
4. Remove the splashguards (12) from the left splashguard body and replace it with a new one or else turn it around (
Fig.11
).
5. Repeat the operations in reverse order to reassemble all the parts.
6. Repeat the operations just carried out also for the right side casing as well.
34