


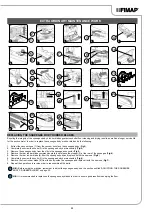


EMPTYING THE SOLUTION TANK
Proceed as follows to empty the solution tank:
1.
Close the detergent solution flow, and shift the knob (13) on the left-hand side of the steering column (
Fig.16
) downwards.
2. Move to the left-hand side of the machine and open the left lateral carter (14) (
Fig.17
).
3.
Unscrew the detergent solution filter cap (15) (
Fig.18
).
N.B.:
For the sweeping versions, the detergent solution filter is located on the right side of the machine.
4.
Open the detergent solution flow to the maximum, and shift the knob on the left hand side of the steering column (13) (
Fig.19
) upward.
5. When the solution tank is empty, go to the rear of the machine and unscrew the cap (16) for the solution tank dumping system (
Fig.20
).
6. Go to the left side of the machine and remove the doser cap (17)(
Fig.21
).
7. Clean the inside of the tank with a jet of running water.
8. Once the work has been completed, repeat the operations in reverse order to reassemble all the parts.
In machine versions with the FLR kit, to empty the solution tank, proceed as follows:
1.
Close the detergent solution flow, and shift the knob (13) on the left-hand side of the steering column (
Fig.16
) downwards.
2. Move to the left-hand side of the machine and open the left lateral carter (14) (
Fig.17
).
3.
Unscrew the detergent solution filter cap (15) (
Fig.18
).
N.B.:
For the sweeping versions, the detergent solution filter is located on the right side of the machine.
4.
Open the detergent solution flow to the maximum, and shift the knob on the left hand side of the steering column (13) (
Fig.19
) upward.
5. When the solution tank is empty, go to the rear of the machine and unscrew the cap (16) for the solution tank dumping system (
Fig.20
).
6. Grip the seat (18) and turn the seat's support plate to its maintenance position (
Fig.22
).
7. In order to prevent the seat's support plate from turning, insert the pin (19) into the slit (20) in the seat's support plate (
Fig.23
).
8. Unscrew the inspection cap (21) (
Fig.24
) located beneath the seat's support plate.
9. Rinse the inside of the solution tank with a jet of water.
10. Once the work has been completed, repeat the operations in reverse order to reassemble all the parts.
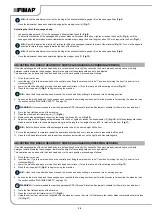
CLEANING THE RECYCLE FILTER (FLR VERSION)
To clean the recycle filter, proceed as follows:
1.
Close the detergent solution flow, and shift the knob (13) on the left-hand side of the steering column (
Fig.16
) downwards.
2. Move to the right-hand side of the machine and open the right lateral carter (22) (
Fig.25
).
3.
Remove the detergent solution recycle filter cap (23) (
Fig.26
).
4.
Rinse the filter cartridge under a jet of water, and use a brush to eliminate any impurities, if necessary.
5.
Once the filter cartridge is clean, repeat the operations in the opposite order to reassemble all the parts.
EMPTYING THE DEBRIS HOPPER (SWEEPING VERSION)
The thorough cleaning of the debris hopper ensures better floor cleaning performance. To empty the debris hopper, proceed as follows:
1. Open the machine's left lateral carter (24) (
Fig.27
).
2. Release the debris hopper locking pin (25) (
Fig.28
).
3. Use the handle (26) to extract the debris hopper (
Fig.29
) and empty it.
4. Clean the inside with a jet of water, and use a brush to remove any residual impurities if necessary.
5. Once the operation is complete, repeat the operations in reverse order to reassemble all the parts.
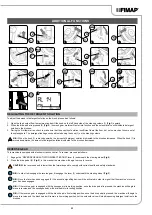
CLEANING THE BRUSH HEAD BRUSHES (SCRUBBING VERSION)
Careful cleaning of the brush guarantees better cleaning of the floor as well as a longer brush head gearmotor lifespan. To clean the brush,
proceed as follows:
1. Open the machine's left lateral carter (14) (
Fig.17
).
2. Remove the side splashguard support (27) by loosening the knobs (28) on it (
Fig.30
).
3. Press the brush locking pin (29) (
Fig.31
).
4. Keeping the pin (29) pressed in, turn the brush clockwise until it is secured (
Fig.32
).
5. Turn until the button is pushed towards the outside of the coupling spring and is locked into place.
6. Clean the brush under a stream of running water to remove any impurities from its bristles.
30