


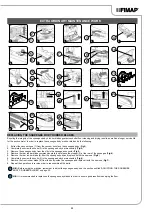


CLEANING THE BRUSH HEAD BODY BRUSHES (SWEEPING VERSION)
Careful cleaning of the brush guarantees better cleaning of the floor as well as a longer brush head gearmotor lifespan. To clean the brush,
proceed as follows:
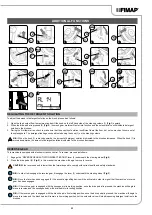
1. Open the machine's left lateral carter (14) (
Fig.17
).
2.
Remove the knobs (30) that fix the left-hand side carter (31) in place by turning anti-clockwise (
Fig.33
).
3. Remove the left lateral carter (
Fig.34
).
4. Extract the front brush from the tunnel (
Fig.35
)
5. Clean the brush under a stream of running water to remove any impurities from its bristles.
N.B.:
Check the bristles. If they are excessively worn, replace the brushes (the bristles should protrude by at least 10 mm). To replace the
brush, see “ASSEMBLING THE BRUSH HEAD BRUSHES (SWEEPING VERSION)” on page 18.
6. After checking to make sure that the brush is clean, reassemble it and move on to the one at the rear.
7.
N.B.:
Check the wear of the bristles and replace the brushes if they are excessively worn (the bristle protrusion must not be less than
10mm; this distance is indicated on the brush by the yellow band). To replace the brush, see “ASSEMBLING THE BRUSH HEAD
BRUSHES (SCRUBBING VERSION)” on page 17.
7. After checking to make sure that the brush is clean, reassemble it and move on to the one on the right hand side.
N.B.:
you are advised to invert the right and left-hand brushes every day.
N.B.:
Image 32 indicates the direction of rotation for coupling the left brush; the right brush must be turned in the opposite direction.
ATTENTION:
If the brushes are not new however, and have deformed bristles, it is better to reassemble them in the same position (the
right-hand one on the right, and the left-hand one on the left), to prevent the different inclination of the bristles producing an overload on
the brush motor as well as excessive vibrations.
8.
CLEANING THE ABRASIVE PAD (ORBITAL VERSION)
Ensuring that the abrasive pad is clean will guarantee better floor cleaning results, and will extend the service life of the brush head motor. In
order to clean the abrasive pad, do the following:
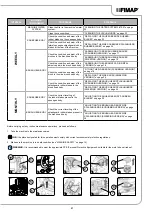
1. Move to the right-hand side of the machine and open the right lateral carter (32) (
Fig.36
).
2. With the brush head raised, release the pad support retainers (33) - (
Fig.37
) shows the rotation direction for releasing the front retainer.
3. Use the handle (34) to remove the pad support (35) (
Fig.38
).
4. Remove the pad from the support and clean it under a jet of running water to remove any impurities present.
5. Once the work is complete, see “ASSEMBLING THE ABRASIVE PAD (ORBITAL VERSION)” on page 18.
CLEANING THE BRUSH HEAD BODY SPLASHGUARD RUBBER BLADES (SCRUBBING VERSION)
Careful cleaning of the splashguard rubber blades present in the brush head body guarantees better cleaning of the floor; in order to clean the
splashguard rubber blades, proceed as follow:
1. Open the machine's left lateral carter (14) (
Fig.17
).
2. Remove the side splashguard support (27) by loosening the knobs (28) on it (
Fig.30
).
3. Clean the splashguard rubber blades with a damp cloth .
N.B.:
Check the condition of the brush head body splashguard rubber blades. If worn, replace these (see “REPLACING THE BRUSH
HEAD SPLASHGUARDS (SCRUBBING VERSION)” on page 34.
4. Once the operation is complete, repeat the operations in reverse order to reassemble all the parts.
31