background image

MSS

TM

 Series

© Copyright 2022 Fluid Equipment Development Company | www.fedco-usa.com

19

 -

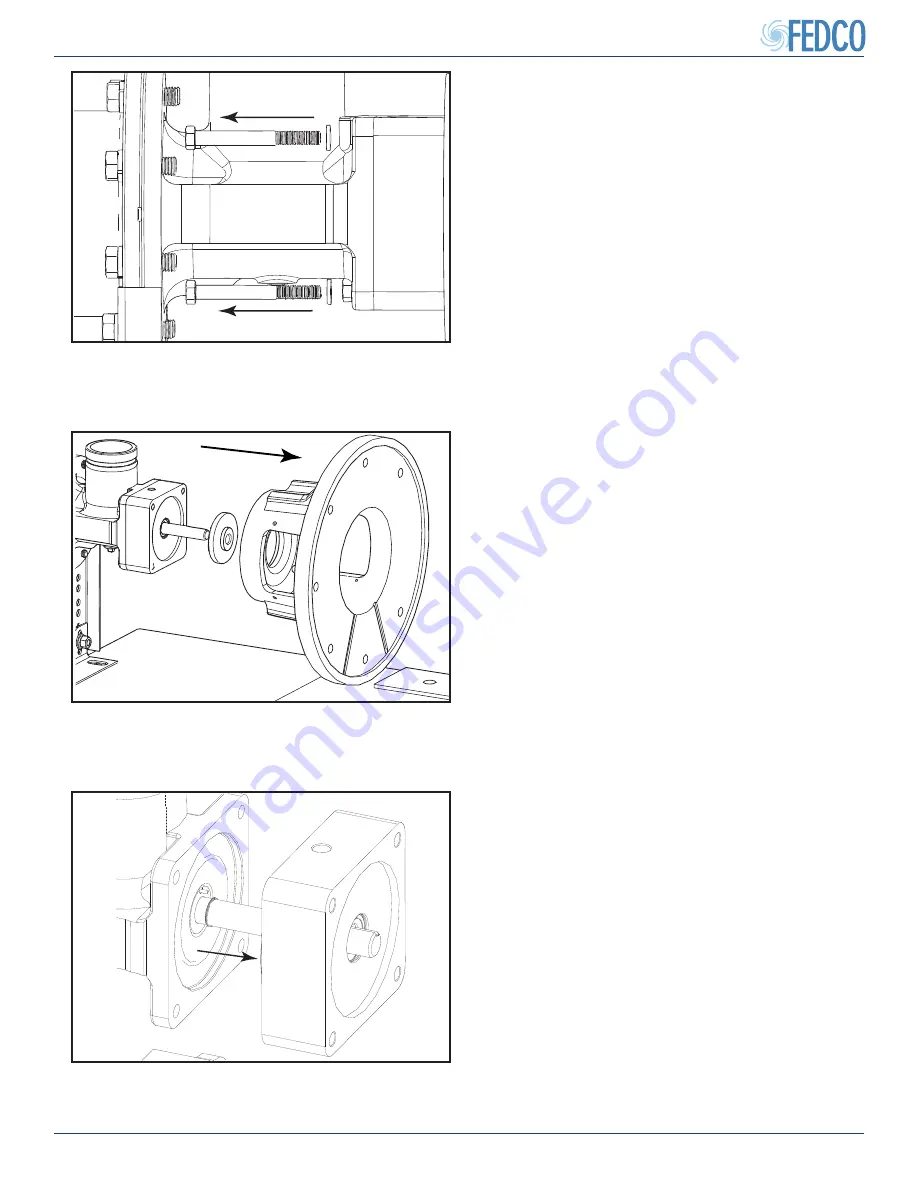
Figure 27 - Removing High Pressure Seal 

Carrier

Figure 26 - 

Removing Motor Adapter and 

Shipping Plug

Figure 25 - Removing Inlet Housing Bolts

5. Remove the high pressure seal carrier from 

the inlet housing.

4. Remove the motor adapter and shipping 

plug from the inlet housing.

3. 

Remove the bolts and lock washers from the 

inlet housing.

Pump Overhaul Continued

Summary of Contents for MSS Series

Page 1: ...w fedco usa com ONE COPY OF THIS MANUAL MUST REMAIN WITH THE EQUIPMENT AT ALL TIMES Original Instruction English Version OVERHAUL MANUAL Models MSS 15 MSS 20 MSS 30 MSS 50 MSS 70 MSS 40 MSS 55 MSS 75...

Page 2: ...0 1 2 0 1 5 R E G I S T E R E D ISO 9 0 0 1 2 0 1 5 R E G I S T E R E D CE Stamp CE marking confirms that specific products are in compliance with European Union requirements This allows FEDCO s produ...

Page 3: ...technical characteristics of the membrane process FEDCO pumps only cover flows and pressures found in BWRO and seawater SWRO applications They are designed for clean fluids and are optimized for typic...

Page 4: ...ponents MSS 40 55 75 11 Mechanical Seal Removal 12 Mechanical Seal Installation 15 HPSC Mechanical Seal Removal 18 HPSC Mechanical Seal Installation 21 Shaft Position Sensor Removal 24 Shaft Position...

Page 5: ...20 30 only X X 15 Impeller X X 16 Series spacer MSS 15 20 30 50 70 two shell pumps only X X 17 Series flange O ring X X X X 18 Discharge ring 19 Stage spacer custom end spacer X 20 Shaft washer balan...

Page 6: ...mpany www fedco usa com 6 Figure 1 MSS A Service Parts Kits Components 1 2 3 4 5 6 7 8 9 10 11 12 13 14 15 16 17 18 19 20 21 22 24 25 26 27 28 29 30 31 32 33 34 35 36 37 38 39 40 41 42 43 48 49 50 23...

Page 7: ...operation To ensure that safe operating and maintenance procedures are followed opera tors should develop and keep up a program of safety checks and current instructions This manual contains certain o...

Page 8: ...FEDCO representative WARNING NEVER operate the pump equipment below the minimum flow rate when dry without priming without proper guards and safety devices installed with the discharge valve closed w...

Page 9: ...O ring 3 Inlet housing bolts 16 Shell flange bolts 4 Inlet housing O ring 17 End shell 5 Inlet housing 18 Discharge housing O ring 6 High pressure seal carrier O ring if equipped 19 Discharge housing...

Page 10: ...echanical seal shaft washer 23 Cavity cover 6 Rotating seal retaining ring 24 Balance disc 7 Inlet O ring 25 Cavity cover O ring 8 Split collar retaining ring 26 Discharge housing O ring 9 Split colla...

Page 11: ...y 4 Mechanical seal 21 Cavity cover 5 Mechanical seal shaft washer 22 Balance disc 6 Rotating seal retaining ring 23 Cavity cover O ring 7 Inlet O ring 24 Discharge housing O ring 8 Inlet ring 25 Bala...

Page 12: ...r repair Mechanical Seal Removal 1 Drain the piping and pump 2 Disconnect the inlet and outlet piping 3 Loosen the screws and remove the coupling guards Figure 7 Support Bracket Anchor Bolt Removal Fi...

Page 13: ...ully slide pump 30 5 cm 12 inches away from motor NOTES Make sure to support inlet end of the pump on support bracket s 6 Remove the nuts and the top cradle from the precision leveling foot Figure 10...

Page 14: ...ring from the inlet housing 9 Remove the motor adapter and shipping plug from the inlet housing Figure 13 Removing Inlet Retaining Ring Figure 12 Removing Motor Adapter and Shipping Plug Figure 11 Re...

Page 15: ...the shaft retaining ring the inlet seal bore and the pump shaft for any damage Remove any oil or dirt with a clean cloth 11 Apply soap and water to the shaft and us ing a suitable tool through the in...

Page 16: ...taining ring into the groove on the inlet housing NOTES Make sure the inlet retaining ring is completely seated in the inlet housing groove Figure 19 Installing Shipping Plug Figure 18 Installing Inle...

Page 17: ...Final Pump Alignment from the MSS Installation Operation Manual 6 Apply system compliant anti seize com pound into the pump shaft keyway and install the pump shaft key NOTES Key should fit securely wi...

Page 18: ...s 1 through 7 in Mechanical Seal Removal removal procedure 2 Disconnect the drain line and vent line s from the high pressure seal carrier Figure 24 Disconnecting Drain Vent Lines 1 2 3 4 5 6 7 8 9 10...

Page 19: ...Seal Carrier Figure 26 Removing Motor Adapter and Shipping Plug Figure 25 Removing Inlet Housing Bolts 5 Remove the high pressure seal carrier from the inlet housing 4 Remove the motor adapter and sh...

Page 20: ...ve the shaft retaining ring HP shaft bushing and O ring NOTES If retaining ring appears worn or dis torted replace it NOTES The graphite shaft sleeve retaining ring does not need to be removed unless...

Page 21: ...r O ring HPSC Mechanical Seal Installation 1 Lubricate and install a new O ring with the HP shaft bushing and shaft retaining ring NOTES Make sure the anti rotation pin slot is aligned with the top of...

Page 22: ...the shipping plug is installed with the stepped portion of the bushing facing inward toward the motor adapt er 4 Position the high pressure seal carrier against inlet housing NOTES Make sure graphite...

Page 23: ...connected to a low pressure manifold behind the first high pressure pump in the train Un der no circumstances should the vent line be plugged A plugged vent line will result in insuf ficient water lu...

Page 24: ...fore carrying out component re placement procedures Follow all Lock out Tag out procedures developed by your company before starting any maintenance or repair Shaft Position Sensor Removal 1 Disconnec...

Page 25: ...mporary power supply to the shaft position sensor which will allow the sensor to rotate 2 Loosely thread the shaft position sensor into the spacer plate Figure 43 Shaft Collar Inspection SHAFT COLLAR...

Page 26: ...te the sensor a further one quarter 1 4 turn to ensure no mis adjustment has occurred 5 Once the sensor is properly adjusted dis connect the sensor from the temporary power supply and permanently conn...

Page 27: ...ription Item Description 1 Cap screw 10 Lock washer 2 Lock washer 11 Washer 3 Retaining clip 12 Balance disc 4 Discharge housing retaining ring 13 Balance disc key 5 Discharge housing O ring 14 Balanc...

Page 28: ...ng 4 Remove the throttle nipple from the dis charge housing ELECTRICAL HAZARD Make sure to disconnect the power supply to the motor before carrying out component re placement procedures Follow all Loc...

Page 29: ...52 Removing Discharge Housing Figure 51 Removing Discharge Housing Cap Screws 8 Remove the cavity cover with O ring 7 Remove the discharge housing retaining ring and discharge housing with O ring fro...

Page 30: ...Securing Pump Shaft Figure 54 Removing Coupling Guards SUITABLE STRAP OR CHAIN WRENCH 11 Remove the shaft nut lock washer and washer from the pump shaft 10 Lock the flexible coupling in place with a s...

Page 31: ...co usa com 31 Figure 58 Removing Balance Disc Washer and Key Figure 57 Removing Bearing Carrier and Balance Disc 13 Remove the balance disc key and washer from the pump shaft 12 Remove the bearing car...

Page 32: ...place if necessary 2 Measure the balance disc outer hub thick ness Refer to the Balance Disc Wear Chart for wear limit specifications The maximum acceptable balance disc wear is 0 508 mm 0 020 If the...

Page 33: ...disc key NOTES Make sure the balance disc keyway is on top and the key is installed with the rounded end facing outward toward the discharge hous ing Balance Disc Installation 1 Carefully install the...

Page 34: ...NOTES Make sure to align throttle nipple opening with the bottom of the pump Figure 65 Installing Balance Disc Washers and Nut APPLY SYSTEM COMPLIANT ANTI SEIZE COMPOUND 4 Apply system compliant anti...

Page 35: ...manual Figure 69 Inspecting Discharge Housing Alignment 8 Temporarily install the throttle nipple to ensure the cavity cover and the discharge housing are properly aligned 9 Remove the throttle nipple...

Page 36: ...o prevent dislodging the throttle nipple O ring Figure 72 Taping Throttle Nipple THREAD SEALING TAPE LUBRICATE 12 Apply thread sealing tape to the throttle nipple threads and generously lubricate the...

Page 37: ...www fedco usa com 37 Figure 75 Installing Coupling Guards Figure 74 Connecting Drain Line 15 Remove the strap or chain wrench and install the coupling guards and tighten the screws 14 Reconnect the be...

Page 38: ...Strap wrench Torque wrench NOTES Consult a FEDCO representative for all information regarding assembly specifications ELECTRICAL HAZARD Make sure to disconnect the power supply to the motor before car...

Page 39: ...and the top cradle from the precision leveling foot 5 Remove the motor adapter bolts and wash ers 4 Remove the anchor bolts and washers from shell support bracket s Pump Overhaul Continued Figure 80...

Page 40: ...3 Using proper lifting methods safely lift unit from base and place on flat surface in the vertical position Figure 82 Disconnecting Drain Line 8 Disconnect the bearing drain line from the throttle ni...

Page 41: ...d part of the shell assembly and will come out when shell is removed Figure 85 Balance Disc Removal 15 Proceed by preforming the Balance Disc Removal procedure as described earlier in this manual NOTE...

Page 42: ...individually These are considered part of the shell assembly and will come out when shell is removed Figure 88 Stage Removal 4 Remove all stage components diffusers impellers and stage spacers NOTES M...

Page 43: ...91 First Stage Spacer Removal 7 Inspect the inlet ring for excessive wear NOTES Remove the inlet ring and replace if necessary The inlet discharge rings are not included in any field service kits but...

Page 44: ...the shaft collar sleeve NOTES The start spacer must contact the col lar sleeve as shown If the collar sleeve s cup side if facing up it is on upside down NOTES The first stage spacer is dimension all...

Page 45: ...ifi cations section of this manual NOTES Make sure there is no gap between flanges after tightening bolts Figure 97 Stage Installation 6 For Single Shell Pumps Install all stage components stage space...

Page 46: ...ing 10 Carefully lower the end shell over the stag es using safe lifting and handling methods Align the end shell flange with the series shell flange serial number stamping op posite to inlet Install...

Page 47: ...13 Remove the gauge block and shaft locking wrench 14 Install and apply tension to approved lifting straps as described in the Lifting and Han dling section of the MSS Installation Manual Using proper...

Page 48: ...nal Pump Alignment Pump Overhaul Continued NOTES If a mechanical seal replacement is necessary refer to the Mechanical Seal Re moval and Mechanical Seal Installation section of this manual 20 Refer to...

Page 49: ...e motor before carrying out component replace ment procedures Follow all Lock out Tag out procedures developed by your company before starting any maintenance or repair Stage Removal 1 Follow the step...

Page 50: ...age Removal 4 Remove all stage components diffusers clamping neck rings floating neck rings impellers split cones and split cone nuts Figure 108 Discharge Ring Removal 3 Remove the discharge ring Pump...

Page 51: ...ing neck ring from the inlet ring 9 Inspect the inlet ring for excessive wear NOTES Remove the inlet ring and replace if necessary The inlet discharge rings are not included in any field service kits...

Page 52: ...mping Neck Ring Installation 2 Install a floating neck ring and clamping neck ring from into the inlet ring Pump Overhaul Continued Figure 116 Shaft Installation b Slowly lower the pump shaft into the...

Page 53: ...ring and diffuser 11 Install a fully assembled diffuser diffuser diffuser bearing floating neck ring and clamping neck ring onto the pump shaft and seat the diffuser assembly onto the spacer washers 1...

Page 54: ...bly 18 For Single Shell Pumps Continue to assemble pump stages as de scribed in previous steps until all end shell stages have been assembled Two Shell Pumps Continue to assemble pump stages as descri...

Page 55: ...es shell O ring Continue to assemble pump stages as described in series shell steps until all end shell stages have been assembled NOTES Verify diffuser bushings have been pre installed before assembl...

Page 56: ...inlet Figure 127 Balance Disc Installation 24 Proceed by preforming the Balance Disc Installation procedure as described earlier in this manual NOTES Although pump is orientated vertically the balanc...

Page 57: ...the MSS Installation Manual for pump re alignment procedures Figure 129 Installing the Drain Line 28 Lubricate and install the throttle nipple O ring into the discharge housing 29 Apply thread sealin...

Page 58: ...e thoroughly before use Internal components should be dried with a clean lint free cloth before assembly Nameplate Protect nameplate integrity Use considerable caution when cleaning Do not use product...

Page 59: ...hell flange bolts MSS 15 through MSS 120 81 N m 60 Lb ft Discharge housing retaining clip cap screws 10 N m 7 Lb ft Pump shaft nut balance disc nut MSS 15 through MSS 75 68 N m 50 Lb ft Pump support b...

Page 60: ...______________________ _____________________________________________________________________________ _____________________________________________________________________________ _____________________...

Page 61: ...ernes Drive Monroe MI 48162 USA Telephone 1 734 241 3935 Fax 734 241 5173 Email sales fedco usa com FEDCO UAE Plot No 598 Showroom No 7 Rajneesh Traders Showroom Bldg Street 2 Dubai Invest Park 1 P O...

Reviews: