


Page 84 of 91
Rev. 4.20
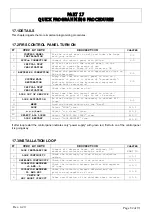
17.5 INPUT PROGRAMMING
This procedure permits to programme a I/O module input (for example).
N°
STEP BY SETP
DESCRIPTION
CHAPTER
1
MENU
Push the button relative at the “Menu”.
7.2
2
POINT
Select “POINT” item.
7.2.1
3
view/mod.
Select “view/mod.” item.
7.2.2
4
LOOP SELECTION
Select the loop of the I/O module.
7.2.3
5
POINT ADDRESS
Insert the point address to begin the points
programming of the system.
7.2.4
6
POINT SETTING
Into this menu, there are all point parameters.
7.2.5
7
INPUT
Change the value of “INPUT” item with “FIRE ALARM”
value.
15.3.4
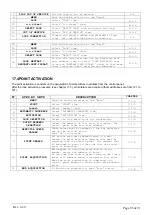
17.6 OUTPUT PROGRAMMING
This procedure permits to programme a relay output apiece of a particular status of the control panel (fire alarm,
technological alarm, ...).
The information about at the loop outputs (for example those of I/O module), they are at inside of the point
information (see chapter
7.2), but they are separated and grouped from “
OUTPUT
” item (see chapter
PART 9).
N°
STEP BY SETP
DESCRIPTION
CHAPTER
1
MENU
Push the button relative at the “Menu”.
2
OUTPUT
Select “OUTPUT” item.
9.1.1
3
view/mod.
Select “view/mod.” item.
9.1.2
4
CONTROL PANEL OUTPUT
LOOP OUTPUT
Select the item, where is the output to programme.
9.1.3
5
OUTPUT SELECTION
Select the loop (if loop output) and the output
address to programme.
6
OUTPUT SETTING
Inside at this menu, there are all output
parameters.
9.1.4
7
ACTIVATION
Change “ACTIVATION” item and to set up its value
at: “STATUS”.
9.1.4
8
ALLARME INCENDIO
Thought the “Mod.” button, to mark the items for
which the output must activate.
9.1.4
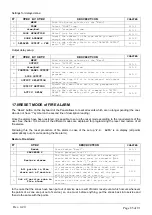
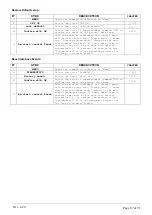
17.7 SETTING AN OUTPUT DELAY
The possibility to set up a delay to an output is subordinate to the various conditions (see chapter
9.4 for details).
1.
The control panel must be in supervision Mode.
2.
The zone in which you want the delay on the output must be set up as “
DELAYED OUTPUT
” = “
YES
”.
3.
Pressing the command the delay is “Zeroed” (in the cases of programmed output for fire alarm).
Settings for supervised Mode:
N°
STEP BY SETP
DESCRIPTION
CHAPTER
1
MENU
Push the button relative to the “Menu”.
2
SETTING
Select “SETTING” item.
3
supervis.
Select “SUPERVIS.” item.
10.1
4
ENABLE
Enable supervised mode.
10.2
5
DATE SETTING
Set up the command field valid from the date in
which the control panel must be active under this
function.
10.2
6
TIME SETTING
Set up the command field valid for the time in
which you want the control panel to operate under
this function.
10.2


