background image

6th edition, 22.05.2023

7000.05060, 6th edition, 22.05.2023

7000.05060

Installation

47

4.3.4

Shielding

Shield cables in all cases.

Shield cables that are longer than 3 m with tightly meshed copper braiding.

Shield all supply lines according to current guidelines/standards (e.g., IPC-A-620B) and 
connect using (round) shield clamp.

In special cases (e.g., with pigtail) or after qualification, the shield can be omitted for 
the following cables:

Cables with length <50 cm

Cables with low power supplies (e.g., <20 V)

Sensor cables

Connect shield clamps to a low-impedance (<0.3 

Ω

) grounding bar or grounding plate.

Establish a star-point earth connection (see chap. 4.3.2, p. 45).

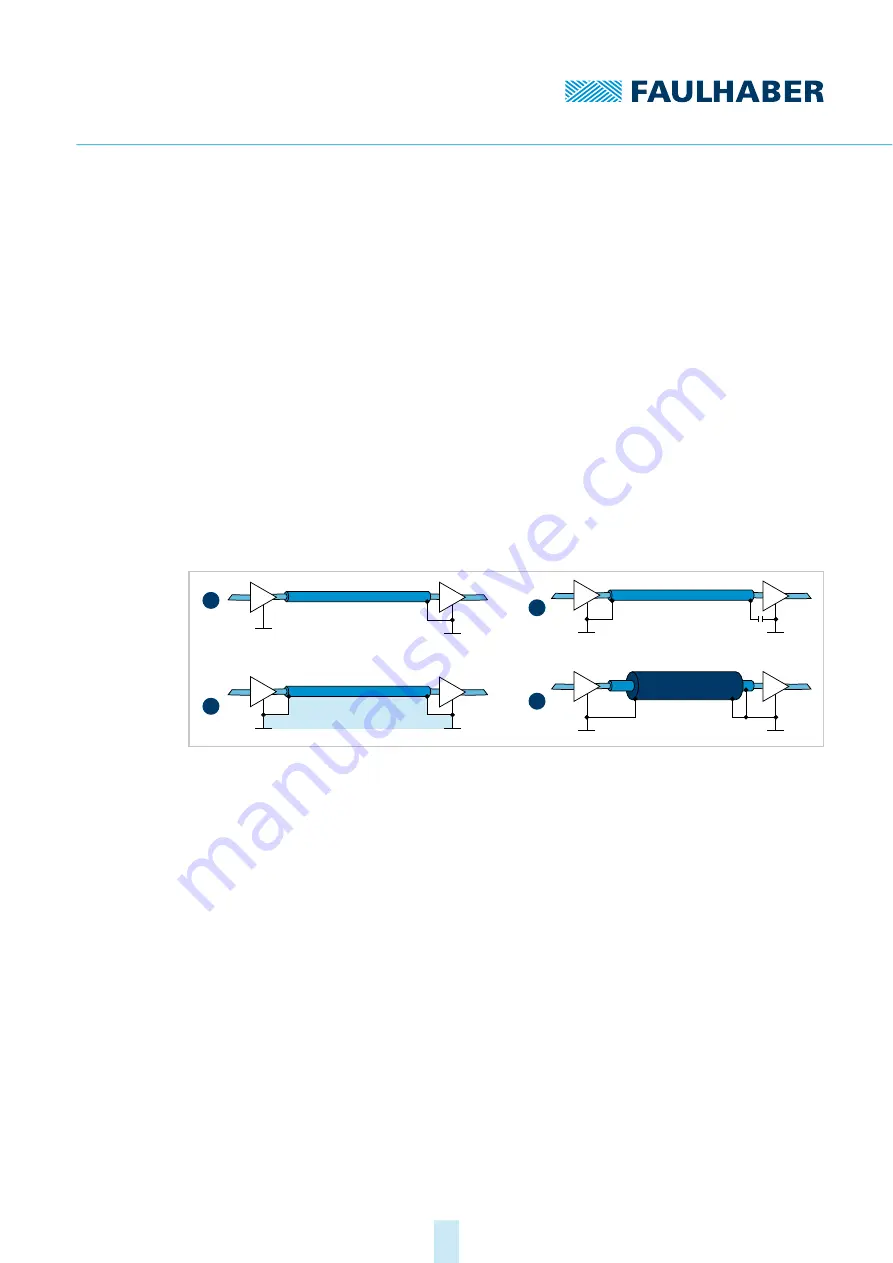
Lay the motor phases in a shield, separate from the sensor or encoder signals, and con

-

nect on at least the motor side (see 1 or 2 in Fig. 33).

Fig. 33: Various possibilities for the shield connection

The sensor signals can optionally be laid with the motor phases in a shared cable/insula

-

tion hose using another outer braided shield. This outer braided shield must be con

-

nected at both ends (e.g., 4 in Fig. 33). A solution such as 2 in Fig. 33 is not functional in 
every case for this configuration. If this is not possible by means of a ground offset, 
establish the RF connection via specially suited capacitors (e.g., safety capacitors such as 
Y1/Y2/X1/X2, see 3 in Fig. 33). In this case, do not connect the shield multiple times 
except at the motor connection and controller side.

1

Suppressing electrical fields

2

Alternating magnetic field

3

Interruption of the ground loop for direct currents or low-frequency currents

4

Discharging parasitic currents to the reference potential

1

2

3

4

Summary of Contents for MC 5004

Page 1: ...WE CREATE MOTION Technical Manual MC 5004 EN...

Page 2: ...ber GmbH Co KG cannot accept any liability for any errors in this document or for the consequences of such errors Equally no liability can be accepted for direct or consequential damages resulting fro...

Page 3: ...tandard PCB 14 3 3 1 2 PCB with vertical plug connector option 5621 15 3 3 1 3 EtherCAT PCB 16 3 3 2 Motherboard 17 4 Installation 21 4 1 Mounting 21 4 1 1 Mounting instructions 21 4 1 2 Installation...

Page 4: ...absolute interface 51 4 3 6 Using filters 52 4 3 6 1 Installing the Motion Controller PCB in the top hat rail housing 53 4 3 6 2 PWM filter motor side 54 4 3 6 3 Emission reducing ferrite based filter...

Page 5: ...information from the following manuals is useful These manuals can be downloaded in pdf format from the web page www faulhaber com manuals 1 3 Using this document Read the document carefully before un...

Page 6: ...p Select Data Data cable Data Data cable with logically inverted signal DigIn Digital input DigOut Digital output DIP Dual In Line Package EFC Electronics Filter Conformity EFM Electronics Filter Moto...

Page 7: ...avoided death or serious injury may result Measures for avoidance CAUTION Danger with low level of risk if not avoided minor or moderate injury may result Measures for avoidance NOTICE Risk of damage...

Page 8: ...chine building Medical technology Laboratory technology When using the Motion Controllers the following aspects should be observed The Motion Controller contains electronic components and should be ha...

Page 9: ...or defective connections immediately replaced by an electrician After replacing a defective or damaged Motion Controller test and document the cor rect function 2 2 2 Correct installation and commissi...

Page 10: ...the wires as shown in the connection assignment 2 2 3 Heat development Active components may cause the Motion Controller to heat up If touched there is a risk of burning Protect the Motion Controller...

Page 11: ...2014 30 EU The directive concerning electromagnetic compatibility EMC applies to all electrical and electronic devices installations and systems sold to an end user In addition CE marking can be under...

Page 12: ...rboard via the 50 pin connector strip For this purpose FAULHABER offers a motherboard for connecting up to four MC 5004 controllers With the integrated output stage with optimized current measurement...

Page 13: ...6th edition 22 05 2023 7000 05060 6th edition 22 05 20237000 05060 Product description 13 3 2 Product information Fig 2 Designation key...

Page 14: ...PCB Tab 1 Connector overview Tab 2 LED overview Status LED USB X1 Power LED Designation Function USB X1 Connection of the USB communication Designation Function State LED Green continuous light Devic...

Page 15: ...B X1 Connection of the USB communication Designation Function State LED Green continuous light Device active Green flashing Device active However the state machine has not yet reached the Operation En...

Page 16: ...a fault state The output stage will be switched off or has already been switched off Red error code Booting has failed Please contact FAULHABER Support Power LED all Green Power supply within the per...

Page 17: ...ion 22 05 20237000 05060 Product description 17 3 3 2 Motherboard Fig 6 Side view top top view middle and isometric view bottom of the mother board with vertical connectors max 52 max 18 5 5 08 1 6 13...

Page 18: ...6th edition 22 05 20237000 05060 Product description 18 Fig 7 Side view top top view middle and isometric view bottom of the mother board with horizontal connectors max 52 max 16 5 08 1 6 130 106 250...

Page 19: ...X General Area DIP switch CAN termination On Off CAN 1 CAN 2 connector EtherCAT communication IN OUT Power supply controller X4 Power supply motor X5 EtherCAT ribbon cable connector Designation Functi...

Page 20: ...n cable connector Optional ribbon cable connection DIP switch CAN termination CAN termination resistor On Off On Termination resistor active Off Termination resistor inactive DIP switch RS232 active i...

Page 21: ...ximity of the controller see chap 2 2 3 p 10 DANGER Incorrect handling and installation can cause the Motion Controller to perform uncon trolled movements A damaged Motion Controller can unexpectedly...

Page 22: ...ive system and components driven by the drive system from being touched 4 1 2 Installation of Motion Controller PCBs Fig 10 Installation of a Motion Controller PCB NOTICE Incorrect installation can da...

Page 23: ...ration and alternating electrical fields arising due to the pulsed control of the motors must be dissipated and damped by appropriate installation Connect the Motion Controller to a grounding system T...

Page 24: ...cation connections Make sure that the connection cables on the connection side are not longer than 3 m Keep the shield connections for connection cables short and flat To reduce the effects on the DC...

Page 25: ...ge can be dissipated by an additional external brake chopper see the data sheet for the brake chopper 4 2 4 Connector pin assignment 4 2 4 1 Pin assignment of the Motion Controller connector strip Mot...

Page 26: ...Index Index channel logically inverted signal 25 n c 26 n c 27 DigOut 1 Digital output 28 DigOut 2 Digital output 29 DigOut 3 Digital output 30 UDD Power supply for sensors 31 GND Ground connection 3...

Page 27: ...assignment of the DC motor connection M1 Tab 13 Electrical data of the DC motor connection M1 Pin Designation Meaning 1 Motor A Connection of motor phase A 2 Motor B Connection of motor phase B 3 Moto...

Page 28: ...s on FAULHABER LM motors or BX4 motors in sin cos special version Tab 16 Electrical data of the sensor connection M2 Pin Designation Meaning 1 UDD Power supply for sensors 2 GND Ground connection 3 Se...

Page 29: ...er M3 Pin Designation Meaning 1 UDD Power supply for incremental encoder 2 GND Ground connection 3 Channel A Encoder channel A logically inverted sig nal 4 Channel A Encoder channel A 5 Channel B Enco...

Page 30: ...Meaning 1 UDD Power supply for absolute encoder 2 GND Ground connection 3 CS Chip Select for absolute encoder logically inverted signal 4 CS Chip Select for absolute encoder 5 Data Data for absolute...

Page 31: ...es of communication RS232 CANopen Tab 25 Pin assignment of the COM port X2 for RS232 Tab 26 Pin assignment CAN1 CAN2 X2 for CANopen Designation Value Absolute encoder power supply 5 V 100 mA Connectio...

Page 32: ...l output open collector 5 DigOut 3 Digital output open collector 6 DigIn 1 Digital input 7 DigIn 2 Digital input 8 DigIn 3 Digital input 9 DigIn 4 Digital input 10 DigIn 5 Digital input 11 DigIn 6 Dig...

Page 33: ...4 Power supply of the motor X5 Tab 31 Pin assignment for the power supply of the motor X5 Tab 32 Electrical data for the voltage supply X5 Pin Designation Meaning 1 GND Ground connection 2 UP Power su...

Page 34: ...ation Pin 1 TxD Transmission Data Pin 2 TxD Transmission Data Pin 3 RxD Receiver Data Pin 6 RxD Receiver Data Designation Meaning IN OUT EtherCAT communication Pin 1 TxD Transmission Data Pin 2 TxD Tr...

Page 35: ...Index Encoder Index Index Encoder Index Channel B Encoder Channel B Channel B Encoder Channel B Channel A Encoder Channel A Channel A Encoder Channel A Motor Motor Motor Motor Encoder U 5 V Encoder Su...

Page 36: ...2 3 4 2 1 5 Sens A Hall Sensor A Motor B Motor C GND GND Sens B Hall Sensor B Sens C Hall Sensor C 5 V Power Supply DD U Motor Phase A Motor Phase B Motor Phase C 1 2 3 4 5 6 7 8 M3 1 3 5 7 2 4 6 8 In...

Page 37: ...ncoders 1 2 3 1 2 3 4 5 PIN M1 1 2 3 BL Motor Motor A M2 3 4 2 1 5 Sens A Hall Sensor A Motor B Motor C GND GND Sens B Hall Sensor B Sens C Hall Sensor C 5 V Power Supply DD U Motor Phase A Motor Phas...

Page 38: ...on Use as a free measurement input queried via the interface Fig 20 Digital input circuit diagram internal The digital inputs are switchable from the input level PLC TTL The digital inputs can be conf...

Page 39: ...ground Monitored output current switch opens in the event of an error A digital output can be assigned to an error output It can be freely programmed 4 2 7 External circuit diagrams Bipolar analog se...

Page 40: ...internally set offset and scaling Connection of reference and limit switches Fig 24 Connection of reference and limit switches Depending on the type of switch it may be necessary to use additional pul...

Page 41: ...and a drive Fig 26 Wiring between PC controller and a drive Depending on the type of encoder it may be necessary to use additional pull up resis tors No internal pull up resistors are incorporated in...

Page 42: ...value may be necessary for the pull down resistor If the CAN wiring is not laid in a straight line it may be necessary to individually opti mize the amount and location of the terminating resistors F...

Page 43: ...ularly during use in residen tial environments Observe the notices for EMC compliant setup NOTICE Drive electronics with qualified limit values in accordance with EN 61800 3 Category C2 can cause radi...

Page 44: ...e and the PWM drive Depending on the design quality and effectiveness of the integrated filters where present the power supply can also cause interference DC mains system Prerequisite for connecting t...

Page 45: ...hing Use a braided shield that is meshed as tightly as possible Direct contact with the grounding plate is to be preferred Therefore avoid contact with the controller and then with the grounding plate...

Page 46: ...what surface is the cable routed Observe the following when laying the cables Use a full surface u shaped and if possible metal cable duct Lay the cables near the corners of the cable duct Separate t...

Page 47: ...coder signals and con nect on at least the motor side see 1 or 2 in Fig 33 Fig 33 Various possibilities for the shield connection The sensor signals can optionally be laid with the motor phases in a s...

Page 48: ...ve approx 50 100 mm from the outer cable shield 1 Make certain that none of the fibers of the braided shield 2 are destroyed 2 Either push back the shield or roll it up and fasten with heat shrink tub...

Page 49: ...Fig 35 Shield connection with cable lug 1 Scrape the surface around the hole to remove as much of the oxide layer as possible 2 Guide screw with washers through the cable lug 3 Place lock washer on t...

Page 50: ...faces Absolute encoder Fig 36 Useful frequency ranges of the encoders To evaluate the interference on the signal transmission quality measure the signals Make certain that no parasitic effects are mea...

Page 51: ...lready integrated in one of the special numbers SN 6419 of the controller Alternatively a so called split termination can be used instead of the 120 to increase the interference resistance See also te...

Page 52: ...function and current ranges Filter types Input side filters filters on the power supply side Motor side filters filters that are connected between controller and motor in the motor phases Fig 37 Filte...

Page 53: ...at rail housing Fig 38 Example for installation in a top hat rail housing The following components from Phoenix Contact could for example be used as a suitable top hat rail housing 1 Motion Controller...

Page 54: ...tage current and thereby reduce the high frequency coupling currents on the shield 4 3 6 4 Input side filters These filters are for applications that either cannot use the motor filter e g integrated...

Page 55: ...o that the motor side end of the cable points away from the user and the plug end of the cable points toward the user 2 Simultaneously guide all three phases through the ferrite ring from below 3 Guid...

Page 56: ...s correct 3 Were the recommended cables used a Select motor cables in the accessory catalog b Motor cables must be shielded as they otherwise act as an antenna Unshielded cables could cause interferen...

Page 57: ...plate Connect the shield of the motor cable on the motor side and as close as possible on the controller side The shield is to be connected over a large area ide ally with a round connection The conne...

Page 58: ...evice is mounted in a cabinet depend ing on the deposition of dust the air filter should be regularly checked and cleaned if neces sary 5 2 Diagnosis Standard PCB and PCB with vertical plug connector...

Page 59: ...tinuous light Device active Green flashing Device active However the state machine has not yet reached the Operation Enabled state Red continuously flashing The drive has switched to a fault state The...

Page 60: ...2023 7000 05060 6th edition 22 05 20237000 05060 Maintenance and diagnostics 60 5 3 Troubleshooting If unexpected malfunctions occur during operation according to the intended use please contact your...

Page 61: ...5060 6th edition 22 05 20237000 05060 Accessories 61 6 Accessories Details of the following accessory parts can be found in the Accessories Manual Connection cables Connectors Connector sets Installat...

Page 62: ...aulhaber GmbH Co KG are produced using the most modern production methods and are subject to strict quality inspections All sales and deliv eries are performed exclusively on the basis of our General...

Page 63: ...6th edition 22 05 2023 7000 05060 6th edition 22 05 20237000 05060 Additional documents 63 8 Additional documents 8 1 Declaration of Conformity...

Page 64: ...6th edition 22 05 2023 7000 05060 6th edition 22 05 20237000 05060 Additional documents 64...

Page 65: ...6th edition 22 05 2023 7000 05060 6th edition 22 05 20237000 05060 Additional documents 65 8 2 Declaration of Incorporation...

Page 66: ...edition 22 05 2023 Dr Fritz Faulhaber GmbH Co KG DR FRITZ FAULHABER GMBH CO KG Antriebssysteme Faulhaberstra e 1 71101 Sch naich Germany Tel 49 0 7031 638 0 Fax 49 0 7031 638 100 info faulhaber de www...

Reviews: