background image

9

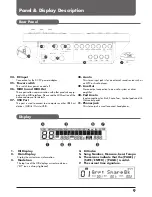
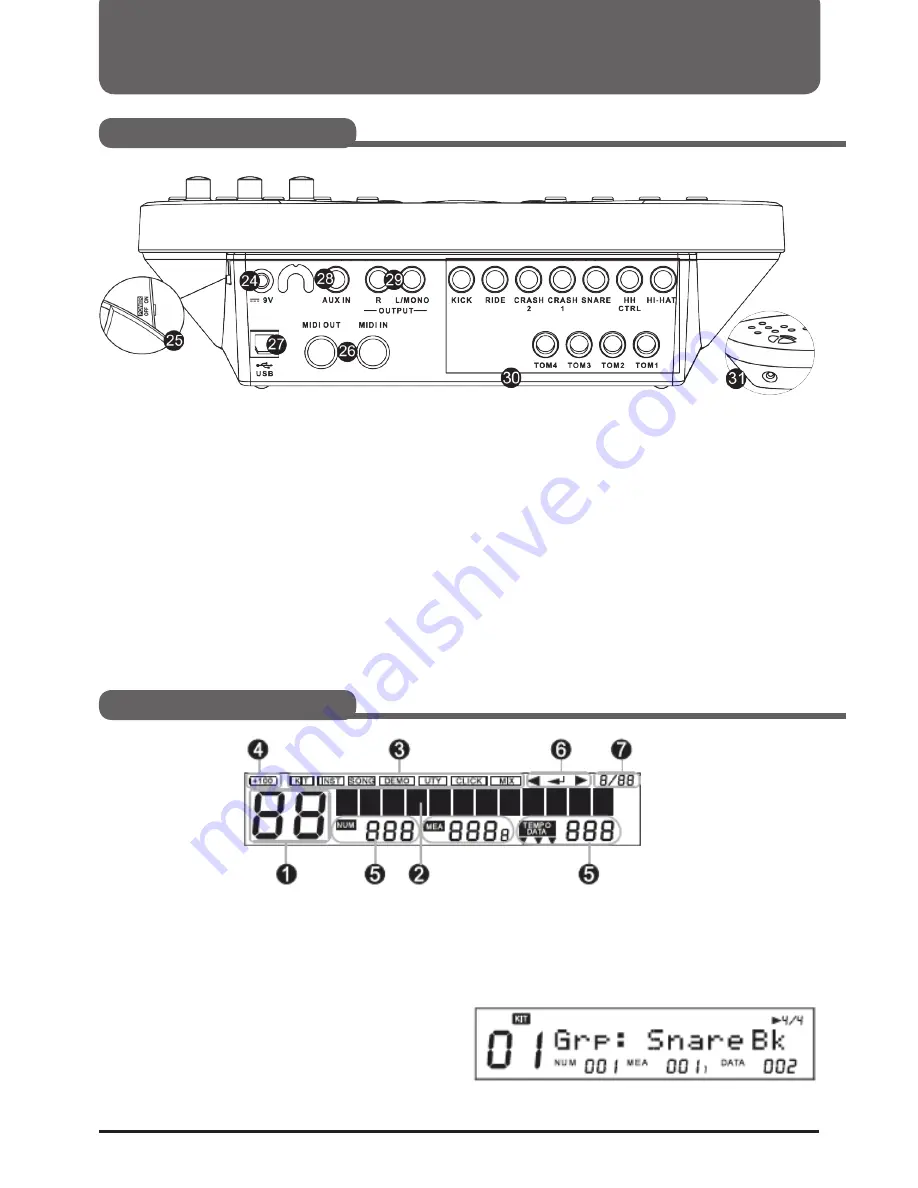
24.  DC input

Connection for the DC 9V power adaptor.

25.  Power switch

This switch turns power on and off.

26.  MIDI In and MIDI Out

These ports allow communication with other products equip-

ped with a MIDI interface. Please see the MIDI section of the 

advanced manual for details.

27.  USB Port

This port is used to connect to a computer or other USB host 

devices. (MIDI In/Out via USB).

1.   Kit Display

2.   Main Display

Display the current menu information.

3.   Mode Icon


The top line of the LCD displays current mode icon. 

(“KIT” icon is always lightened)

28. Aux In

This stereo input jack is for an external sound source such as 
an MP3 or Audio player.

29. Line Out

Stereo output connection to an audio system or drum 
amplifier.

30. Pad Line In

Input connections for Kick, Snare, Tom, Cymbal pads and Hi-

Hat control pedal.

31. Phones jack

This stereo jack is used to connect headphones.

4.  Kit Index

5.   Song Number, Measure, beat, Tempo

6.  These icons indicate that the [PAGE-] / 

[SAVE/ ENTER] / [PAGE+] is valid.

7.  The current time signature.

Panel & Display Description

Rear Panel

Display

Summary of Contents for DD-One Simon Philips

Page 1: ...Digital Drum Owner s Manual DRU0036414 000 19 09 2018 ...

Page 2: ...oduct Fame DD One Simon Philips was designed for use as an electronic drum set By striking the pads an electronic module simulates an artificial drum sound in various forms and optionally reproduces it via headphones or external speakers The device may only be used for this purpose and in accordance with the operating instructions Other purposes as well as operation under other operating condition...

Page 3: ...carried out by quali ed service personnel This Symbol wherever it appears warns of any dangerous non isolated voltage within the housing voltage which may be dangerous and cause electrocution This Symbol wherever it appears alerts to important operating and main tenance instructions which can be found in the included documents Please read the hand book Only suitable for indoor use Read the operati...

Page 4: ...if swallowed DANGER electric shock caused by short circuit Modi cations to the mains cable or the mains plug are prohibited Failure to do so may result in re or death hazard due to an electric shock Warning Service Conditions Due to its structural characteristics the device is designed for indoor use Do not expose the device to rain moisture or liquids as this can cause damage Vibrations dirt or s...

Page 5: ......

Page 6: ... prevent serious damage to the equipment or other connected devices turn all power supplies OFF when wiring This device complies with Part 15 of the FCC Rules Operation is subject to the following two conditions 1 This equipment generates uses and can radiate radio frequency energy and if not installed and used in accordance with the instructions may cau se harmful interference to radio communicat...

Page 7: ... Recording a new song 22 Record 23 Recording based on preset song 23 Recording Settings 24 Error messages during recording 25 Setting the Metronome CLICK Click on off 26 Click settings 26 Data storage SAVE Save User Kit 27 Save User Song 27 Save general settings 27 Pad and Trigger Settings UTILITY 28 Effect Settings REVERB EQ MIDI settings 30 Reset factory settings 31 SD card operation CARD Search...

Page 8: ...ong Mode to select a song 13 Display 14 Data Dial 15 MASTER AUX PHONES Volume Knob Mater Volume knob control the volume of output jack 16 PAGE PAGE Buttons Page Buttons Scroll through the menu pages or move the cursor left right when naming 17 SAVE ENTER Buttons Enters the Save menu when available enter the current folder or confirm current operation 18 EXIT Button Exit from the current sub menu b...

Page 9: ...current menu information 3 Mode Icon The top line of the LCD displays current mode icon KIT icon is always lightened 28 Aux In This stereo input jack is for an external sound source such as an MP3 or Audio player 29 Line Out Stereo output connection to an audio system or drum amplifier 30 Pad Line In Input connections for Kick Snare Tom Cymbal pads and Hi Hat control pedal 31 Phones jack This ster...

Page 10: ...pedal Just as with an acoustic drum set the open hi hat sounds when the pedal is not depressed When the pedal is depressed the closed hi hat sounds 2 The touch surface of the cymbal pads Ride Crash Hi Hat is close to the edge of the pad unlike the rest of the pads Caution To prevent electric shock and damage to drum module or other devices always turn off the power of all devices before making any...

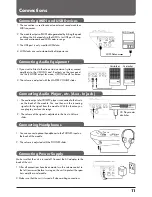
Page 11: ...he module You can then mix the incoming signal with the signal from the module With this function you can play to your favorite songs 2 The volume of the signal is adjusted via the Aux In Volume slider Make sure that the unit is turned off Connect the AC adapter to the back of the unit 1 After all connections have been made turn the volume control to the left minimum before turning on the unit to ...

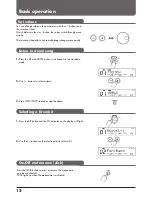
Page 12: ...dial to select a kit Basic operation You can change values in the parameters with the buttons and the selection wheel If you hold down the or button the values switch through more quickly The selection wheel allows you to make larger changes more quickly Press the CLICK button to insert or remove the metronome must be switched off CLICK lights up when the metronome is activated Set values Listen t...

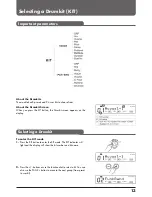
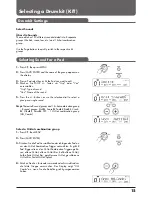
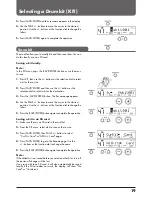
Page 13: ...e display To enter the KIT mode 1 Press the KIT button to enter the KIT mode The KIT indicator will light and the display will show the kit number and kit name 2 Press the buttons or use the function dial to select a kit You can also use the PAGE button to move to the next group from preset to user kit Selecting a Drumkit KIT Important parameters Selecting a Drumkit ...

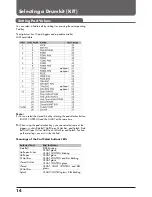
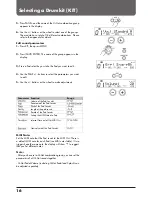
Page 14: ...ell Half Open Hi Hat Rim and Splash Ride Bell Half Open Hi Hat Half Open Hi Hat Rim and Splash To chan ge these settings you must strike the Pad Meanings of the Pad Select buttons LEDs optional optional optional optional Ride Bell RIDE blinking HI HAT CONTROL glows RIM blinking HI HAT glows HI HAT CONTROL glows HI HAT HI HAT CONTROL and RIM glows HI HAT glows HI HAT CONTROL blinking HI HAT glows H...

Page 15: ...und groups and 1 hi hat combination group 8 sound groups KickBk SnareBk TomBk RideBk Crash Bk HihatBk PercuBk SFX 1 Hi Hat combination group HH_Combi Select a Hi Hat combination group 1 Press KIT then MENU 2 Press SAVE ENTER 3 Drücken Sie die Pad Auswahltaste oder schlagen das Pad an um den Hi Hat Kombination Trigger anzuwählen Es gibt 8 Pad Trigger die zu den Hi Hat Kombination Triggern gehö ren ...

Page 16: ...el to make adjustments MIDI Note Set the MIDI note that the Pad sends to the MIDI Out There is a default MIDI note for each Pad see MIDI notes table If two triggers have the same note the display will show to suggest that you Set different notes Note After you have set a Hi Hat combination group you can set the parameters of all Hi Hat sounds together Hi Hat Pedal Volume including Hi Hat Pedal and...

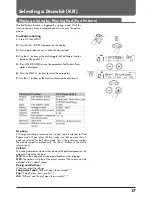
Page 17: ...Time When you select the settings Loop oder 1shot RstTime menu shows invalid Tap Retrig menu shows invalid Hit RstTime and Retrig menu shows invalid The Pad Pattern function is triggered by striking a pad With this function you can easily incorporate patterns into your live perfor mance Pad Pattern Setting 1 Press KIT then MENU 2 Press PAGE PATTERN appears on the display 3 Press a pad selection ke...

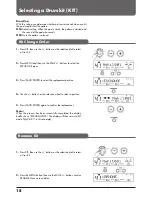
Page 18: ...ons to select the EXCHANGE menu 3 Press SAVE ENTER to select the replacement position 4 Use the buttons or the selection wheel to select a position 5 Press SAVE ENTER again to confirm the replacement Note When the process has been successfully completed the display briefly shows EXCHANGE OK The display will then return to KIT mode MyKit001 in this example 1 Press KIT then use the buttons or the se...

Page 19: ...appears 4 Use the PAGE buttons to move the cursor to the desired position Use the buttons or the function dial to change the letters 5 Press the SAVE ENTER button again to complete the operation Saving a kit to an SD card 1 Make sure there is an SD card in the card slot 2 From the KIT menu select a kit to save as the source 3 Press SAVE ENTER then PAGE buttons to select CurKit Card or AllKits Card...

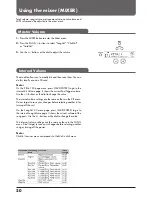
Page 20: ... same as those in the KIT menu Do not forget to save your changes before selecting another kit or turning off the unit On the SongVol 20 menu page press SAVE ENTER to go to the internal Song Volume page It shows the current volume of the song parts Use the buttons or the dial to change the value The internal volume settings are the same as those in the SONG menu Don t forget to save your changes b...

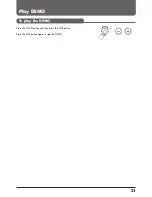
Page 21: ...21 Play DEMO Press the SONG button and then press the PLAY button Press the PLAY button again to stop the DEMO To play the DEMO ...

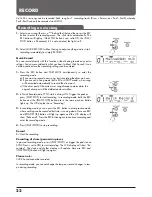
Page 22: ...a new song will be created automatically to record the drum part c If the drum part of the current user song already contains data the original drum part will be deleted and overwritten 2 In Quick Record mode SYNC start is always ON Trigger the pads or press PLAY STOP to start recording In recording mode both the REC button and the PLAY STOP button are in the same position button lights up The LCD...

Page 23: ...t1 part5 can be recorded at the same time Some preset songs use GM kits for the percussion part In this case the digital drum will automatically select new as the REC mode Because some percussion voices in the GM Kits use notes from the internal KIT you can use the Overdub mode to use new notes in the percussion section The notes that were previously heard from the GM kits may now no longer be hea...

Page 24: ... 99 For example if you have selected Fusion1 as the preset song it will display 9 99 which is longer than the length of the song Fusion1 All Loop all bars only displayed if the current song is not a new song Qntize 1 Quantize all parts being recorded including drums percussion part1 part5 2 Quantize where the note begins precision but not the note length 3 NOT quantize 1 Press the REC button to en...

Page 25: ...25 RECORD Error message during recording Song too big for memory more than 2 500 notes TooLarge Space Full User song memory full only up to 64 000 LCD Display Explanation ...

Page 26: ...is not accentuated Please note The time signature cannot be changed during song playback 1 You can access the Click Settings menu by holding down MENU and pressing CLICK 2 Press Page Page to select the Click Settings menu 3 Press or the control dial to adjust the parameters Please note While the click is activated you can go to the Click Settings menu without interrupting the playback or the click...

Page 27: ...See Save Song for more information Save User Kit Save User Song Save general settings 1 Make sure your SD card is inserted and working 2 Press UTILITY and then Page to enter SAVE GLOBAL mode 3 Press SAVE ENTER to enter the renaming mode Then press Page Page or the button and the function dial to change the file name 4 Press and hold SAVE ENTER until the save operation is completed ...

Page 28: ...SAVE ENTER to enter the Trigger Parameter menu Then press the PAD SELECT button or strike a pad at will 3 Then press Page Page to select the appropriate parameter 4 Then press the button or the control dial to select the setting Sensitivity You can adjust the sensitivity of the pad to adjust the response of the pad A higher setting also increases the sensitivity so that the pad produces a loud sou...

Page 29: ...ng Even if you can prevent retriggering by setting the setting to a high value this can cause the sounds to disappear completely when you play the drums fast e g drum roll Therefore it is recommended to set the lowest possible value X Talk Cross Talk If two pads are attached to the same stand the vibration of one pad can inadvertently trigger a sound in the other pad this is called crosstalk You c...

Page 30: ... sound when the pad is triggered Press the Pad select buttons to hear the sound all the time You can connect this digital drum to another MIDI device or PC using a MIDI or USB cable 1 Press UTILITY and then Page to select the MIDI SET menu 2 Press SAVE ENTER and then press Page Page to select the parameter to be set 3 Now turn the control dial to select the appropriate setting MIDI Settings Playba...

Page 31: ... menu 2 Press SAVE ENTER then press Page Page to select ResetPara or ResetAll 3 Press SAVE ENTER to save the settings Resets only general settings MIXER UTILITY Trigger CLICK Song Setup etc Resets the general settings and all user songs and user kits Then it goes back to the main screen of the display ...

Page 32: ...he display will show Too Many Files The digital drum supports SD and SDHC cards from 16M to 32G and FAT16 to FAT32 It does not support SD cards that have more than one partition In this case only the first partition can be opened and searched We recommend using an SD card formatted for digital drums Playback 1 If you have selected a new MIDI file the original tempo and time will update in less tha...

Page 33: ... of user song after the MIDI file is loaded Use or or the control dial to select 1 Shot Loop Tap or Hit 2 Press SAVE ENTER to confirm your selection then select the User Memory slot where you want to save the new song If there is a in front of the name this means that the space is empty and can be used to save without over writing the old files 3 Press SAVE ENTER to confirm your selection If you h...

Page 34: ...t Comment LCD Display Explanation 10 Set drum controller to 0 to use bank as 127 for internal KIT otherwise GM Kit is used No usable data in the MIDI file can be found File errors The MIDI file is larger than 32kb The data memory is full 1 Shot Loop DELETE 1 Select DELETE from the Map menu press SAVE ENTER and confirm your selection 2 Press SAVE ENTER and confirm or select EXIT to can cel After de...

Page 35: ...firm or select EXIT to cancel Please note 1 After you have formatted all previous files on the card will be deleted Therefore please make sure to backup all im portant information before selecting this function 2 The digital drum only supports FAT16 and FAT32 Smaller SD cards under 32M capacity can use FAT12 but in this case the card would be formatted to FAT16 Error messages during card operation...

Page 36: ...r MAC OSX The digital drum is automatically recognized as a USB audio device to receive or send MIDI files via USB cable The USB port is only usable for MIDI files MIDI via USB Please note When the USB port is connected to a computer all MIDI files are received and sent via USB The digital drum transmission channel for the drum kit is on channel 10 It sends MIDI files generated by the triggers as ...

Page 37: ...ist The drum s MIDI system has 16 receive channels numbered 1 16 Each of the channels is responsible for one voice When the instrument receives MIDI information from an external device the active channel is determined by a control signal Channel 10 is intended for drums The drum has two options for channel 10 GM ON or OFF depending on what is selected in the UTILITY MIDI menu When the GM mode is s...

Page 38: ...torted Wrong tone 1 Make sure the pad is properly connected 2 Make sure the volume is not set to 0 1 Make sure that the volume is not set to 0 1 Turn the volume down 1 If you get the wrong sound e g you hit the snare and get a rim sound make sure that the sensitivity of the adjuster on the snare has been turned to an optimal position and that the device does not touch the snare head too tightly or...

Page 39: ... Sequenzer User Song 94 Resolution 192 per quarter note Tempo 30 280 Display Backlit LCD Ports Trigger Input Headphones Aux In Output R L MONO USB MIDI MIDI IN OUT SD Card Load save kit song and user settings Play MIDI files maximum 16 channels Power supply DC 9V 500mA IO Port Headphones MIDI In Out USB MIDI AUX In Out Dimensions mm 300 B x 330 H x 160 T mm Sound Module Weight Module ca 500g ...

Page 40: ...40 Drum Kit List ...

Page 41: ...41 Sound List ...

Page 42: ...42 Sound List ...

Page 43: ...43 Sound List Song List ...

Page 44: ...44 ASCII ...

Page 45: ...45 GM Drum Kit List ...

Page 46: ...46 GM Accompanying instrument List ...

Page 47: ...47 MIDI Implementation List ...

Page 48: ...hen adjusting the clamps There is a risk of crushing and other injuries Also pay attention to the tube ends the inside of the tubes and screws There may be sharp edges that can lead to cuts Before you begin assembly please make sure that the package contents are complete Stimmschlüssel ...

Page 49: ... to fix the screws to the clamps 5 Attach the side arm L1 to the clamp of rod L1 6 Tighten the screws on the clamp 7 Attach the rod L2 to the clamp of the side arm L1 8 Tighten the screws on the clamp 9 Attach the side arm R to the rod R1 10 Attach the rod R2 to the clamp of the side arm R 11 Tighten the screws on the clamp 12 Attach the side arm L2 to the rod clamp L1 13 Tighten the screws on the...

Page 50: ... Attach the pads to the L holders and tighten the wing screws 1 Insert the two gallows cymbal holders into the rack rods 2 Insert the basin holder R into the clamp 3 Remove the wing screws and felt washers from the cymbal holders and then place the cymbals on the holders 4 Replace the felt washers and wing screws on the holders and tighten the screws Note 2 Crash 1 on the left boom cymbal holder 1...

Page 51: ...arm L1 Loosen the wing screw Tighten the wing screw Install the Drum Module 1 Place the Bassdrum Pad on the floor centered under the rack Then attach the Bassdrum Pedal to the Bassdrum Pad 2 Place the Hi Hat on the floor on the left side 3 Connect the clearly marked cables to the pads and inputs of the module and you re ready to go Make the connections as follows ...

Page 52: ...ved This device is subject to the WEEE directive Waste Electrical and Electronic Equipment in its current ly valid version The device must not be disposed of with normal household waste The device is disposed of via an approved disposal company or your local waste disposal centre The regulations valid in your country must be observed WEEE Reg Nr DE 41617453 Cleaning The ventilation grilles of the ...

Reviews: