EN
0
7
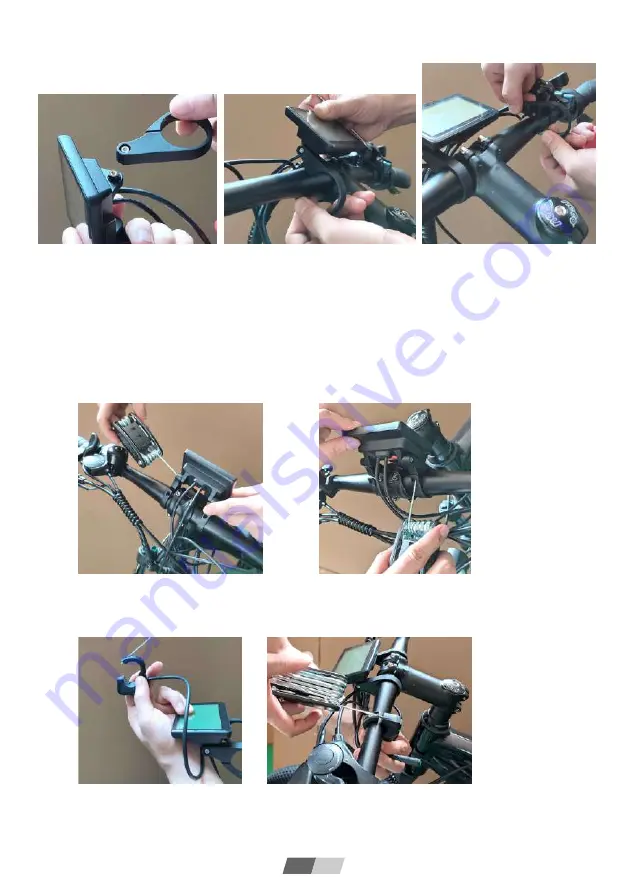
Display installation
:
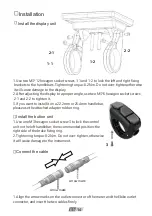
1.The display can be installed only after the handlebar is installed. For the convenience of installation,
as shown in the left picture above, one of the pipe clamps of the instrument can be completely
removed first.
3.Tighten the screws behind the pipe clamps of the display to fix it, as shown in the right picture below.
4.Loosen the fixing clip of the button unit, click it into the handlebar tube, and then tighten the fixing
screw, as shown in the figure below.
2.Gently open the fixing pipe clamp of the instrument first, in order to install it firmly, first place the
pipe clamp gasket on the handlebar tube, and then clamp the pipe clamp into the handlebar tube,
as shown in the middle picture above.
Summary of Contents for F26 PRO
Page 1: ...Smart EV Moped User Manual Model F26 PRO F28 PRO EN DE FR IT ES...
Page 2: ......
Page 4: ......
Page 5: ...Model F26 PRO Model F28 PRO...
Page 6: ...CONTENTS English 1 20 Deutsch 21 40 Fran ais 41 60 Italiano 61 80 Espa ol 81 100...
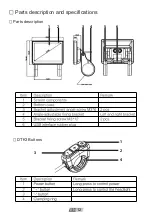
Page 18: ...3 1 2 4 1 3 2 4 5 6 EN 12 Parts description and specifications Parts description DTK3 Buttons...
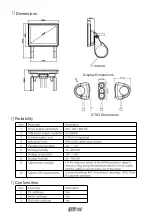
Page 19: ...Dimensions Display Dimensions DTK3 Dimensions Reliability Conformities EN 13...
Page 38: ...3 1 2 4 1 3 2 4 5 6 DE 32 Teilebeschreibung und Spezifikationen Teilebeschreibung DTK3 Tasten...
Page 39: ...Abmessungen Display Abmessungen DTK3 Abmessungen Verl sslichkeit Conformities DE 33...
Page 59: ...Dimensions Dimensions d affichage Dimensions DTK3 Fiabilit Conformities FR 53...
Page 79: ...Dimensioni Dimensioni del display Dimensioni DTK3 Affidabilit Conformities IT 73...
Page 99: ...Dimensions Dimensiones de la pantalla Dimensiones DTK3 Fiabilidad Conformidades ES 93...
Page 107: ......


