


Replacing the Disk Drives
ARX-2000 Hardware Installation Guide
A - 7
6. Insert the replacement drive into the slot and slide the drive in until
the left side of the drive carrier is behind the faceplate.
7. To fully seat the drive, grasp the thumb screw and push the carrier
door closed.
8. Tighten the thumb screw to secure the drive in place.
9. Install the front bezel. If necessary, see the instructions
Removing
and Re-Installing the Front Bezel, on page A-4
.
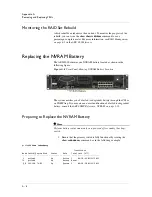
Silencing the RAID Alarm
After you remove a drive, an audible alarm goes off to signal that the drive
is missing. From the CLI (priv-exec mode), enter the
raid silence
command
to silence this alarm.
For example, the following command sequence logs into a switch at address
10.1.23.11, enters
enable
to go to priv-exec mode, and silences the RAID
alarm:
$
telnet
10.1.23.11
Trying
10.1.23.11...
Connected
to
10.1.23.11.
Escape
character
is
'^]'.
Username:
admin
Password:
password
A2k>
enable
prtlndA#
raid
silence
prtlndA#
...
Rebuilding the RAID Set
Simply replacing a failed disk does note incorporate the newly-installed disk
into the RAID set nor does it initiate the process of rebuilding the RAID set.
Note
Rebuilding the RAID set places a load on the disk subsystem. To achieve
maximum performance on the active switch during the rebuilding process
and to avoid service interruptions, rebuild the RAID set on the secondary
(backup) switch.
To enable the newly-installed disk to join the RAID set, issue the
raid rebuild
command from the CLI priv-exec mode:
prtlndA#
raid
rebuild
{disk1
|
disk2}
where disk1 | disk2 specifies the disk to rebuild. (The disk in bay 1 is disk1.)
For example, the following command rebuilds the disk in bay 2:
prtlndA#
raid
rebuild
disk2
prtlndA#
...
Summary of Contents for ARX-2000
Page 1: ...ARX 2000 Hardware Installation Guide 810 0062 00 ...
Page 2: ......
Page 6: ...vi ...
Page 7: ...Table of Contents ...
Page 8: ......
Page 11: ......
Page 12: ...Table of Contents xii ...
Page 14: ......
Page 22: ......
Page 28: ...Chapter 2 Unpacking and Installing the Switch 2 8 ...
Page 30: ......
Page 48: ...Chapter 3 Connecting the Switch to the Network 3 20 ...
Page 49: ...4 Maintenance Powering Down the ARX 2000 LED Indicators POST Diagnostics ...
Page 50: ......
Page 60: ......
Page 72: ...Appendix A Removing and Replacing FRUs A 14 ...
Page 73: ...B Installing the Rail Kit Installing the Rail Kit ...
Page 74: ......
Page 76: ...Appendix B Installing the Rail Kit B 4 ...
Page 77: ...Index ...
Page 78: ......
Page 80: ...Index Index 4 ...


