background image


- 48 - 

Use the Router for DHCP 

To use the built-in DHCP server, click to select the 

DHCP Server


Enabled 

option if it is not 

already selected. The IP Address Pool settings can be adjusted. The 

Start IP 

address is the 

lowest available IP address (default = 192.168.1.100). If you change the IP address of the router 
this will change automatically to be 1 more that the IP address of the router.  

The 

End IP

 address is the highest IP address number in the pool. Type in the 

Lease Time

 in the 

entry field provided. This is the amount of time in seconds that a workstation is allowed to 
reserve an IP address in the pool if the workstation is disconnected from the network or powered 
off.  

Disable the DHCP Server 

To disable DHCP, click to select the 

Disabled

 option and click on the 

Apply

 button. Choosing 

this option requires that workstations on the local network must be configured manually or use 
another DHCP server to obtain IP settings.  

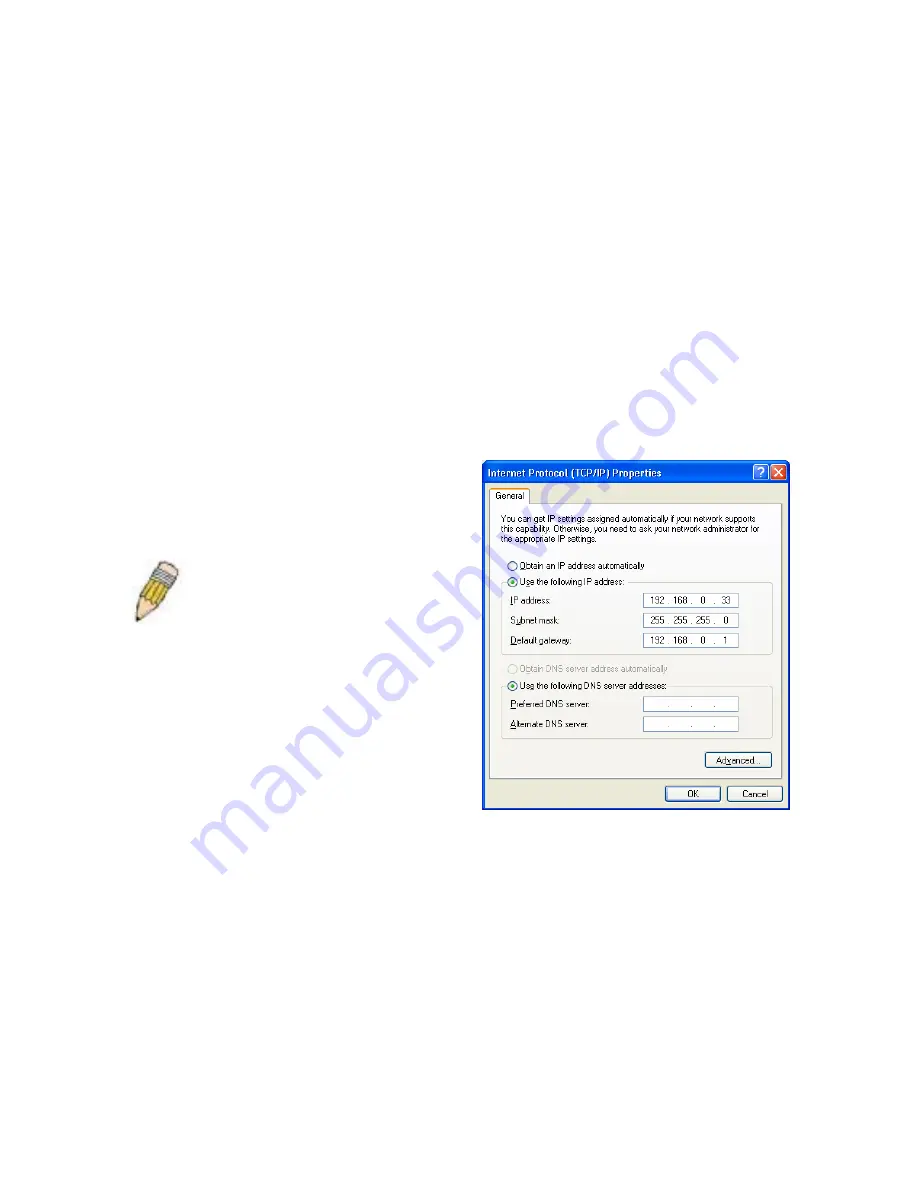
If you configure IP settings manually, make sure to use IP addresses in the subnet of the router. 
You will need to use the router’s IP address as the Default Gateway for the workstation in order 
to provide Internet access. 


NOTE: To manually configure IP 
settings on Windows workstations, 
open the TCP/IP Properties menu 
and select the “Use the following IP 
address” option. You will need to 
supply the computer IP address, 
Subnet mask and Default gateway 
(usually the IP address of router). 


Static IP Address with DHCP 

If the router has the DHCP server enabled it is possible to permanently assign IP addresses to 
workstations specified by their MAC address. Up to five IP addresses may be assigned to five 
different devices. This will take the chosen IP address used out of the available addresses in the 
dynamic IP address pool and give a permanent lease time for the IP address to the selected 
device. 

To assign an IP address that will not age out, type in the 

MAC Address

 of the device and its 

static 

IP Address

 in the spaces provided. Use the format: 00-00-00-00-00-00 for the MAC 

address and the standard format: 192.168.1.xxx for the IP address. A Static DHCP Client List 
will appear below the DHCP Client list with any clients that have been configured for static IP 
address assignment.  

Summary of Contents for Wireless-N 4-Port Router

Page 1: ...Wireless N 4 Port Router User s Manual Copyright 2007 EUSSO Technologies Inc All rights reserved ...

Page 2: ... Up a Wireless Network 5 Installation Considerations for Wireless LAN 7 POWER ON WIRELESS BROADBAND ROUTER 8 Factory Reset Button 8 CONFIGURATION 9 IP SETTINGS ON YOUR COMPUTER 9 ACCESS THE CONFIGURATION MANAGER 9 Login to Home Page 10 WEB MANAGER 11 BASIC CONFIGURATION HOME DIRECTORY MENUS 12 SETUP WIZARD 13 BASIC WIRELESS SETUP 27 Wireless Security 28 Wi Fi Protected Setup WPS 29 WAN CONFIGURATI...

Page 3: ...ng 57 Wireless Performance 58 Dynamic DNS 59 QoS 60 TOOLS 62 Change System Password 62 Remote Web Access 62 Time 63 SYSTEM 64 Save or Load Configuration File 64 Reset to Factory Default Settings 64 Firmware 65 Miscellaneous 66 STATUS 67 Log 68 Wireless Clients 68 Statistics 68 TECHNICAL SPECIFICATIONS 69 CONFIGURING IP SETTINGS ON YOUR COMPUTER 71 ...

Page 4: ...l the hardware connect the cables to the device and connect the power adapter 3 Check the IP settings on your computer and change them if necessary so the computer can access the web based management software built into the Wireless Broadband Router 4 Use the web based management software to configure the device to suit the requirements of your Internet service Packing List Open the shipping carto...

Page 5: ...guration manager may be accessed using any operating system capable of running web browser software including Microsoft Windows operating systems Web Browser Any common web browser can be used to configure the router using the web configuration management software The program is designed to work best with more recently released browsers The web browser must have JavaScript enabled JavaScript is en...

Page 6: ...he default Username is admin Record your info here Password This is the Password you will be prompted to enter when you access the Wireless N Router s configuration windows using a Web browser The default Password is admin LAN IP address This is the IP address you will enter into the Address field of your Web browser to access the router s configuration windows using a Web Browser The default IP a...

Page 7: ...formation about your Wireless LAN SSID Record your info here Channel Authentication WEP Hex ASCII Key 1 Key 2 Key 3 Key 4 Record your info here WPA 802 1x RADIUS IP Address Port Secret WPA PSK Pass phrase ...

Page 8: ...on Sharing Connects multiple computers to a Broadband Cable or DSL modem to share the Internet connection Ethernet Switch Allows sharing of an Internet connection with multiple computers and devices VPN Supported Supports multiple and concurrent IPsec and PPTP pass through sessions so multiple users behind the Wireless N Router can access corporate networks through various VPN clients more securel...

Page 9: ...LED indicators on the Wireless N Router are located on the front panel the device Front of Wireless Broadband Router Place the router in a location where it is not exposed to heat and where the LED indicators are visible ...

Page 10: ...icates a valid link on startup This light blinks when there is activity currently passing through the Ethernet ports WLAN Steady green light indicates a wireless connection A blinking green light indicates activity on the WLAN interface WAN Lights steady green during power on self test POST Once the connection status has been settled the light will blink green If the indicator lights steady green ...

Page 11: ... next section for instructions to connect the power adapter and power on the router Rear Panel View of Wireless N Router WAN Port Connect to broadband Internet device Ethernet Ports Connect to computers and Ethernet LAN Power Input Connect to AC Power Adapter Reset button CAUTION Using a power supply with a different voltage rating will damage the device and void the warranty of this product ...

Page 12: ...hernet cabling The rules governing Ethernet cable lengths apply to the LAN to router connection Be sure the Ethernet cables connected to the LAN ports do not exceed 100 meters in length Connecting through 802 11 Wireless The default wireless settings of the access point allow roaming 802 11g and 802 11b wireless clients to associate with it The first time you set up the router however use the Ethe...

Page 13: ...ss devices that wish to communicate with each other must use the same SSID Several access points can be set up using the same SSID so that wireless stations can move from one location to another without losing connection to the wireless network The embedded wireless access point of the router operates in Infrastructure mode It controls network access on the wireless interface in its broadcast area...

Page 14: ...types of materials and background RF noise in your home or business To maximize range and signal strength use these basic guidelines Keep the number of walls and ceilings between the access point and other network devices to a minimum each wall or ceiling can reduce your wireless device s range from 3 90 feet 1 30 meters Position wireless devices so that the number of walls or ceilings is minimize...

Page 15: ...t Link Act LED indicators to make sure they have valid connections The Wireless Broadband Router will attempt to establish the WAN connection if the WAN line is connected and the connection is properly configured the WAN LED indicator will light up after several seconds Factory Reset Button The Wireless N Router may be reset to the original factory default settings by depressing the reset button f...

Page 16: ...192 168 1 254 with a subnet mask of 255 255 255 0 NOTE If you are not sure how to configure your Windows computer to be a DHCP client see Configuring IP Settings on Your Computer in Configuring IP Settings on Your Computer Access the Configuration Manager In order to make sure your computer s IP settings allow it to communicate with the router it is advisable to configure your system be a DHCP cli...

Page 17: ...L in the address bar should read http 192 168 1 1 Type in the default User Name admin and the default Password admin then click the Submit button to access the web based manager Enter Password It is recommended to change the web based manager access user name and password once you have verified that a connection can be established The user name and password allows any PC within the same subnet as ...

Page 18: ...ch menu directory click the symbol to expand the menu tree Parent Directory Configuration and Read only menus Home Click the Home link to access the Setup Wizard and the menus used to configure the basic router settings The Home directory menus are Wizard Wireless WAN LAN and DHCP Advanced Click the Advanced link to access the Virtual Server Applications Firewall DMZ IP Filters MAC Filters URL Blo...

Page 19: ...gle computer making sure that both the computer and the router are not connected to the Ethernet LAN or other Ethernet devices Once the Internet connection is configured and working go ahead and connect other Ethernet and wireless devices Home Directory Menus The Setup Wizard page is the first page to appear when clicking on the Home directory link ...

Page 20: ...rowser window that appears in the Home directory and follow the instructions in the pop up window that appears Click the Run Wizard button to launch the Setup Wizard Launch Setup Wizard Follow the instruction below to the type of connection used for your broadband Internet connection ...

Page 21: ...izard you will return to the Setup Wizard window without saving any of the settings changed during the process The first pop up window of the Setup Wizard lists the basic steps in the process These steps are as follows 1 Set the system password 2 Set the system time 3 Configure the connection to the Internet 4 Set the wireless configuration 5 Save the new configuration settings and reboot the syst...

Page 22: ...rd Set System Password Change the password used for management access of the router Type the new Password and Confirm it in the spaces provided Click the Next button to proceed NOTE The System user name admin cannot be changed ...

Page 23: ...This sets the system time used for the router If you wish to return to the previous window during the setup process click the Back button Select the Connection Type specific to your service and click Next to go to the next Setup Wizard window Follow the instructions below for the type of connection you have selected ...

Page 24: ...Connection Type used for the Internet connection Your ISP has given this information to you The connection types available for are Static IP Dynamic IP PPPoE PPtP and L2tP Each connection type has different settings that are configured in the next Setup Wizard window ...

Page 25: ...ues are incorrect 3 You may want to copy the MAC address of your Ethernet adapter to the router Some ISPs record the unique MAC address of your computer s Ethernet adapter when you first access their network This can prevent the router which has a different MAC address from being allowed access to the ISPs network and the Internet To clone the MAC address of your computer s Ethernet adapter type i...

Page 26: ...ry DNS Address and Secondary DNS Server IP Address as instructed by your ISP For IPoA connections it may also be necessary to change the ARP Server Address IPoA connection users who have not been given this information should leave the field blank 3 If you are instructed to change the VPI or VCI number type in the correct setting in the available entry fields Most users will not need to change the...

Page 27: ...d For PPPoE connections 1 Type in the Username and Password used to identify and verify your account to the ISP Retype the password to make sure it is correct 2 Click Next to go to the Set Wireless LAN Connection pop up window ...

Page 28: ...P Client connections 1 Enter the appropriate PPTP Client information including PPTP Server IP PPTP Account name and the PPTP Password twice 2 Click Next when you are ready to continue to the Set 802 11g Wireless LAN Configuration window ...

Page 29: ...P Client connections 1 Enter the appropriate L2TP Client information including L2TP Server IP L2TP Account name and the L2TP Password twice 2 Click Next when you are ready to continue to the Set 802 11g Wireless LAN Configuration window ...

Page 30: ...k must use the same SSID 2 The wireless Channel number is available from your Internet Service Provider ISP What channels are available for use by the access point depends on the local regulatory environment Remember that all devices communicating with the device must use the same channel and use the same SSID Use the drop down menu to select the channel used for your 802 11 Wireless LAN 3 Click N...

Page 31: ...WEP and WPA versions 1 and 2 Select the preferred method from the list and click on the Next button You can choose to setup security later in which case choose the Disabled option If you choose to leave security disabled at this time the next menu will be the Save and Take Effect wizard menu ...

Page 32: ...ype use the Cipher pull down menu to select the level of encryption or cipher rate 64 bits or 128 bits and type in an encryption key of appropriate length For 64 bit encryption type a key ten hexadecimal digit 0 9 A F key for 128 bit encryption type a 26 hexadecimal digit key Using the Setup Wizard WPA2 Auto Configuration If you are configuring WPA security select Security type WPA2 Auto enter the...

Page 33: ... Restart button to save the new configuration settings and restart the router If you need to change settings from a previous window click the Back button CAUTION Do not turn the router off while it is restarting After the router is finished restarting you are now ready to continue to configure the router as desired You may want to test the WAN connection by accessing the Internet with your browser...

Page 34: ... the Service Set Accept the default name or change it to something else All other devices on the wireless network using the Wireless Broadband Router must use the same SSID What channels are available for use by the access point depends on the local regulatory environment Remember that all devices communicating with the device must use the same channel and use the same SSID Use the drop down menu ...

Page 35: ...ication and WPA with a user configured Pre Shared Key PSK or RADIUS authentication The Wireless N Router supports Wi Fi Protected Setup WPS for quickly establishing a secure link to stations that support WPS Enabling WEP or WPA security will automatically disable WPS function Wireless Settings window WEP Wireless bandwidth Short Guard Interval and SSID Broadcast options are available for configura...

Page 36: ...PA or WPA2 The WPS menu is located at the bottom of the Wireless menu To use WPS click to select the Enabled radio button for Wi Fi Protected Function NOTE The Generate New PIN button is for the Wireless N Router s own PIN This is used when the router needs to connect to other WPS enabled access points Wireless Settings menu To add a wireless station using WPS enter the PIN number of the WPS enabl...

Page 37: ...d a message informs you to start the WPS device WPS start PIN device message Alternatively for wireless stations that support the push button WPS method click on the Virtual Push Button or press the red WPS button on the front panel of the router to begin the WPS connection process WPS push button on WPS device message The router will attempt to establish the WPS secure connection for 120 seconds ...

Page 38: ...n from the Security pull down menu to configure WEP encryption Wireless Settings menu WEP encryption Enter the appropriate parameters for the type of security selected from this menu WEP security requires the following Authentication Type Open Key or Shared Key Encryption Length The IP address of the RADIUS server Key Type ASCII or Hexidecimal Key Type up to four keys of appropriate length 10 char...

Page 39: ...ication using WPA or WPA2 enter the following Cypher Type Choose TKIP AES or TKIP AES RADIUS Server The IP address of the RADIUS server RADIUS Port The port number used for 802 1x Shared Key The password or character string used for wireless station authentication Key Renewal The time in seconds after which the Shared Key is changed automatically NOTE If encryption of any kind at any level is appl...

Page 40: ...s for the type of security from this menu For PSK authentication using WPA or WPA2 enter the following Cypher Type Choose TKIP AES or TKIP AES Key Type Choose ASCII or Hexidecimal Passphrase The password or character string used for wireless station authentication Key Renewal The time in seconds after which the Shared Key is changed automatically ...

Page 41: ...t Connection Type The default Internet Connection menu displays the Dynamic IP DHCP Internet Connection Type menu To select another connection type use the pull down My Internet Connection is menu to select the connection type you wish to configure The menu configuration parameters in the display will change according to the connection option you choose The available Internet connection types are ...

Page 42: ... When the router is configured to use Static IP Address assignment for the WAN connection you must manually assign a global IP Address Subnet Mask and Gateway IP Address used for the WAN connection WAN Settings menu Static IP Address ...

Page 43: ...address of the Ethernet Card of your computer if instructed to do so by your ISP To quickly accomplish this click the Clone MAC Address button which will automatically copy the MAC address of your Ethernet card and enter it into the space provided which will replace the MAC address of the router DNS Primary Secondary These are the IP addresses of your primary and backup domain name server which sh...

Page 44: ...s from a DHCP server on the ISP s network The service provider assigns a global IP address from a pool of addresses available to the service provider Typically the IP address assigned has a long lease time so it will likely be the same address each time the router requests an IP address WAN Settings window Dynamic IP Address ...

Page 45: ...e space provided which will replace the MAC address of the router DNS Primary Secondary These are the IP addresses of your primary and backup domain name server which should also be provided to you by your ISP The router will first try the Primary DNS Address to resolve a website s URL IP address If this IP address fails the router will then try the Secondary DNS Address MTU The Maximum Transmissi...

Page 46: ...the Ethernet network There are two ways to configure the PPoE connection on the router one is for a Dynamic PPPoE configuration which means the router will implement some settings automatically through DHCP such as the router s IP address and the default gateway The other is through a Static PPPoE connection in which the user must configure the IP address and the DNS addresses automatically WAN Se...

Page 47: ... the router will then try the Secondary DNS Address This field is only to be completed if the Static PPPoE button is selected Secondary DNS Address The IP address of the secondary domain name server will be used to resolve a website s URL IP address if the Primary DNS Address fails The information in this field should also be provided by your ISP and is only to be completed if the Static PPPoE but...

Page 48: ...he Wireless N Router as a bridge for the WAN connection select the Bridge WAN settings option and click Apply Do this immediately change the IP settings status of the device to DHCP client Be sure to have a DHCP server running and connected to the network if this option is to be used Remember that as a bridge third party connection software is normally required on each computer attempting to get I...

Page 49: ...ays to enable the router to become a PPTP client one is through assigning the router an IP address dynamically which means that the DHCP protocol will be implemented by the router to automatically configure the IP settings The user may input the IP settings manually by choosing the Static IP option above the configuring area PPTP Internet Connection configuration menu ...

Page 50: ... Enter your password for this PPTP account here as stated to you by your ISP PPTP Confirm Password Retype the password entered in the PPTP Password field Maximum Idle Time A value of 0 in this field means that the PPTP connection will remain connected If your network account is billed according to the amount of time the router is actually connected to the Internet enter an appropriate Idle Time va...

Page 51: ...ays to enable the router to become a L2TP client one is through assigning the router an IP address dynamically which means that the DHCP protocol will be implemented by the router to automatically configure the IP settings The user may input the IP settings manually by choosing the Static IP option above the configuring area L2TP Internet Connection configuration menu ...

Page 52: ... Enter your password for this L2TP account here as stated to you by your ISP L2TP Confirm Password Retype the password entered in the L2TP Password field Maximum Idle Time A value of 0 in this field means that the L2TP connection will remain connected If your network account is billed according to the amount of time the router is actually connected to the Internet enter an appropriate Idle Time va...

Page 53: ...e the LAN IP Address or Subnet Mask type in the desired values and click the Apply button Your web browser should automatically be redirected to the new IP address You will asked to login again to the router s web manager This IP address is private to your internal network and cannot be seen on the Internet The default IP Address is 192 168 1 1 and the Subnet Mask is 255 255 255 0 In addition the ...

Page 54: ... IP address The default IP address pool uses 100 IP addresses in the 192 168 1 100 192 168 1 199 range DHCP Server for LAN Settings menu To display the DHCP Server menu click the DHCP link in the Home directory Any active DHCP clients appear in the DHCP Clients List with their IP address and MAC address listed The options for DHCP service are as follows Use the router as a DHCP server for your LAN...

Page 55: ...ubnet of the router You will need to use the router s IP address as the Default Gateway for the workstation in order to provide Internet access NOTE To manually configure IP settings on Windows workstations open the TCP IP Properties menu and select the Use the following IP address option You will need to supply the computer IP address Subnet mask and Default gateway usually the IP address of rout...

Page 56: ...nced features used for network management and security as well as administrative tools to manage the router view statistics and other information used to examine performance and for troubleshooting Advanced Directory menus Use your mouse to click the parent directory links and menu links in order to display the various configuration and read only windows discussed below ...

Page 57: ...wall For example you can configure the router to direct HTTP packets to a designated HTTP server in the DMZ Virtual Server menu To configure a new port forwarding rule follow these steps 1 Click on the Enabled option for Virtual Server 2 Type a Name for the rule being created 3 Type the Private IP address of the server or station on the LAN used for the rule 4 Select the Protocol used for the rule...

Page 58: ... the rule being created 3 Type the Trigger Port or port range used for the rule 4 Select the Trigger Type used for the rule TCP UDP or Both 5 Type the Public Port number normally used for the application 6 Select the Public Type used for the rule TCP UDP or Both 7 Choose an available Schedule for the rule to be applied Schedules can be created using the Schedule menu in the Tools directory 8 Click...

Page 59: ...nterface of the traffic choose LAN WAN or Any and type an IP address range to which to action specified in the rule 5 For the Destination interface of the traffic choose LAN WAN or Any and type an IP address range to which to action specified in the rule There is an option to specify the protocol Any TCP UDP or ICMP For TCP and UDP traffic a port or port range must be specified 6 Choose an availab...

Page 60: ...pes of security risks If you use the DMZ take measures such as client based virus protection to protect the remaining client PCs on your LAN from possible contamination through the DMZ DMZ menu To designate a DMZ IP address select the Enabled radio button type in the IP Address of the server or device on your LAN and click the Apply button To remove DMZ status from the designated IP address select...

Page 61: ... a Name for the rule being created 3 Type the IP Range of address to which the rule applies 4 Optional Select the Protocol used for the rule TCP UDP or Both and type the Port or port range to which the rule is applied 5 Choose an available Schedule for the rule to be applied Schedules can be created using the Schedule menu in the Tools directory 6 Click the Apply button to put the rule into effect...

Page 62: ...ption for Set MAC Filters to allow or deny access to the MAC filters on the list 2 Type a Name for the rule being created 3 Type the MAC Address to which the rule applies or select an active client from the DHCP Client pull down menu and click on the Clone button to select that client the MAC address will appear 4 Choose an available Schedule for the rule to be applied Schedules can be created usi...

Page 63: ...for the rule being created 3 Type the URL Keyword to which the filter is applied 4 Choose an available Schedule for the rule to be applied Schedules can be created using the Schedule menu in the Tools directory 5 Click the Apply button to put the rule into effect The newly created URL blocking rule appears listed in the URL Blocking List To modify an existing rule click on the notepad icon in the ...

Page 64: ...tion for Set Domain Blocking Action to allow or deny access to the Domain being added to the list 2 Type a Name for the rule being created 3 Type the Domain to which the filter is applied 4 Choose an available Schedule for the rule to be applied Schedules can be created using the Schedule menu in the Tools directory 5 Click the Apply button to put the rule into effect The newly created domain bloc...

Page 65: ...smit power of the router A high transmit power allows a greater area range of accessibility to the router When multiple overlapping access points are present it may be desirable to reduce transmission power Beacon Interval Beacons are emitted from the router in order to synchronize the wireless network You may set the Beacon Interval range between 20 100 microseconds per beacon sent The default is...

Page 66: ...be setup with one of the supported DDNS providers Dynamic DNS Configuration menu Please note that DDNS requires that an account be setup with one of the supported DDNS servers prior to engaging it on the router This function will not work without an accepted account with a DDNS server Enter the required DDNS information and click Apply to set this information in the router NOTE DDNS requires that ...

Page 67: ...est various applications for performance then if necessary enter QoS settings manually Use the Manual option if you want to specify bandwidth for a devices or devices on the network Bandwidth settings can also be configured using the Auto Smart option the bandwidth settings will be applied globally and not to any specific device IP address To configure a individual IP address for a pre configured ...

Page 68: ...se Applications Online Game or Customized options Applications or online games can then be selected from the drop down menu The pre configured QoS applications include web browser MSN Messenger Skype and Yahoo Message The online games include Counter Strike Half Life World of Warcraft Quake I II and Diablo You can choose an application first to enter the parameters automatically then choose the Cu...

Page 69: ...ge System Password Under the Administrator heading type the New Password and Confirm Password to be certain you have typed it correctly Click the Apply button to activate the new password The System User Name remains admin this cannot be changed using the web manager interface Be sure to save the new setting Remote Web Access The Administrator Settings window is also used to enable remote manageme...

Page 70: ...ngs menu To configure system time on the router select the method used to maintain time The options available include SNTP using your computer s system clock or set the time and date manually If you opt to use SNTP you must enter the SNTP server URL or IP address Click the Apply button to set the system time ...

Page 71: ... File To load a previously saved configuration file click the Browse button and locate the file on your computer Click the Restore button to Load Settings From Local Hard Drive Confirm that you want to load the file when prompted and the process is completed automatically The router will reboot and begin operating with the configuration settings that have just been loaded Reset to Factory Default ...

Page 72: ...NOTE Performing a Firmware Upgrade can sometimes change the configuration settings Be sure to back up the router s configuration settings before upgrading the firmware Firmware Upgrade To upgrade firmware type in the name and path of the file or click on the Browse button to search for the file Click the Apply button to begin copying the file The file will load and restart the router automatically...

Page 73: ...firewall the user can enable to keep track of the state of network connections UPnP Settings UPnP supports zero configuration networking and automatic discovery for many types of networked devices When enabled it allows other devices that support UPnP to dynamically join a network obtain an IP address convey its capabilities and learn about the presence and capabilities of other devices DHCP and D...

Page 74: ... system information and monitor performance Click the Status directory link to reveal the menu links for various functions located in this directory The Device Information display is the first item in the Status directory Status Directory menus ...

Page 75: ...e for email alerts from the log Wireless Clients This window displays all the wireless clients currently connected to the acess point Wireless Client List display menu Statistics Use this window to monitor traffic on the WAN LAN and Wireless connections Traffic Statistics Click Refresh to view updated traffic information Click Reset to return packets counts to zero ...

Page 76: ...ady green light for valid link blinks when for activity WLAN Steady green light for valid link blinks when for activity WAN Steady green light for valid link blinks when for activity Status Blinks green when system function is normal Power Steady green when powered on Operating Temperature 0ºC to 40ºC 32ºF to 104ºF Humidity 10 to 95 non condensing Dimensions 200 mm x 120 mm x 34 mm Weight 320 gm C...

Page 77: ...SM band Channels 11 channels for United States 13 channels for European Countries 13 channels for Japan Operating Range Indoors up to 328 feet 100 meters Outdoors up to 1312 feet 400 meters Transmit Power 11g 14dBm Typical 11b 17dBm Typical Media Access Protocol CSMA CA with ACK WEP 64 128 bits Wireless Certification Wi Fi WPA Antenna type 2 0 dbi external dipole ...

Page 78: ... other Windows operating systems to first check if the TCP IP protocol has been installed if it is not instructions are provided for installing it Once the protocol has been installed you can configure the system to receive IP settings from the router For computers running non Windows operating systems follow the instructions for your OS that configure the system to receive an IP address from the ...

Page 79: ...steps to configure a computer running Windows XP to be a DHCP client 1 From the Start menu on your desktop go to Settings then click on Network Connections 2 In the Network Connections window right click on LAN Local Area Connection then click Properties ...

Page 80: ...tion Properties menu highlight Internet Protocol TCP IP under This connection uses the following items by clicking on it once Click on the Properties button 4 Select Obtain an IP address automatically by clicking once in the circle Click the OK button ...

Page 81: ... 74 Your computer is now ready to use the router s DHCP server ...

Page 82: ...log box select Protocol and then click Add 7 Select Internet Protocol TCP IP in the Network Protocols list and then click OK 8 You may be prompted to install files from your Windows 2000 installation CD or other media Follow the instructions to install the files 9 If prompted click OK to restart your computer with the new settings Configure Windows 2000 for DHCP 1 In the Control Panel double click...

Page 83: ...and then click the Network icon 2 Select the network component labeled TCP IP and then click Properties 3 If you have multiple TCP IP listings select the listing associated with your network card or adapter 4 In the TCP IP Properties dialog box click the IP Address tab 5 Click the Obtain an IP address automatically option 6 Double click OK to confirm and save your changes You will be prompted to r...

Page 84: ...indow double click the Network icon 3 In the Network dialog box click the Protocols tab 4 The Protocols tab displays a list of currently installed network protocols If the list includes TCP IP then the protocol has already been enabled Skip to Configure IP Information 5 If TCP IP does not display as an installed component click Add 6 In the Select Network Protocol dialog box select TCP IP and then...

Page 85: ...nd on the user is encouraged to try to correct the interference by one or more of the following measures Reorient or relocate the receiving antenna Increase the separation between the equipment and receiver Connect the equipment into an outlet on a circuit different from that to which the receiver is connected Consult the dealer or an experienced radio TV technician for help 1 This Transmitter mus...

Reviews: