background image

 
eSync DVR Manual  


Revision A 

- 13 - 

© 2008 eSync Manual 

© eSync

 System 

Operation 


16 Sub-Screens (1 group) 


Use the 16 Sub-Screen button. 

  The user can view an image on full screen by double-clicking the mouse on 4/9/16 Sub-Screen mode. Double-click the 


mouse on any part of the screen to return to the previous mode. 

  The user can select the automatic change mode by selecting the [Select] button in 1/4/9 Sub-Screen mode.   


Click the [Select] button again to return to the previous mode. 

  Using the Up/Down button, the user can change the time interval from 1 second to 5 seconds (to change time interval, 


multiple cameras must be connected to the DVR). 

  The user can also change the time interval by right-clicking any part of the screen. 

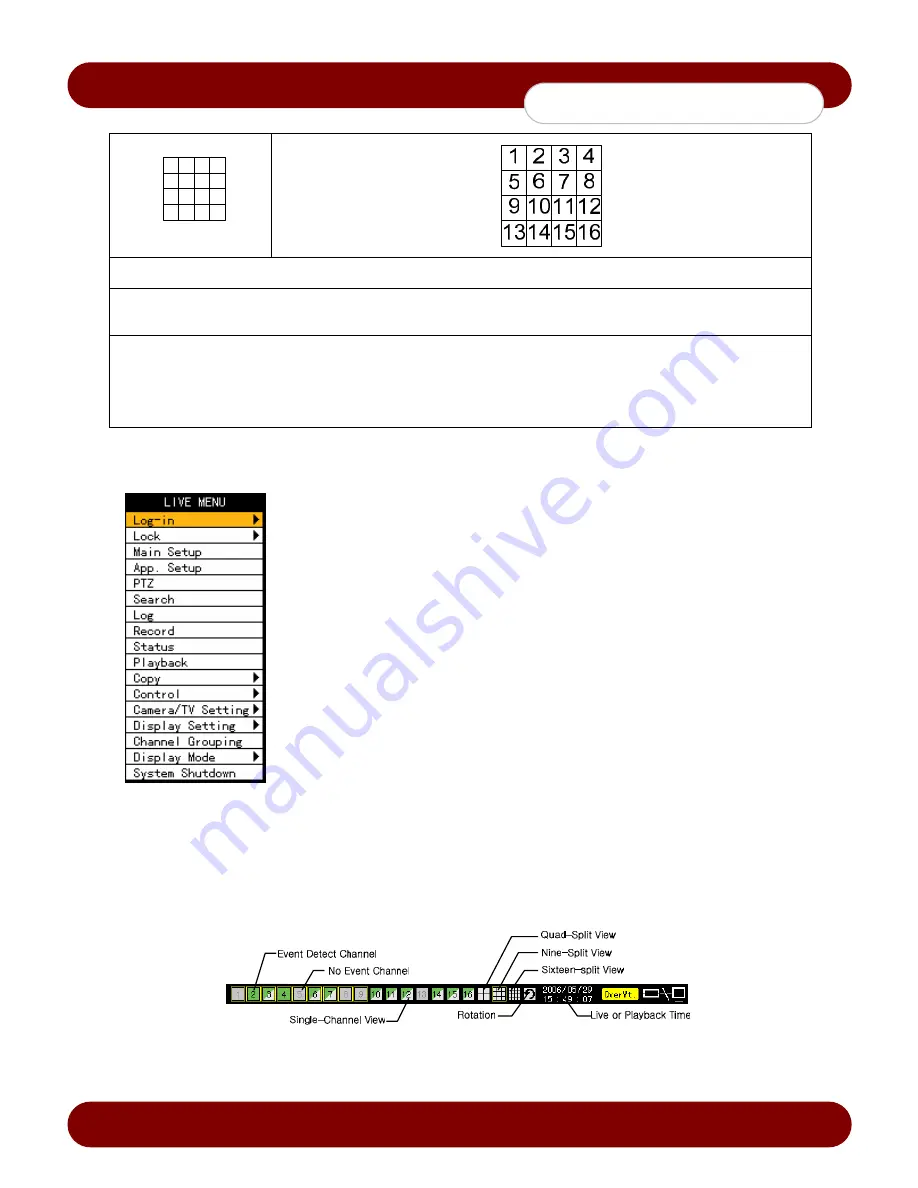
4-2-2 Menus in Live mode 

In real-time Live mode, the user can control all functions using 

{Live menu}


Press or right-click the Menu button.  
The Live menu will appear as shown in Figure 4-1. 
Select the desired item using the up or down arrow keys. 
Press the ESC button or right-click the Menu button to hide the menu. 


        [Figure 4-1. Live Menu] 

4-2-3 Relocating the recording status window 

In Live mode window or playback mode, use the mouse to change the position of the recording status window. 


1.  The user can move the recording status window using only the mouse. 


2.  Move the cursor to the date/time status section. The recording status window will be bordered. 


3.  At this time, drag the recording status window to the desired location. 


[Figure 4-2. Recording Status Window]


Summary of Contents for SSA-0424e

Page 1: ......

Page 2: ...wo conductions 1 this device may not cause harmful interference and 2 this device must accept any interference received including interference that may cause undesired operations WARNING Unauthorized...

Page 3: ...Safety Notes on the DVR 1 When installing Application HDD turn OFF the DVR and remove the power cable completely 2 Keep the product away from heat generating devices such as heaters 3 Do not use a da...

Page 4: ...n and Automatic Screen Conversion 12 4 2 2 Menus in Live mode 13 4 2 3 Relocating the recording status window 13 4 3 System Login 14 4 3 1 User Accounts 14 4 3 2 Login 14 4 3 3 Logout 14 4 4 Audio Rec...

Page 5: ...ing the Search Method 27 4 11 3 Search using the file list 27 4 11 4 Multi Channel Search 28 4 11 5 Multi Time Search 28 4 11 6 Multi Day Search 28 4 12 Backup 29 4 12 1 Backup Method 29 4 13 Snapshot...

Page 6: ...per channel 480 480 480fps SSA 1648e CIF 240 240 240fps SSA 0824e Half D1 CIF 120 120 120fps SSA 0424e Full D1 Half D1 CIF Compression type MPEG4 video G 723 1 audio Backup Copy Ethernet IEEE1394 USB2...

Page 7: ...al eSync Introduction 1 3 Components After unpacking the product check whether the following accessories are included eSync CMS CD e Manual CMS PDA Viewer eSync User Manual Remote Controller Two AAA 1...

Page 8: ...LOG Playback Frame by Frame in Playback mode View Event Log in Live mode 10 Forward Play Fast Forward PLAY Playback Fast Forward in Playback mode Starts Playback Mode in Live mode 11 COPY Option to Ba...

Page 9: ...AUDIO IN Audio input connection 1 Audio Per Channel RCA 6 NTSC PAL VGA TV Used to select the video input format Used to select the video output format DA 2 7 FIREWIRE Port for external backup device v...

Page 10: ...ted 4 8 16 input lines and 1 output line 4 Sensor Relay Connect to the rear side of the product using the cable Sensor Input Relay Output 4ch DVR 4 1 8ch DVR 8 2 16ch DVR 16 4 A Sensor Connection Conn...

Page 11: ...er ID B System operation and setup buttons MENU Displays Menu options ESC Exits the current menu SEARCH Searches recorded files SELECT Selects the current menu or selection or enable automatic screen...

Page 12: ...OCK Locks the system STATUS View Configuration Statistics RELAY Relay Control D Search Button in Play mode Play Fast Forward Playback Fast Forward Frame by Frame Play frame by frame Pause Pause Revers...

Page 13: ...assword select Main Setup System Local Administrator s Password 1 Press the Power button on the DVR or the remote controller 2 On the password input screen enter a new password using the numeric butto...

Page 14: ...er can also change the time interval by right clicking any part of the screen 4 2 2 Menus in Live mode In real time Live mode the user can control all functions using Live menu Press or right click th...

Page 15: ...and downloading files from DVR via local and network PTZ Control Enable PTZ camera control via local and network Main Application Setup Enable Local Administrator Privileges via local and network Netw...

Page 16: ...ode window press the Menu Button Main Setup 2 The main setup window will appear as shown in Figure 4 4 3 Select Recording Setup Recording Audio using the arrow keys and press the Select button 4 Set u...

Page 17: ...nu Button Channel Grouping 2 The user can select the screen in split mode by selecting Menu Display Setting 3 On the Live mode window go to the channel selection window and select the channel to be ch...

Page 18: ...by repeating step 2 Moving the display positions up down right or left may cause appearance of black or grey areas on the screen If the adjustment of the display if not properly positioned or set in...

Page 19: ...ll be played back from the from the previous point where the playback was stopped 4 8 2 Playback Menu In Playback mode the user can control all functions using Playback Menu 1 Select or right click th...

Page 20: ...eSync System Operation 4 8 3 Multi Channel Search The user can playback the video contents at a specifc recored time In Playback mode multi channel playback can be run by selecting Playback Menu Multi...

Page 21: ...e video contents of a certain channel recorded at different times The video contents can be sorted by time in descending order In Playback mode select Playback Menu Multi Time The user can run multi t...

Page 22: ...ideo contents of a certain time recorded on different dates The video contents can be sorted by date in descending order In Playback mode select Playback Menu Multi Day The user can run multi day play...

Page 23: ...x30 Forward Frame by Frame Frame by frame playback Pause Pause Reverse frame by frame Reverse playback frame by frame Reverse playback Fast reverse Playback in reverse x1 Rewind x30 Speed Down Decrea...

Page 24: ...e folder directory count is used to select a folder in a different time The user can set the channel in Multi day Playback or Multi time Playback mode only 4 8 11 Go To The First Search 1 The user can...

Page 25: ...r Playback Menu Log in Playback mode The Log List window will appear as shown in Figure 4 13 2 On the calendar Select the desired date year month date using the arrow keys and press the Select button...

Page 26: ...g Setup The user can set the recording type by selecting Main Setup Data Setup For more information see Main Setup Data Setup Recording Setup 4 10 3 Viewing the Recording Status The user can view the...

Page 27: ...e Menu Button Recording 2 On the login window enter the password of the local administrator 3 The force recording of all channels will start based on the previous setting and the recording status will...

Page 28: ...se two methods can be used 4 11 3 Search using the file list 1 Select the desired search date The one hour file list for the recorded video will be displayed 2 Select the desired file using the arrow...

Page 29: ...the time change via the status bar 1 Files stored in the folder before the time change will be displayed in light blue on the status bar 2 By selecting a light blue colored file the user can view the...

Page 30: ...ice Initialization is required Go to page 48 for details 3 It will display the free space of the media selected Initilization process might take a few moments depending on size of the media 4 Once in...

Page 31: ...device excluding DVD R drive is searched the JPEG file will be stored in the same device 3 If there are more than two USB2 0 devices attached to the DVR excluding DVD R Drive a window for selecting t...

Page 32: ...press the Select button The channel is selected and the channel screen border is highlighted in blue 4 15 3 PTZ Control 1 Pan Tilt 1 Select a PTZ camera using the arrow keys and press the Select butt...

Page 33: ...to choose the presets and press the Select button to call the preset 6 Using the Tour mode To configure the Tour mode Select Application Setup PTZ Setup Tour 1 To set the Tour feature navigate to the...

Page 34: ...Main Setup window select data using the arrow keys up to four data types are supported 5 1 3 Shifting to Recording Setup Mode Recording Setup supports two modes data mode and channel mode On the Recor...

Page 35: ...le the activated camera channel manually 1 Select Title for the camera channel using the arrow keys and press the Select button 2 On the selection window select the Off disable and On to enable the ca...

Page 36: ...n event is triggered Continuous DVR will record on continuous mode Motion DVR will record when motion is activated on the specific channel Sensor DVR will record when the external sensor port is trigg...

Page 37: ...rate on a channel that is higher than the maximum frame rate the DVR will prompt a menu to adjust the other channels 4 The yellow colored channel is currently being set as shown in Figure 5 3 Figure 5...

Page 38: ...the arrow keys and press the Menu button 2 On the selection window select the sensitivity using the arrow keys and press the Select button To set all channels at the same time navigate the arrow keys...

Page 39: ...4 On the selection window select audio sensitivity using the arrow keys and press the Select button To set all channels at the same time navigate the arrow keys to go to the top of the Sound on top o...

Page 40: ...Preset for each event 5 Select the OK button to save Otherwise select the cancel button and press the SELECT button to cancel Figure 5 4 Preset Action Setting Window To set all channels at the same ti...

Page 41: ...to go to the top of the Relay column and press the Select button 5 1 6 Recording Schedule Recording Schedule is used to save the system configuration as data from Data 1 to Data 4 and to make a record...

Page 42: ...displayed per page and the rest will be displayed on the following page s if more than 15 C Holiday Information Detailed information for the selected date will be displayed Page shows the page count...

Page 43: ...running the system 5 Date Display Type To set the date display format 6 Users To register add modify or delete users 7 Alarm Action To turn the System Buzzer ON OFF 8 Set Alarm Duration To set the ala...

Page 44: ...nput is made in the System Setup menu using the front buttons remote controller or mouse the system automatically logs out to Live mode 2 Select Menu Time Out using the arrow keys and press the Select...

Page 45: ...modify or deletes the user levels Network Live Enable live vieweing via network Playback Enable playback via local and network Copy Download Enable copying and downloading files from DVR via local and...

Page 46: ...ting the alarm using the arrow keys and press the Select button 9 Upgrade The DVR can be upgraded through an external USB 2 0 storage device The user will need to need set the USB2 0 as a Backup Init...

Page 47: ...n using this type B Type When the directional arrow key is pressed in the PTZ mode the DVR will move the PTZ in 1 second increments There is a 0 5 second delay when using this type 13 Language To sele...

Page 48: ...us settings and initializes the setup B HDD Overwrite This feature is used to overwrite on the HDD 1 Select HDD Overwrite using the arrow keys and press the Select button 2 On the input window select...

Page 49: ...e device in offline state Format Formats the selected storage Eject Separates the selected device completely from the software Physical states supporting the execution of the commands above include He...

Page 50: ...r a Backup disk The following describes the method of setting a direct storage Selecting Direct Init or Backup Init may cause all data in the device to be erased While Direct Init or Backup Init is in...

Page 51: ...enter the directory using the arrow keys and press the Select button 6 Execution time 1 Select Execution Time Hourly using the arrow keys and press the Select button 2 On the input window enter the t...

Page 52: ...the NTP Server Time will be automatically synchronized every hour with the NTP Server A Automatic Setup The nearest server from the user s zone will be selected for connection If the connection fails...

Page 53: ...the server URL using the arrow keys and press the Select button 3 The user can enter the IP only when the server type is DVR For the NTP server Automatic IP or URL should be selected 4 GPS Reception...

Page 54: ...l appear as shown in Figure 5 12 Figure 5 12 PTZ Setup Window 5 2 2 PTZ setup Used to set the PTZ camera connected to the system Menu CH Displays Channel Numbers Menu PTZ Displays an PTZ Icon when the...

Page 55: ...The camera ID must be the same as the ID set on the PTZ camera 2 Select the camera ID for the channel 3 Setting the baud rate 1 Select the baud rate for the PTZ 4 Preset Time setting 1 Set the interva...

Page 56: ...by using the arrow keys numeric buttons and press the Select button 3 DHCP Assign a dynamic IP address to the DVR 1 Select DHCP using the arrow keys and press the Select button 2 Use the Repair optio...

Page 57: ...ing on network setup and ISP 1 Select Port using the arrow keys and press the Select button 2 Enter the port number and save it using the arrow keys and press the Select button 7 DDNS The default valu...

Reviews: