


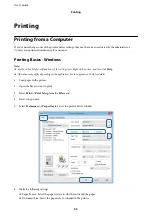


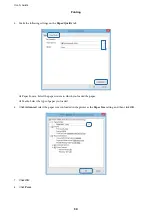


6.
Click
Print Density
, select the document type from
Select Document Type
, and then click
OK
.
he printer driver automatically sets the
Adjustments
options for that document type.
Note:
❏
Printing may be slow depending on the combination of options selected for
Select Document Type
in the
Density Adjustment
window and for
Quality
on the
Main
tab.
❏
For manual 2-sided printing, the
Print Density Adjustment
setting is not available.
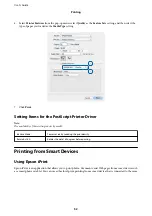
7.
Set the other items on the
Main
and
More Options
tabs as necessary, and then click
OK
.
8.
Click
.
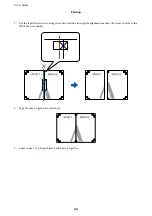
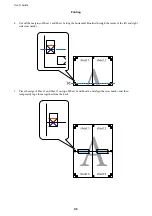
For manual 2-sided printing, when the irst side has inished printing, a pop-up window is displayed on the
computer. Follow the on-screen instructions.
Related Information
&
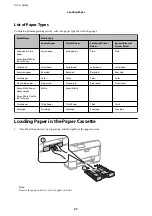
“Loading Paper in the Paper Cassette” on page 27
&
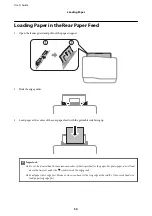
“Loading Paper in the Rear Paper Feed” on page 30
&
“Printing Basics - Windows” on page 33
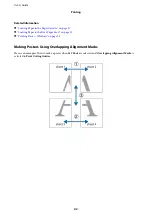
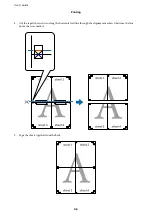
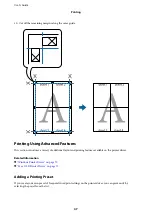
Printing on 2-Sides - Mac OS X
1.
Load paper in the printer.
2.
Open the ile you want to print.
3.
Access the print dialog.
4.
Select
Two-sided Printing Settings
from the pop-up menu.
5.
Select the bindings and
Document Type
.
Note:
❏
Printing may be slow depending on the
Document Type
setting.
❏
If you are printing high-density data such as photos or graphs, select
Text & Graphics
or
Text & Photos
as the Document Type
setting. If scuing occurs or the image bleeds through to the reverse side, adjust the print
density and ink drying time by clicking the arrow mark next to
Adjustments
.
6.
Set the other items as necessary.
7.
Click
.
Related Information
&
“Loading Paper in the Paper Cassette” on page 27
&
“Loading Paper in the Rear Paper Feed” on page 30
&
“Printing Basics - Mac OS X” on page 34
User's Guide
Printing
37


